PC Games
• Orb
• Lasagne Monsters
• Three Guys Apocalypse
• Water Closet
• Blob Wars : Attrition
• The Legend of Edgar
• TBFTSS: The Pandoran War
• Three Guys
• Blob Wars : Blob and Conquer
• Blob Wars : Metal Blob Solid
• Project: Starfighter
• TANX Squadron
Tutorials
• 2D shoot 'em up
• 2D top-down shooter
• 2D platform game
• Sprite atlas tutorial
• Working with TTF fonts
• 2D adventure game
• Widget tutorial
• 2D shoot 'em up sequel
• 2D run and gun
• Roguelike
• Medals (Achievements)
• 2D turn-based strategy game
• 2D isometric game
• 2D map editor
• 2D mission-based shoot 'em up
• 2D Santa game
• 2D split screen game
• 2D quest game
• SDL 1 tutorials (outdated)
Latest Updates
The Legend of Edgar 1.38
Thu, 1st January 2026
SDL2 Quest game tutorial
Wed, 7th May 2025
SDL2 Versus game tutorial
Wed, 20th March 2024
Download keys for SDL2 tutorials on itch.io
Sat, 16th March 2024
The Legend of Edgar 1.37
Mon, 1st January 2024
Tags
• battle-for-the-solar-system (10)
• blob-wars (10)
• brexit (1)
• code (6)
• edgar (10)
• games (45)
• lasagne-monsters (1)
• making-of (5)
• match3 (1)
• numberblocksonline (1)
• orb (2)
• site (1)
• tanx (4)
• three-guys (3)
• three-guys-apocalypse (3)
• tutorials (18)
• water-closet (4)
Books
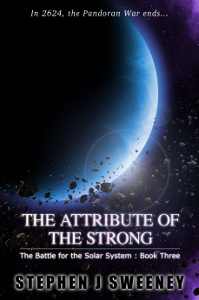
The Attribute of the Strong (Battle for the Solar System, #3)
The Pandoran War is nearing its end... and the Senate's Mistake have all but won. Leaving a galaxy in ruin behind them, they set their sights on Sol and prepare to finish their twelve year Mission. All seems lost. But in the final forty-eight hours, while hunting for the elusive Zackaria, the White Knights make a discovery in the former Mitikas Empire that could herald one last chance at victory.
— Mission-based 2D shoot 'em up —
Part 6: The HUD
Note: this tutorial assumes knowledge of C, as well as prior tutorials.


Introduction
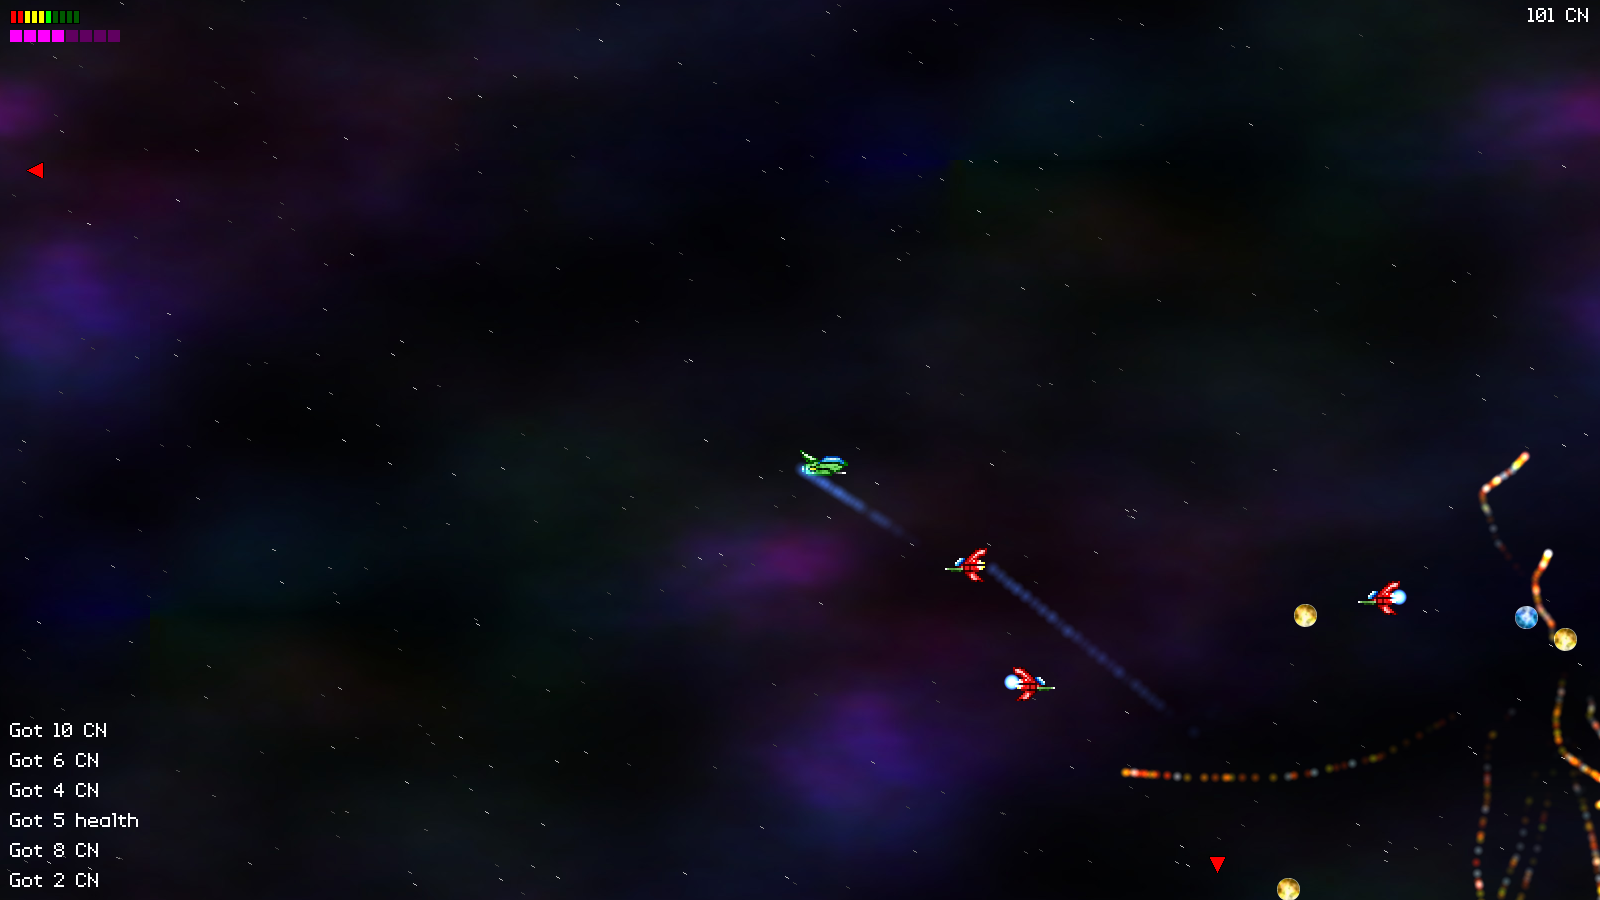
A HUD is essential for the type of game we're making. It displays all the information that we need to know about things that are happening during our mission, from the player's remaining health, to events that have just occurred. Indeed, HUDs have been a part of many of these tutorials. In this part, we're going to add one to our game.
Extract the archive, run cmake CMakeLists.txt, followed by make, and then use ./shooter3-06 to run the code. You will see a window open like the one above. Use the WASD control scheme to move the fighter around. Hold J to fire your main guns. Play the game as normal. Your fighter's remaining health is displayed in the top-left, and will drop as you take damage (and go back up if you collect a health pickup). Your catnip will increase as you both collect catnip and defeat enemies (top right). Notice how as you pickup collectables messages are displayed. Once you're finished, close the window to exit.
Inspecting the code
Adding in our HUD is, once again, a simple task, although there is quite a lot to it. Most of this part will be focused on the new hud.c compilation unit. Before we get there, let's look our prerequisites.
Starting with structs.h:
struct HudMessage
{
	char        message[MAX_DESCRIPTION_LENGTH];
	double      health;
	SDL_Color   color;
	HudMessage *next;
};
We've added in a struct called HudMessage, that will hold all of our hud message's information. `message` is the message text itself, `health` is how long the message will display for, and `color` is the colour of the text.
We've also updated Stage:
typedef struct
{
	// snipped
	Collectable collectableHead, *collectableTail;
	HudMessage  hudMessageHead, *hudMessageTail;
	double      engineEffectTimer;
	int         numActiveEnemies;
	Entity     *player;
	PointF      camera;
} Stage;
We've added hudMessageHead and hudMessageTail to act as the linked list for our HUD messages. We're doing this here, rather than in hud.c, so that later on we can test whether HUD messages are being displayed.
Now onto hud.c, the new file we've created to handle all our HUD functions. This file is quite big (and will grow a little in future). It handles all the HUD's processing and drawing. So, let's jump right in. Starting with initHUD:
void initHUD(void)
{
	stage.hudMessageTail = &stage.hudMessageHead;

	positionIndicatorTexture = getAtlasImage("gfx/hud/positionIndicator.png", 1);

	healthWarningTimer = 0;

	prevHealthPercent = 0;
}
We're setting up our hud messages linked list. Next, we're loading a texture to act as our enemy position indicator (positionIndicatorTexture), and setting some variables for use later. healthWarningTimer is used to flash our health bar when we're low on health. prevHealthPercent is a control variable to store our fighter's previous health percentage. This, as we'll see in a moment, allows us to show the "Critical Damage!" message when we hit our critical health value.
That's our setup done, so now onto doHUD. This is the function that will process our HUD:
void doHUD(void)
{
	Fighter *f;
	double   percent;

	healthWarningTimer -= app.deltaTime;

	if (healthWarningTimer <= 0)
	{
		healthWarningTimer = FPS;
	}

	f = (Fighter *)stage.player->data;

	percent = ((1.0 * f->health) / f->maxHealth);

	if (prevHealthPercent > LOW_HEALTH_WARNING && percent <= LOW_HEALTH_WARNING)
	{
		addHudMessage("WARNING: Critical damage!", 255, 0, 0);
	}

	prevHealthPercent = percent;

	doMessages();
}
We're decreasing the value of our healthWarningTimer and resetting it to FPS if it falls below 0. Next, we're calculating the current percentage of the player's `health` and comparing it to the previous health percent (prevHealthPercent). If the previous amount was above our LOW_HEALTH_WARNING and the current percent is LOW_HEALTH_WARNING or less, our player's `health` has just hit the warning amount. We'll therefore call addHudMessage to display a message (we'll see more on this in a moment). We'll then set the value of prevHealthPercent to the value of `percent`, so that we can check it again later. Finally, we're calling doMessages to process our HUD messages (again, we'll see this later).
Next onto addHudMessage:
void addHudMessage(char *message, int r, int g, int b)
{
	HudMessage *h;
	int         num;

	h = malloc(sizeof(HudMessage));
	memset(h, 0, sizeof(HudMessage));
	stage.hudMessageTail->next = h;
	stage.hudMessageTail = h;

	STRCPY(h->message, message);
	h->color.r = r;
	h->color.g = g;
	h->color.b = b;
	h->health = FPS * 5;

	num = 0;

	for (h = stage.hudMessageHead.next; h != NULL; h = h->next)
	{
		num++;
	}

	while (num > MAX_HUD_MESSAGES)
	{
		h = stage.hudMessageHead.next;

		stage.hudMessageHead.next = h->next;

		free(h);

		num--;
	}
}
This function works very much like the HUD message system found in SDL2 Rogue and SDL2 Strategy. Here, we're creating a new HUD message, and adding it to our linked it, applying all the relevant attributes from those passed into the function (the message itself, along with the RGB colour values). Each message will also "live" for 5 seconds (via it's `health` variable). Next, we're counting how many HudMessages we currently have in our list. If there are more than MAX_HUD_MESSAGES (defined as 8), we'll begin removing messages from the head of the list, using a while-loop, until there are only 8 remaining. We don't want the screen to be filled with lots and lots of messages, getting in the way!
Next, we can look at doMessages:
static void doMessages(void)
{
	HudMessage *h, *prev;

	prev = &stage.hudMessageHead;

	for (h = stage.hudMessageHead.next; h != NULL; h = h->next)
	{
		h->health -= app.deltaTime;

		if (h->health <= 0)
		{
			prev->next = h->next;

			if (h == stage.hudMessageTail)
			{
				stage.hudMessageTail = prev;
			}

			free(h);

			h = prev;
		}

		prev = h;
	}
}
Nothing much to say here. We're looping through all our HudMessages, reducing their `health`, and removing them if their `health` is 0 or less.
Now for our rendering functions. Some of these will be more complex than others, but nothing too taxing. To begin with, we have to drawHUD function:
void drawHUD(void)
{
	drawIndicatorArrows();

	drawHealthBar();

	drawAmmoBar();

	drawCatnip();

	drawHudMessages();
}
This function delegates to many others, that we'll come to in turn. Starting with drawIndicatorArrows:
static void drawIndicatorArrows(void)
{
	Entity *e;
	int     x, y;

	for (e = stage.entityHead.next; e != NULL; e = e->next)
	{
		switch (e->side)
		{
			case SIDE_GREEBLE:
				SDL_SetTextureColorMod(positionIndicatorTexture->texture, 255, 0, 0);
				break;

			case SIDE_CATS:
				SDL_SetTextureColorMod(positionIndicatorTexture->texture, 0, 255, 0);
				break;

			default:
				SDL_SetTextureColorMod(positionIndicatorTexture->texture, 0, 255, 255);
				break;
		}

		x = e->x - stage.camera.x;
		y = e->y - stage.camera.y;

		if (x < 0)
		{
			blitRotated(positionIndicatorTexture, INDICATOR_PADDING, MIN(MAX(INDICATOR_PADDING, y), SCREEN_HEIGHT - INDICATOR_PADDING), -90);
		}
		else if (x > SCREEN_WIDTH)
		{
			blitRotated(positionIndicatorTexture, SCREEN_WIDTH - INDICATOR_PADDING, MIN(MAX(INDICATOR_PADDING, y), SCREEN_HEIGHT - INDICATOR_PADDING), 90);
		}
		else if (y < 0)
		{
			blitRotated(positionIndicatorTexture, MIN(MAX(INDICATOR_PADDING, x), SCREEN_WIDTH - INDICATOR_PADDING), INDICATOR_PADDING, 0);
		}
		else if (y > SCREEN_HEIGHT)
		{
			blitRotated(positionIndicatorTexture, MIN(MAX(INDICATOR_PADDING, x), SCREEN_WIDTH - INDICATOR_PADDING), SCREEN_HEIGHT - INDICATOR_PADDING, 180);
		}
	}

	SDL_SetTextureColorMod(positionIndicatorTexture->texture, 255, 255, 255);
}
This is the function responsible for displaying the arrows showing the location of off-screen enemies. What we do is loop through all the entities in the stage, and check which are off-screen. We assign two variables, `x` and `y`, the value of the entity's position, less the camera position (much like when rendering). We then test the `x` and `y` values, to see if these are outside of the screen position, and render an arrow at the relevant screen edge. For this purpose, we simply call blitRotated using our positionIndicatorTexture, and rotating the arrow to the appropriate angle. When positioning the arrows, we're making sure to provide a reasonable amount of padding away from the screen edges, using the value of INDICATOR_PADDING (defined as 35). This prevents the arrows from being lodged into the corners of the screen, where they are harder to see.
Now on to drawHealthBar:
static void drawHealthBar(void)
{
	int      i, x;
	SDL_Color c;
	double   percent;
	Fighter *f;

	f = (Fighter *)stage.player->data;

	x = 10;

	for (i = 0; i < f->maxHealth; i++)
	{
		memset(&c, 0, sizeof(SDL_Color));

		percent = 1.0 * i / f->maxHealth;

		if (percent < LOW_HEALTH_WARNING)
		{
			c.r = 255;
		}
		else if (percent < 0.5)
		{
			c.r = c.g = 255;
		}
		else
		{
			c.g = 255;
		}

		if (i >= f->health)
		{
			c.r *= 0.35;
			c.g *= 0.35;
			c.b *= 0.35;
		}
		else if ((f->health / f->maxHealth) <= LOW_HEALTH_WARNING && healthWarningTimer < FPS / 2)
		{
			c.r = c.g = c.b = 255;
		}

		drawRect(x, 10, HEALTH_BLOCK_WIDTH, HEALTH_BLOCK_HEIGHT, c.r, c.g, c.b, 255);

		drawOutlineRect(x, 10, HEALTH_BLOCK_WIDTH, HEALTH_BLOCK_HEIGHT, 0, 0, 0, 255);

		x += HEALTH_BLOCK_WIDTH;
	}
}
This function is responsible for drawing the player's current health. We do this using a for-loop, stepping from 0 to the the player's fighter's maxHealth. We then zero a variable called `c` (an SDL_Color), that will represent the colour of our current health block. For each block, we work out what percentage of the player's health it represents, and colour it appropriately. If the block is less than LOW_HEALTH_WARNING, we'll set our SDL_Color's `r` value to 255 (red). If percent less than 0.5 (less than 50% health), we'll colour it yellow (r and g = 255). Otherwise, we'll colour it green (g = 255). With our colour known, we'll check if our `i` value is greater than our fighter's current `health`. If so, we'll multiply all of `c`'s values by 0.35, to dim them. Basically, this means that while we'll draw all the blocks to represent our health bar, we'll dim those blocks that are greater than our current health value. Finally, we're checking if this block is at our low health threshold value, and that our warning timer is less than half a second (healthWarningTimer), and changing the block's colour to be pure white. We're doing this here to avoid dimming the block when we don't want to.
At last, we can draw the block, using a call to drawRect. We're also calling drawOutlineRect, to outline it black, in case it gets lost against the game's other graphics. We then increase the horizontal position (`x`) by the value of HEALTH_BLOCK_HEIGHT, to move the next block across to the right.
Phew! That certainly sounded more complicated than it is. Thankfully, we now understand the principle, which will help us in the next function, and also later on. So, let's now consider the next function, drawAmmoBar:
static void drawAmmoBar(void)
{
	int i, x, c;

	x = 10;

	for (i = 0; i < MAX_KITE_AMMO; i++)
	{
		c = 255;

		if (i >= game.kite.ammo)
		{
			c = 96;
		}

		drawRect(x, 30, AMMO_BLOCK_SIZE, AMMO_BLOCK_SIZE, c, 0, c, 255);

		drawOutlineRect(x, 30, AMMO_BLOCK_SIZE, AMMO_BLOCK_SIZE, 0, 0, 0, 255);

		x += AMMO_BLOCK_SIZE + 2;
	}
}
This draws our remaining ammo. Somewhat like our health bar, we're using a for-loop to count up to MAX_KITE_AMMO, and rendering a block with a colour that will represent how much ammo we have left. Once again, if the value of `i` (our counter) is greater than our current ammo (Game's `kite`'s `ammo`), we'll be drawing the block in a darker colour. The blocks are of AMMO_BLOCK_SIZE size (12) and are spaced a little further apart (+2), to provide a small gap between them. As with our health blocks, we're outlining them in black.
the drawCatnip function follows:
static void drawCatnip(void)
{
	char text[16];

	sprintf(text, "%d CN", game.catnip);

	drawText(text, SCREEN_WIDTH - 10, 0, 255, 255, 255, TEXT_ALIGN_RIGHT, 0);
}
Not much to say here - we're calling drawText to render our current catnip amount at the top right-hand side of the screen (we've abbreviated catnip to CN).
The last function we're going to look at is drawHudMessages:
static void drawHudMessages(void)
{
	HudMessage *h;
	int         y;

	y = SCREEN_HEIGHT - 35;

	for (h = stage.hudMessageHead.next; h != NULL; h = h->next)
	{
		drawText(h->message, 10, y, h->color.r, h->color.g, h->color.b, TEXT_ALIGN_LEFT, 0);

		y -= 30;
	}
}
Nothing spectacular going on here - we're looping through all our hud messages, and rendering their text (`message`). We're starting near the bottom of the screen (assigned to `y`), and moving up the screen with each successive message displayed.
That's our HUD dealt with for now. We just have to make a few tweaks to the rest of the code to have it all working.
Turning to player.c, we've updated initGame:
void initGame(void)
{
	memset(&game, 0, sizeof(Game));

	game.kite.health = game.kite.maxHealth = 10;
	game.kite.reload = MIN_KITE_RELOAD;
	game.kite.output = 1;
	game.kite.damage = 1;
}
We're setting Game's `kite`'s `health` and maxHealth to 10.
Next, we're moving over to player.c, where we've updated initPlayer:
void initPlayer(Entity *e)
{
	Fighter *f;

	f = malloc(sizeof(Fighter));
	memset(f, 0, sizeof(Fighter));
	f->health = game.kite.health;
	f->maxHealth = game.kite.maxHealth;

	e->side = SIDE_CATS;
	e->facing = FACING_RIGHT;
	e->data = f;
	e->texture = getAtlasImage("gfx/fighters/kit-e.png", 1);

	e->tick = tick;
	e->draw = draw;
	e->takeDamage = fighterTakeDamage;
	e->die = die;

	stage.player = e;
}
We're setting the player's fighter's `health` and maxHealth to that of Game's `kite`'s values. You may be wondering why we're doing this, and it's because in our game we will be carrying over the player's fighter's health and ammo between missions; the player will be able to repair the fighter between missions, and so we need to keep track of the values. This is basically a pre-empt to that gameplay feature.
Lastly, let's look at stage.c, where we've updated initStage:
void initStage(void)
{
	initStarfield();

	initHUD();

	// snipped
}
We've added the call to initHUD. We've updated doStage in a similar way:
static void doStage(void)
{
	stage.numActiveEnemies = 0;

	stage.engineEffectTimer -= app.deltaTime;

	doEntities();

	doBullets();

	doEffects();

	doDebris();

	doCollectables();

	doHUD();

	// snipped
}
We're calling doHUD here now, to process our HUD. Finally, we've updated `draw`:
static void draw(void)
{
	// snipped

	drawEffects();

	drawHUD();
}
We've calling drawHUD. Note that we're calling this last, so that it overlays everything else on the screen. We don't want things like effects, bullets, etc. to obscure it.
Another part down, another step closer to our complete game. With our HUD, we can now view important information about what is happening during our mission. Speaking of missions, our game is meant to be mission and objective based, isn't it? Well, we're not going to do that quite yet, as we've still got a few bits and pieces left to do with the gameplay itself. We can collect ammo, but have nothing to use it with. How about we fix that? In our next several parts, we're going to look into implementing our secondary weapons and benefits.
Purchase
The source code for all parts of this tutorial (including assets) is available for purchase:
From itch.io
It is also available as part of the SDL2 tutorial bundle: