PC Games
• Orb
• Lasagne Monsters
• Three Guys Apocalypse
• Water Closet
• Blob Wars : Attrition
• The Legend of Edgar
• TBFTSS: The Pandoran War
• Three Guys
• Blob Wars : Blob and Conquer
• Blob Wars : Metal Blob Solid
• Project: Starfighter
• TANX Squadron
Tutorials
• 2D shoot 'em up
• 2D top-down shooter
• 2D platform game
• Sprite atlas tutorial
• Working with TTF fonts
• 2D adventure game
• Widget tutorial
• 2D shoot 'em up sequel
• 2D run and gun
• Roguelike
• Medals (Achievements)
• 2D turn-based strategy game
• 2D isometric game
• 2D map editor
• 2D mission-based shoot 'em up
• 2D Santa game
• 2D split screen game
• 2D quest game
• SDL 1 tutorials (outdated)
Latest Updates
The Legend of Edgar 1.38
Thu, 1st January 2026
SDL2 Quest game tutorial
Wed, 7th May 2025
SDL2 Versus game tutorial
Wed, 20th March 2024
Download keys for SDL2 tutorials on itch.io
Sat, 16th March 2024
The Legend of Edgar 1.37
Mon, 1st January 2024
Tags
• battle-for-the-solar-system (10)
• blob-wars (10)
• brexit (1)
• code (6)
• edgar (10)
• games (45)
• lasagne-monsters (1)
• making-of (5)
• match3 (1)
• numberblocksonline (1)
• orb (2)
• site (1)
• tanx (4)
• three-guys (3)
• three-guys-apocalypse (3)
• tutorials (18)
• water-closet (4)
Books

Firmware
HF-Tech's chips have changed the world. Embedded into the heads of over 90% of the world's population, they have cured autism, dementia, provided intelligence boosts, and helped to ease some of the more mundane tasks in life. Daniel Blair, hacker and Workshop member, however is not convinced that everything is as rosy as it seems. But is he looking in all the wrong places..?
— A simple turn-based strategy game —
Part 14: Enhancing the HUD
Note: this tutorial assumes knowledge of C, as well as prior tutorials.


Introduction
There's plenty that our game can do at this point. However, our HUD and UI could use some love. So, in this part we're going to add in messages and some basic controls.
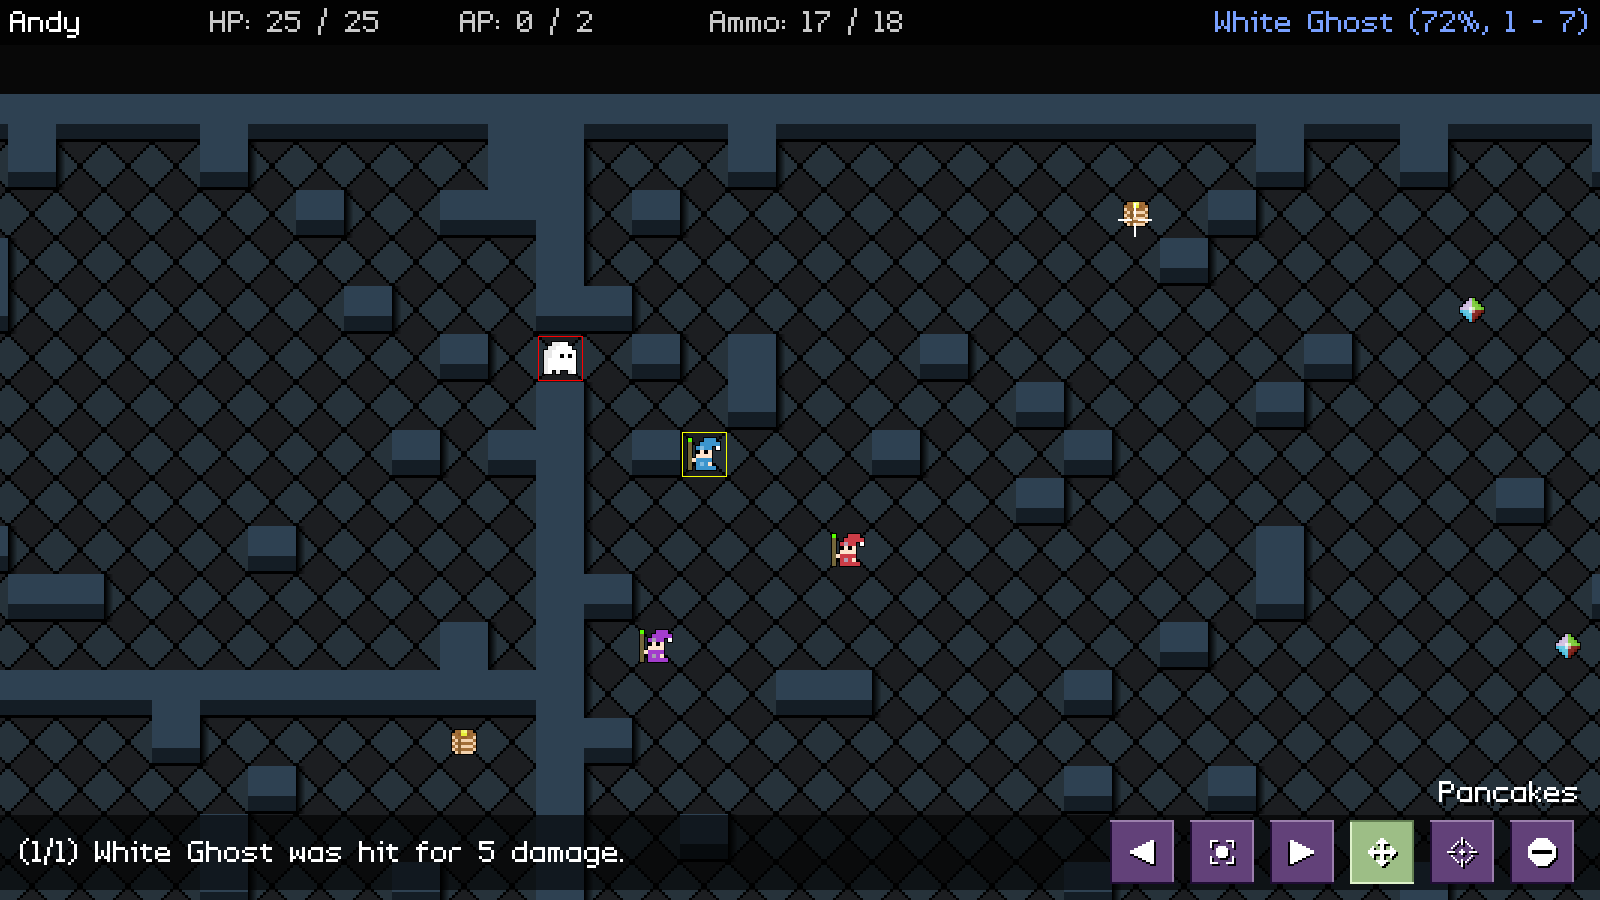
Extract the archive, run cmake CMakeLists.txt, followed by make, and then use ./sdl2TBS14 to run the code. You will see a window open like the one above, showing three wizards in a large room, surrounded by walls, as well as a number of ghosts. Play the game as normal. The purple buttons in the bottom-right allow for various actions to be performed From left to right: Prev unit, centre on current unit, next unit, display move range (toggle), display attack range (toggle), end turn. Notice also how messages are displayed for various actions, such as attacking, taking damage, and interacting with items. Once you're finished, close the window to exit.
Inspecting the code
This part will be fairly long, since we're doing all the HUD work in one go. However, it's not actually very complicated; there's just a lot of it!
Starting with structs.h:
typedef struct {
	int x;
	int y;
	int w;
	int h;
	int active;
	AtlasImage *texture;
} CommandButton;
We've added a CommandButton struct, to represent the buttons on the HUD that can be clicked. `x`, `y`, `w`, `h` are the location and dimensions of the button, while `active` will specify whether the button is active (used for things like the move and attack ranges, to give visual feedback to the player). `texture` is the button's icon.
Next, we have Message:
struct Message {
	char text[MAX_DESCRIPTION_LENGTH];
	SDL_Color color;
	Message *next;
};
This is a simple struct to hold the details of a message displayed on the HUD. `text` is the message detail itself, while `color` is the colour of the text.
Lastly, we've updated Stage:
typedef struct {
	unsigned int entityId;
	MapTile map[MAP_WIDTH][MAP_HEIGHT];
	Entity entityHead, *entityTail;
	Entity deadEntityHead, *deadEntityTail;
	Entity *currentEntity, *targetEntity, *hoverEntity;
	Effect effectHead, *effectTail;
	DamageText damageText;
	Message messageHead, *messageTail;
	Node routeHead;
	int turn;
	int animating;
	int showRange;
	Bullet bullet;
	struct {
		int x;
		int y;
	} selectedTile;
	struct {
		double x;
		double y;
	} camera;
} Stage;
We've added in our Messages linked list (as messageHead and messageTail).
Now, let's head over to hud.c Buckle up, as this will be a long section, as we detail all the updates to this file.
Starting with initHud:
void initHud(void)
{
	int i, x;
	char *commandIconTextureNames[] = {
		"gfx/hud/prevUnit.png", "gfx/hud/centerOnUnit.png", "gfx/hud/nextUnit.png", "gfx/hud/move.png", "gfx/hud/attack.png", "gfx/hud/endTurn.png"
	};

	selectedTileTexture = getAtlasImage("gfx/hud/selectedTile.png", 1);

	commandButtonTexture = getAtlasImage("gfx/hud/commandButton.png", 1);

	commandButtonHighlightTexture = getAtlasImage("gfx/hud/commandButtonHighlight.png", 1);

	commandButtonActiveTexture = getAtlasImage("gfx/hud/commandButtonActive.png", 1);

	x = SCREEN_WIDTH - ((commandButtonTexture->rect.w + 16) * CI_MAX);

	for (i = 0 ; i < CI_MAX ; i++)
	{
		memset(&commandButtons[i], 0, sizeof(CommandButton));

		commandButtons[i].texture = getAtlasImage(commandIconTextureNames[i], 1);

		commandButtons[i].x = x;
		commandButtons[i].y = SCREEN_HEIGHT - 80;
		commandButtons[i].w = commandButtons[i].texture->rect.w;
		commandButtons[i].h = commandButtons[i].texture->rect.h;

		x += commandButtonTexture->rect.w + 16;
	}

	selectedTilePulse = 0;

	memset(&stage.messageHead, 0, sizeof(Message));
	stage.messageTail = &stage.messageHead;

	totalMessages = 0;

	messageNum = 0;

	messageTimer = 0;
}
We're loading a bunch of new textures: commandButtonTexture, commandButtonHighlightTexture, and commandButtonActiveTexture. Next, we're setting a variable called `x` to a position on the screen that will allow us to draw all our command buttons (the right-hand side of the screen, less commandButtonTexture's width (w), multiplied by the number of buttons, plus some padding for each).
We then enter in a for-loop, to setup our command buttons (commandButtons, an array of size CI_MAX, in hud.c). For each one, we're memsetting it, loading setting its `texture`, its `x`, `y`, `w`, and `h`, and then increasing the value of `x` by the width of commandButtonTexture, plus some padding. This means that each button we create will lie to the right of the previous (we could've gone backward here, but it makes the code a bit harder to read).
With our buttons done, we setup the linked list for our message, and set variables called totalMessage, messageNum, and messageTimer to 0. These variables will control our message cycling, as you will have seen when several events occur during the ghosts' turn (such as multiple attacks). We'll see all these in action in a bit.
doHud follows:
void doHud(void)
{
	doCommandButtons();

	doSelectedTile();

	doMessages();

	doHoverEntitySelect();
}
We're now calling new several functions: doCommandButtons, doMessages, and doHoverEntitySelect. We'll start with doCommandButtons:
static void doCommandButtons(void)
{
	int i;

	hoverCommandButton = NULL;

	for (i = 0 ; i < CI_MAX ; i++)
	{
		if (collision(app.mouse.x, app.mouse.y, 1, 1, commandButtons[i].x, commandButtons[i].y, commandButtons[i].w, commandButtons[i].h))
		{
			hoverCommandButton = &commandButtons[i];

			if (app.mouse.buttons[SDL_BUTTON_LEFT])
			{
				app.mouse.buttons[SDL_BUTTON_LEFT] = 0;

				switch (i)
				{
					case CI_PREV_UNIT:
						cyclePlayerUnits(-1);
						break;

					case CI_NEXT_UNIT:
						cyclePlayerUnits(1);
						break;

					case CI_CENTER:
						centreCameraOn(stage.currentEntity);
						break;

					case CI_SHOW_MOVES:
						stage.showRange = (stage.showRange != SHOW_RANGE_MOVE) ? SHOW_RANGE_MOVE : SHOW_RANGE_NONE;
						break;

					case CI_SHOW_ATTACK:
						stage.showRange = (stage.showRange != SHOW_RANGE_ATTACK) ? SHOW_RANGE_ATTACK : SHOW_RANGE_NONE;
						break;

					case CI_END_TURN:
						clearHudMessages();
						endTurn();
						break;

					default:
						break;
				}
			}
		}
	}

	commandButtons[CI_SHOW_MOVES].active = commandButtons[CI_SHOW_ATTACK].active = 0;

	if (stage.showRange == SHOW_RANGE_MOVE)
	{
		commandButtons[CI_SHOW_MOVES].active = 1;
	}
	else if (stage.showRange == SHOW_RANGE_ATTACK)
	{
		commandButtons[CI_SHOW_ATTACK].active = 1;
	}
}
This function is where we handle the interactions with our command buttons. We first set a variable called hoverCommandButton to NULL. This is a pointer to the command button that the mouse is currently over, and will draw the yellow rectangle you see. We then enter into a for-loop, to check each button. For each one, we test to see if the mouse pointer is over it (by way of the `collision` function), and assign it as hoverCommandButton. We then test to see if the left mouse button has been pressed. If so, we'll check which command button the player has clicked, via a switch statement.
These should all be self-explanatory, as cases are calling many functions that we've seen before (other than CI_END_TURN that calls clearHudMessages). With our buttons checked, we set both CI_SHOW_MOVES and CI_SHOW_ATTACK command buttons `active` flags to 0. We then test the state of Stage's showRange. If its SHOW_RANGE_MOVE, we set CI_SHOW_MOVES's `active` flag to 1. If it's SHOW_RANGE_ATTACK, we set CI_SHOW_ATTACK's `active` flag to 1. The reason we do this is to keep things consistent with the rest of the game. Since the player can also cycle the units' action by clicking on them, we need the UI to reflect this state probably. This step helps to keep things in sync.
That's doCommandButtons handled. As you can see, we're just checking if we've clicked on a button, and are calling various (already existing) functions in response.
Now, let's look at doMessages:
static void doMessages(void)
{
	if (totalMessages > 0)
	{
		messageTimer -= app.deltaTime;

		if (messageTimer <= 0)
		{
			messageNum++;

			currentMessage = currentMessage->next;

			if (currentMessage == NULL)
			{
				messageNum = 1;

				currentMessage = stage.messageHead.next;
			}

			messageTimer = FPS * 1.5;
		}
	}
}
This function will process our messages, cycling them at an interval. We first test to see how many total messages we have (totalMessages). If it's more than 0, we'll decrease the value of messageTimer. Once that falls to 0 or less, we'll increase the value of messageNum, and also move to the next message in our linked list. currentMessage points to a message in our linked list, so updating currentMessage to currentMessage's `next` will move along the list. We next check to see we've not reached the end of the list, by testing if currentMessage is NULL. If so, we'll return to the start of the list and also set messageNum to 1. Finally, we'll update messageTimer to FPS * 1.5, so that each message is displayed for one-and-a-half seconds.
In short, this function will cycle our messages by moving along our message linked list, at a fixed interval. messageNum is used in the display of the messages, as we'll see in a little while.
Next, we come to addHudMessage:
void addHudMessage(int r, int g, int b, char *text, ...)
{
	char buffer[MAX_LINE_LENGTH];
	Message *m;
	va_list args;

	va_start(args, text);
	vsprintf(buffer, text, args);
	va_end(args);

	m = malloc(sizeof(Message));
	memset(m, 0, sizeof(Message));
	stage.messageTail->next = m;
	stage.messageTail = m;

	STRCPY(m->text, buffer);
	m->color.r = r;
	m->color.g = g;
	m->color.b = b;

	if (totalMessages == 0)
	{
		currentMessage = m;

		messageNum = 1;
	}

	totalMessages++;
}
This function is quite similar to addDamageText, in that it takes a formatted string. It also takes RGB values, so we can colour the message. We malloc and memset a Message (as `m`) and add it to our linked list, then set all the Message data (`text` and `color`). Next, we test if totalMessages is 0 (meaning this is the first message in the list). If so, we'll set currentMessage to point at `m`, and set messageNum to 1, so that we can start displaying the messages from the beginning. Finally, we increment the value of totalMessages, so we know how many messages we currently have.
clearHudMessages is up next:
void clearHudMessages(void)
{
	Message *m;

	while (stage.messageHead.next)
	{
		m = stage.messageHead.next;

		stage.messageHead.next = m->next;

		free(m);
	}

	stage.messageTail = &stage.messageHead;

	totalMessages = messageNum = 0;
}
A simple function. This just empties our messages linked list, resets the linked list, and sets totalMessages and messageNum to 0. So, yes, it just clears all our HUD messages and resets the state!
doHoverEntitySelect follows:
static void doHoverEntitySelect(void)
{
	int mx, my;

	mx = (app.mouse.x + stage.camera.x) / MAP_TILE_SIZE;
	my = (app.mouse.y + stage.camera.y) / MAP_TILE_SIZE;

	stage.hoverEntity = getEntityAt(mx, my);
}
This function will set Stage's hoverEntity to the entity at the map location that the mouse is currently hovering over. We're using getEntityAt here, to ensure that a solid entity will take priority.
That's our logic steps for the HUD down, so we can now move onto the rendering phase. Starting with drawHud:
void drawHud(void)
{
	if (!stage.animating)
	{
		if (hoverCommandButton == NULL)
		{
			drawSelectedTile();
		}

		drawMessages();

		drawCommandButtons();

		drawHoverEntityInfo();
	}

	drawTopBar();
}
We're now calling a few new functions: drawMessage, drawCommandButtons, and drawHoverEntityInfo. These functions will only be called if Stage's `animating` flag isn't set. Additionally, we're only calling drawSelectedTile if we're not hovering over a command button. Things look a bit ugly if we do so.
First, let's look at the updates we've made to drawSelectedTile:
static void drawSelectedTile(void)
{
	double pulse;
	int x, y, r, g, b;
	MapTile *t;

	x = (stage.selectedTile.x * MAP_TILE_SIZE) - (int) stage.camera.x;
	y = (stage.selectedTile.y * MAP_TILE_SIZE) - (int) stage.camera.y;

	t = &stage.map[stage.selectedTile.x][stage.selectedTile.y];

	if (t->inMoveRange || t->inAttackRange)
	{
		pulse = (sin(selectedTilePulse) + 1) / 2;

		if (t->inMoveRange && t->inAttackRange)
		{
			r = b = 255;
			g = 0;
		}
		else if (t->inMoveRange)
		{
			r = 64;
			g = 200;
			b = 255;
		}
		else if (t->inAttackRange)
		{
			r = 255;
			g = b = 0;
		}

		SDL_SetTextureColorMod(selectedTileTexture->texture, r, g, b);
		SDL_SetTextureAlphaMod(selectedTileTexture->texture, 127 + (pulse * 128));

		blitAtlasImage(selectedTileTexture, x, y, 0, SDL_FLIP_NONE);

		SDL_SetTextureAlphaMod(selectedTileTexture->texture, 255);
		SDL_SetTextureColorMod(selectedTileTexture->texture, 255, 255, 255);
	}
}
We've made a change to this function to now change the colour of the selected tile texture when we draw it (assigned to RGB values). For this purpose, we're testing whether the selected tile is either in the unit's move range or attack range. If the selected tile lies within both, we'll be setting a yellow colour. If it's only in the move range, we'll be setting a blue colour. Finally, if it's only in the attack range, we'll be setting a red color. We're then using SDL_SetTextureColorMod to update the colour of the selected tile texture.
The purpose of this is to give a better hint to the player about what range the tile they're hovering over lies within, without them needing to toggle the range displays. If it's not in a range at all, we'll not draw anything. A small update, but one some players might appreciate.
Next, comes drawMesages:
static void drawMessages(void)
{
	char line[MAX_LINE_LENGTH];

	if (totalMessages > 0)
	{
		drawRect(0, SCREEN_HEIGHT - 85, SCREEN_WIDTH, 75, 0, 0, 0, 160);

		sprintf(line, "(%d/%d) %s", messageNum, totalMessages, currentMessage->text);

		drawText(line, 20, SCREEN_HEIGHT - 70, currentMessage->color.r, currentMessage->color.g, currentMessage->color.b, TEXT_ALIGN_LEFT, 0);
	}
}
A simple function. We first test to see if totalMessages is greater than 0, then draw a transparent black rectangle at the positon we'll draw our message, to increase readability. Next, we're using `sprintf` to create the message text. Here, you can see where we're using messageNum. This variable will inform the player which message out of the total they are viewing. This helps us to know how many of the messages we've seen when it cycles back around, so the player doesn't need to wonder if they've seen all of the messages in the list.
Next, we have drawCommandButtons:
static void drawCommandButtons(void)
{
	int i;

	for (i = 0 ; i < CI_MAX ; i++)
	{
		if (commandButtons[i].active)
		{
			blitAtlasImage(commandButtonActiveTexture, commandButtons[i].x, commandButtons[i].y, 0, SDL_FLIP_NONE);
		}
		else
		{
			blitAtlasImage(commandButtonTexture, commandButtons[i].x, commandButtons[i].y, 0, SDL_FLIP_NONE);
		}

		blitAtlasImage(commandButtons[i].texture, commandButtons[i].x, commandButtons[i].y, 0, SDL_FLIP_NONE);

		if (&commandButtons[i] == hoverCommandButton)
		{
			blitAtlasImage(commandButtonHighlightTexture, commandButtons[i].x, commandButtons[i].y, 0, SDL_FLIP_NONE);
		}
	}
}
This function is basically responsible for drawing our UI elements. As you can see from the function, the command buttons are actually a composite, with the base image being rendered and the actual icon image being drawn on top. Depending on whether the button's `active` flag is set (for move and attack buttons), we'll either draw commandButtonActiveTexture or commandButtonTexture. We'll then render the command button's image. Finally, we test to see if the command button we're processing is the one our mouse is hovering over (hoverCommandButton). If so, we'll also render commandButtonHighlightTexture. This is the texture that puts the yellow square around the command button.
So, in conclusion, this function draws our command buttons by simply layering different images on top of one another. This means we don't need to have multiple images of different states.
One last function to look at, and hud.c is done. drawHoverEntityInfo is an easy one to follow:
static void drawHoverEntityInfo(void)
{
	int x, y;

	if (stage.hoverEntity != NULL)
	{
		x = SCREEN_WIDTH - 20;
		y = SCREEN_HEIGHT - 130;

		drawText(stage.hoverEntity->name, x + 4, y + 4, 0, 0, 0, TEXT_ALIGN_RIGHT, 0);
		drawText(stage.hoverEntity->name, x, y, 255, 255, 255, TEXT_ALIGN_RIGHT, 0);
	}
}
This is the function that draws the name of the entity that we're hovering over, just above the command buttons. We first test that hoverEntity is not NULL, then setup two variables, `x` and `y`, as the position we'll draw the name of the entity. Like our damageText, we're first rendering the name in black, offset by 4 pixels. We then draw the text in white, in the original location, so that we have a shadow effect, making it a bit easier to read.
Wow! That was a lot! But all our HUD functionality is now available to us, and works like a charm. Just a few bits left to do and this part is all wrapped up. So, we'll look at where we're using addHudMessage and clearHudMessages.
First, in ghosts.c, we've updated die:
static void die(Entity *self)
{
	self->dead = 1;

	addHudMessage(255, 255, 255, "%s was destroyed.", self->name);

	addDeathEffect(MAP_TO_SCREEN(self->x), MAP_TO_SCREEN(self->y));
}
We're calling addHudMessage to say that the ghost was destroyed, all in white.
Moving over to items.c, we've updated healthTouch:
static void healthTouch(Entity *self, Entity *other)
{
	Unit *u;

	if (other->type == ET_MAGE)
	{
		u = (Unit*) other->data;

		if (u->hp < u->maxHP)
		{
			u->hp = MIN(u->hp + 10, u->maxHP);

			self->dead = 1;

			addHudMessage(160, 200, 255, "Restored 10 HP.");
		}
	}
}
We're adding a message to say that consuming those lovely pancakes has restored some HP. We're adding the message with a light blue colour.
ammoTouch has also been updated:
static void ammoTouch(Entity *self, Entity *other)
{
	Unit *u;

	if (other->type == ET_MAGE)
	{
		u = (Unit*) other->data;

		if (u->weapon.ammo < u->weapon.maxAmmo)
		{
			u->weapon.ammo = MIN(u->weapon.ammo + 10, u->weapon.maxAmmo);

			self->dead = 1;

			addHudMessage(160, 200, 255, "Restored 10 magic ammo.");
		}
	}
}
We're adding a message to say the magic crystal restored some ammo, again with a light blue colour.
Now for mages.c. We've updated the die function:
static void die(Entity *self)
{
	Entity *tombstone;
	char name[MAX_NAME_LENGTH * 2];

	self->dead = 1;

	addHudMessage(255, 0, 0, "%s was killed.", self->name);

	// snipped
}
Oh! A bad message here saying that one of our wizards has been killed. This message is being added in red, to show something terrible has happened.
Over in player.c, we've updated doControls:
static void doControls(void)
{
	if (app.keyboard[SDL_SCANCODE_SPACE])
	{
		app.keyboard[SDL_SCANCODE_SPACE] = 0;

		clearHudMessages();

		endTurn();
	}

	// snipped
}
Whenever we end our turn, we want to clear the HUD messages. We're not doing this in endTurn, as that would mean that when the AI hands back control to the player, all the events that occurred would be lost, so we wouldn't know what happened during the ghosts' go.
attackTarget has seen several updates:
static void attackTarget(Unit *u)
{
	clearHudMessages();

	if (u->ap > 0 && u->weapon.ammo > 0 && stage.map[stage.targetEntity->x][stage.targetEntity->y].inAttackRange)
	{
		fireBullet();
	}
	else if (u->ap == 0)
	{
		addHudMessage(255, 255, 255, "Not enough AP");
	}
	else if (u->weapon.ammo == 0)
	{
		addHudMessage(255, 255, 255, "Not enough ammo");
	}
	else
	{
		addHudMessage(255, 255, 255, "Target not in range");
	}
}
If we're unable to attack the target, we're going to supply a message to the player to inform them why. This could be that we don't have any AP, that we don't have any ammo, or that the target cannot be attacked (line of sight check failures, etc).
doMoveUnit has been updated:
static void doMoveUnit(void)
{
	MapTile *t;

	if (app.mouse.buttons[SDL_BUTTON_LEFT])
	{
		app.mouse.buttons[SDL_BUTTON_LEFT] = 0;

		t = &stage.map[stage.selectedTile.x][stage.selectedTile.y];

		if (t->inMoveRange)
		{
			createAStarRoute(stage.currentEntity, stage.selectedTile.x, stage.selectedTile.y);

			clearHudMessages();
		}
	}
}
When we decide to move a unit, we're going to clear the hud messages, so that we can work with a clean slate. We don't want loads of messages stacking up that we've already seen.
Finally, in units.c, we've updated takeDamage:
static void takeDamage(Entity *self, int damage)
{
	Unit *u;
	int r, g, b;

	u = (Unit*) self->data;

	u->hp -= damage;

	u->shudder = 10;

	addDamageText(MAP_TO_SCREEN(self->x), MAP_TO_SCREEN(self->y) - (MAP_TILE_SIZE / 2), "%d", damage);

	if (self->side == SIDE_PLAYER)
	{
		r = 255;
		g = b = 0;
	}
	else
	{
		r = g = b = 255;
	}

	addHudMessage(r, g, b, "%s was hit for %d damage.", self->name, damage);

	if (u->hp <= 0)
	{
		self->die(self);
	}
}
Depending on the side of the unit that took the damage (the player or the AI), we'll display a message to say the unit was hurt. The colour of the message will depend on the side of the unit. If it's the player, we'll display it in red. Otherwise, it will be shown in white.
Our HUD is done! We've now got a way to display messages, control the game using on-screen icons, and see data about objects on the field.
Once again, we're stepping closer to completion. What we should do now is generate a better map. Right now, we're just surrounding the stage in walls and then randomly placing other walls. In the next part, we're going to use cellular automata to create a better, more interesting layout.
Purchase
The source code for all parts of this tutorial (including assets) is available for purchase:
From itch.io
It is also available as part of the SDL2 tutorial bundle: