PC Games
• Orb
• Lasagne Monsters
• Three Guys Apocalypse
• Water Closet
• Blob Wars : Attrition
• The Legend of Edgar
• TBFTSS: The Pandoran War
• Three Guys
• Blob Wars : Blob and Conquer
• Blob Wars : Metal Blob Solid
• Project: Starfighter
• TANX Squadron
Tutorials
• 2D shoot 'em up
• 2D top-down shooter
• 2D platform game
• Sprite atlas tutorial
• Working with TTF fonts
• 2D adventure game
• Widget tutorial
• 2D shoot 'em up sequel
• 2D run and gun
• Roguelike
• Medals (Achievements)
• 2D turn-based strategy game
• 2D isometric game
• 2D map editor
• 2D mission-based shoot 'em up
• 2D Santa game
• 2D split screen game
• 2D quest game
• SDL 1 tutorials (outdated)
Latest Updates
The Legend of Edgar 1.38
Thu, 1st January 2026
SDL2 Quest game tutorial
Wed, 7th May 2025
SDL2 Versus game tutorial
Wed, 20th March 2024
Download keys for SDL2 tutorials on itch.io
Sat, 16th March 2024
The Legend of Edgar 1.37
Mon, 1st January 2024
Tags
• battle-for-the-solar-system (10)
• blob-wars (10)
• brexit (1)
• code (6)
• edgar (10)
• games (45)
• lasagne-monsters (1)
• making-of (5)
• match3 (1)
• numberblocksonline (1)
• orb (2)
• site (1)
• tanx (4)
• three-guys (3)
• three-guys-apocalypse (3)
• tutorials (18)
• water-closet (4)
Books
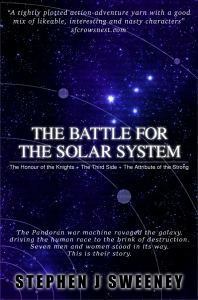
The Battle for the Solar System (Complete)
The Pandoran war machine ravaged the galaxy, driving the human race to the brink of destruction. Seven men and women stood in its way. This is their story.
— Mission-based 2D shoot 'em up —
Part 1: Basic fighter control
Note: this tutorial assumes knowledge of C, as well as prior tutorials.


Introduction
The first game I ever wrote in C was Project: Starfighter. It started life on the Amiga, when it had been coded in Blitz Basic. After I moved to Linux, I returned to the game and decided to use it as a test bed for learning C/C++. It was a very popular game back in the early 2000s, thanks to its multi directional combat, non-linear mission structure, and cast of characters.
In this tutorial set, we're going to look into how to develop a game such as Project: Starfighter. As you may have already seen, this is by far the largest tutorial, running at over 30 parts. Making such a game is quite involved, hence the length compared to all the other tutorials that have proceeded this one. So, let's get started.
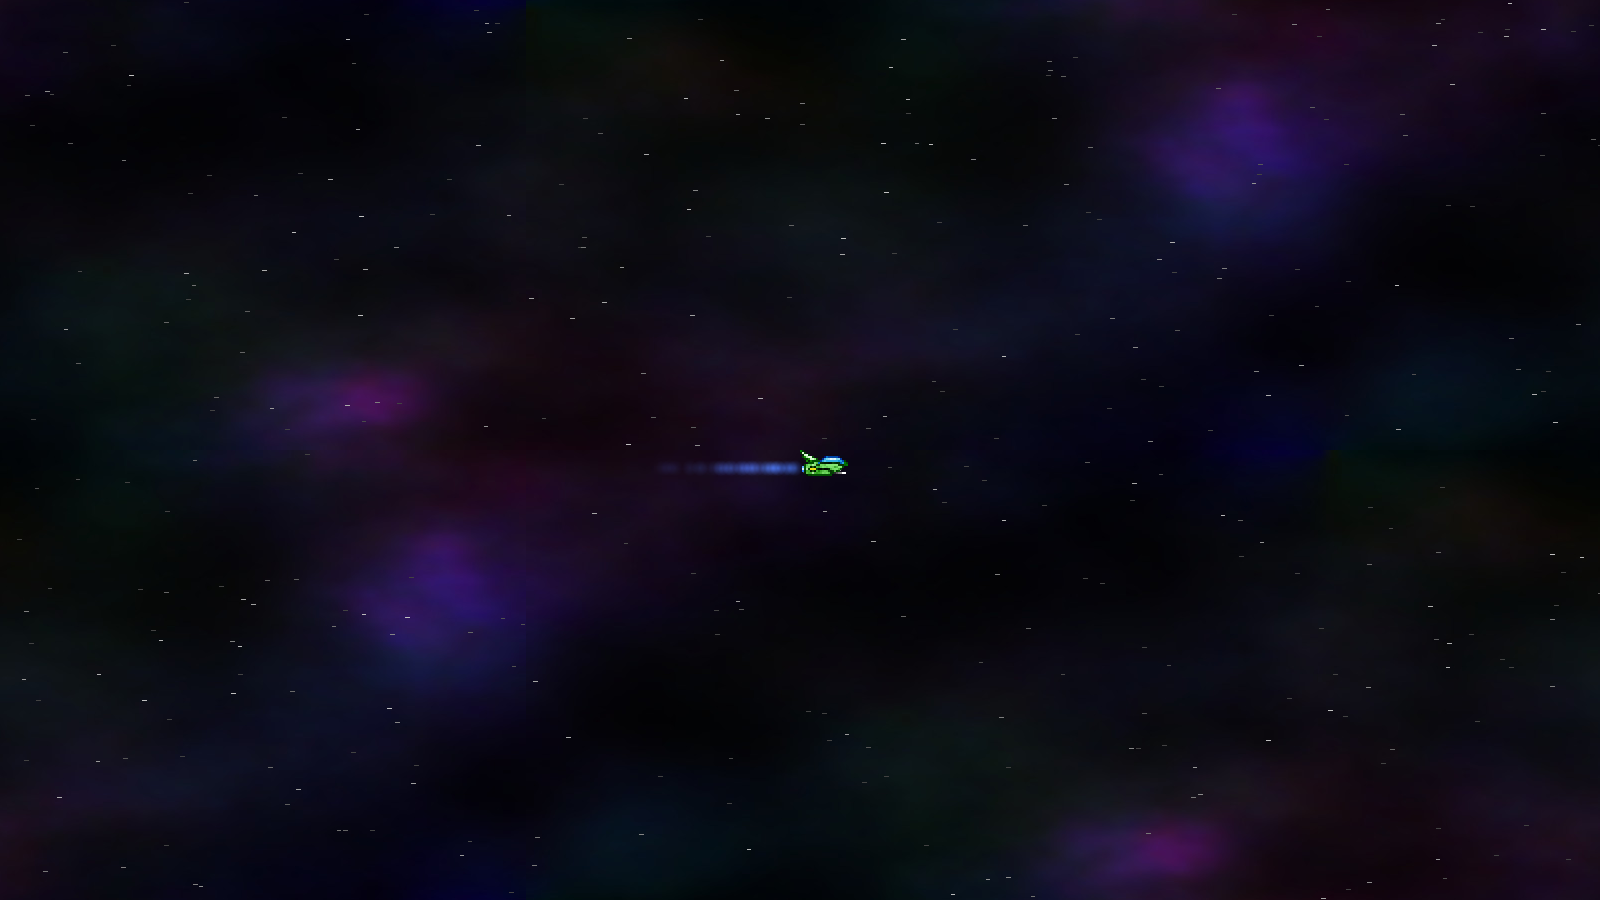
Extract the archive, run cmake CMakeLists.txt, followed by make, and then use ./shooter3-01 to run the code. You will see a window open like the one above. Use the WASD control scheme to move the fighter around. Notice how the fighter is affected by inertia, and must slow down to change direction. These are the flight mechanics that will apply to the player in our game (although not the enemies, as we'll discover later). Notice also how the stars and background scroll a relation to the player's movement. When you're finished, close the window to exit.
Inspecting the code
Important: since this tutorial is ultimately the culmination of all those that have come before, it will feel rather accelerated; we will be skipping over things that have already been covered and seen before, and only mention some other things for context (for example, linked list handling, effects rendering, entity factories, controls, and all the rest). This game is quite large and there is a lot of cover even at this pace. We will focus on those things that make the game what it is, and refer the reader to previous tutorials as needed. One should almost consider this as the closing chapter of the book. If you're not familiar with the other tutorials, you should start there. However, if you're feeling comfortable to ignore such things, then you might still find learning about the other concepts just fine.
We're going to proceed in the usual way, by breaking down the code into chunks and looking at various compilation units and their functions.
Let's start with structs.h:
struct Entity
{
	double      x;
	double      y;
	int         facing;
	AtlasImage *texture;
	int         dead;
	void(*data);
	void (*tick)(Entity *self);
	void (*draw)(Entity *self);
	Entity *next;
};
A standard entity struct, to hold our entity definition. Things such as the fighters and collectables will all be entities.
Next, we have the Fighter struct:
typedef struct
{
	double health;
	int    maxHealth;
	double dx, dy;
} Fighter;
This is to define the fields for a Fighter (such as the player). This is typically assigned to an Entity's `data` field.
Now, for our Star struct:
typedef struct
{
	double x;
	double y;
	double speed;
} Star;
This defines a background star, that moves around as we fly the KIT-E.
Next, we have Effect:
struct Effect
{
	double      x;
	double      y;
	double      dx;
	double      dy;
	double      health;
	AtlasImage *texture;
	SDL_Color   color;
	void (*tick)(Effect *self);
	Effect *next;
};
This will hold the values for various effects, such as the engine trails and explosions.
Finally, we have the Stage struct:
typedef struct
{
	double  ssx, ssy;
	Effect  effectHead, *effectTail;
	Entity  entityHead, *entityTail;
	double  engineEffectTimer;
	Entity *player;
	PointF  camera;
} Stage;
This will hold all the data for what is happening during play. Of note here are the `ssx` and `ssy` fields. These will control the speed of the stars and the background as we move (short for "star speed x", and "star speed y"). We also have a variable called engineEffectTimer, that will be used to control how often all our fighters produce their engine trails. We'll see how this works later on.
Now, let's look at player.c. This is where we'll be handling all our player-related functions.
To start with, our initPlayer function:
void initPlayer(Entity *e)
{
	Fighter *f;

	f = malloc(sizeof(Fighter));
	memset(f, 0, sizeof(Fighter));

	e->facing = FACING_RIGHT;
	e->data = f;
	e->texture = getAtlasImage("gfx/fighters/kit-e.png", 1);

	e->tick = tick;
	e->draw = draw;

	stage.player = e;
}
This function is registered with our entity factory, and invoked by initEntity, hence the Entity reference passed into the function. We're mallocing a Fighter here (`f`) to act as the player's craft, assigning our `texture`, `tick` and `draw` functions. We're also setting Stage's `player` pointer to be the player (`e`), so that we can track it throughout the game. Again, all standard stuff.
The `tick` function follows:
static void tick(Entity *self)
{
	Fighter *f;

	f = (Fighter *)self->data;

	doPlayerControls(self, f);

	fighterTick(self, f);

	stage.ssx = -f->dx;
	stage.ssy = -f->dy;

	if (stage.engineEffectTimer <= 0)
	{
		addEngineEffect(self->x + (self->facing == FACING_LEFT ? self->texture->rect.w : 0), self->y + 18);
	}
}
We're calling two functions here - doPlayerControls and fighterTick, that we'll get to in a bit. Notice how we're updating Stage's `ssx` and `ssy` values, based on the negative of the [player's] fighter's `dx` and `dy`. Since we're using `ssx` and `ssy` to drive the starfield and background scrolling, this will mean that our background and starfield will move in the opposite direction to that of the player (and at half the speed). Finally, we're testing if Stage's engineEffectTime is 0 or less and calling addEngineEffect, to add an effect that will represent the blue engine trail. The engine position of each craft varies, so we need to do this per fighter type.
Now for doPlayerControls:
static void doPlayerControls(Entity *self, Fighter *f)
{
	if (isControl(CONTROL_LEFT))
	{
		f->dx -= FIGHTER_SPEED * app.deltaTime;

		self->facing = FACING_LEFT;
	}

	if (isControl(CONTROL_RIGHT))
	{
		f->dx += FIGHTER_SPEED * app.deltaTime;

		self->facing = FACING_RIGHT;
	}

	if (isControl(CONTROL_UP))
	{
		f->dy -= FIGHTER_SPEED * app.deltaTime;
	}

	if (isControl(CONTROL_DOWN))
	{
		f->dy += FIGHTER_SPEED * app.deltaTime;
	}

	f->dx = MIN(MAX(f->dx, -MAX_FIGHTER_SPEED), MAX_FIGHTER_SPEED);
	f->dy = MIN(MAX(f->dy, -MAX_FIGHTER_SPEED), MAX_FIGHTER_SPEED);
}
No real surprises here. We're testing whether various controls are in effect (left, right, up, down) and responding accordingly. We're updating the fighter's `dx` and `dy` based on the direction we wish to go, and ultimately limiting the values to MAX_FIGHTER_SPEED (defined in player.c as 16). isControl is a function found in controls.c, and is used to check whether the relevant key or joypad button is pressed. We saw how this was done in SDL2 Gunner. The code here is more or less identical.
Lastly, we have the `draw` function:
static void draw(Entity *self)
{
	Fighter *f;

	f = (Fighter *)self->data;

	fighterDraw(self, f);
}
This function is delegating to fighterDraw.
That's it for player.c. Since we've seen fighterTick and fighterDraw used, we should head over to fighters.c and discover what they do. Starting with fighterTick:
void fighterTick(Entity *e, Fighter *f)
{
	e->x += f->dx * app.deltaTime;
	e->y += f->dy * app.deltaTime;
}
This is a shared function that will be used by both the player and AI craft alike. Right now, it doesn't do much - we're adjusting the entity's (`e`) `x` and `y` values by the value of the fighter's (`f`) `dx` and `dy` values, to cause it to move.
fighterDraw is the only other function in fighters.c:
void fighterDraw(Entity *e, Fighter *f)
{
	int x, y;

	x = e->x - stage.camera.x;
	y = e->y - stage.camera.y;

	blitAtlasImage(e->texture, x, y, 0, e->facing == FACING_LEFT ? SDL_FLIP_HORIZONTAL : SDL_FLIP_NONE);
}
Simply, this function will draw the current fighter offset by the camera position. Note that we're passing in both the entity (`e`) and the fighter data (`f`). We're not using the fighter data just yet, but will do in a future part. Again, this function will be used by both the player and the enemies alike.
With that done, let's turn to entities.c. You'll recognise a lot of functions here, as the standard way in which we've been doing things in this tutorial series. Starting with initEntiites:
void initEntities(void)
{
	memset(&stage.entityHead, 0, sizeof(Entity));

	stage.entityTail = &stage.entityHead;
}
We're just preparing our linked list here, which is the way we'll be storing our entities in Stage.
Next, doEntities:
void doEntities(void)
{
	Entity *e;

	for (e = stage.entityHead.next; e != NULL; e = e->next)
	{
		e->tick(e);
	}
}
We're merely looping through all the entities and calling their `tick` function. Right now, this is only the player.
Finally, drawEntities:
void drawEntities(void)
{
	Entity *e;
	int     x, y;

	for (e = stage.entityHead.next; e != NULL; e = e->next)
	{
		x = e->x - stage.camera.x;
		y = e->y - stage.camera.y;

		if (collision(x, y, e->texture->rect.w, e->texture->rect.h, 0, 0, SCREEN_WIDTH, SCREEN_HEIGHT))
		{
			e->draw(e);
		}
	}
}
Again, we're looping through our entities and preparing to draw them. Note, however, that we're first assigning two variables, `x` and `y`, as the entity's `x` and `y` offset by the camera position. We're then testing to see if the entity we want to draw is on screen, by doing a collision check of their bounding rectangle against the screen. If so, we'll render it by calling its `draw` function. We only want to draw things that are on screen, and since we can fly all over the place, we can push stuff out of view frequently. Using a quadtree here, as we did with SDL2 Gunner, isn't an option, since our game world is much, much larger*, making it unfeasible.
(* - I did, in fact, use a quadtree in The Pandoran War, but the game world there was limited in size, whereas here we technically have no limit, other than the maxmium value of double, which on a 64-bit system a monsterous).
Moving on now to starfield.c. We've seen starfields before in the other two shooters. At its heart, this one operates in mostly the same way. We'll start first with initStarfield:
void initStarfield(void)
{
	int   i;
	Star *s;

	for (i = 0; i < MAX_STARS; i++)
	{
		s = &stars[i];

		s->x = rand() % SCREEN_WIDTH;
		s->y = rand() % SCREEN_HEIGHT;
		s->speed = rand() % (MAX_STAR_SPEED * 10);
		s->speed *= 0.1;

		s->speed = MAX(s->speed, 1);
	}
}
Are stars are an array of size MAX_STARS. We loop through all the entries in the array and assign them a random positon on screen, as well as a random speed.
doStarfield is where things can a little more interesting:
void doStarfield(double _dx, double _dy)
{
	int   i;
	Star *s;

	dx = _dx;
	dy = _dy;

	for (i = 0; i < MAX_STARS; i++)
	{
		s = &stars[i];

		s->x += dx * s->speed * app.deltaTime;
		s->y += dy * s->speed * app.deltaTime;

		if (s->x < 0)
		{
			s->x = SCREEN_WIDTH;
		}

		if (s->y < 0)
		{
			s->y = SCREEN_HEIGHT;
		}

		if (s->x > SCREEN_WIDTH)
		{
			s->x = 0;
		}

		if (s->y > SCREEN_HEIGHT)
		{
			s->y = 0;
		}
	}
}
The function takes two arguments: `_dx` and `_dy`. We're assigning these values to `dx` and `dy`, static variables in starfield.c, as we'll want them later. Next, we're looping through all our stars and updating their `x` and `y` values by `dx` and `dy`, multiplied by their speed. Next, we test if our stars have moved off the edges of the screen. If they have, we'll wrap them back around to the opposite side.
Finally, we have drawStarfield:
void drawStarfield(void)
{
	int   i, c;
	Star *s;

	for (i = 0; i < MAX_STARS; i++)
	{
		s = &stars[i];

		c = (200.0 / MAX_STAR_SPEED) * s->speed;

		SDL_SetRenderDrawColor(app.renderer, c, c, c, 255);

		SDL_RenderDrawLine(app.renderer, s->x, s->y, s->x - dx, s->y - dy);
	}
}
Once again, we're looping through all our stars and drawing them. We're doing two things special. First, assigning a variable called `c` a value based on the speed of the star. Faster moving stars will be bright, while slower moving ones will be fainter. We're using a maximum of 200 here (out of 255), so our stars don't appear too bright. We're calling SDL_SetRenderDrawColor to set the colour we want to use. We then call SDL_RenderDrawLine to render our star. The first pair of points use the star's `x` and `y`, while the second pair use the star's `x` and `y`, less our stored `dx` and `dy`. What this means is that the lines will lengthen as the player flies faster, giving a greater sense of momentum. It also makes the stars slightly easier to see.
Time to move onto stage.c, where our main gameplay will be handled. Once again, this will look very familiar. Starting with initStage:
void initStage(void)
{
	initStarfield();

	initEntities();

	initEffects();

	initEntity("player");

	background = loadTexture("gfx/backgrounds/default.jpg");

	app.delegate.logic = logic;
	app.delegate.draw = draw;
}
Where calling a bunch of init functions, to setup our starfield, entities, effects, etc. We're also creating the player with a call to initEntity, loading the background to use, and setting up our delegates. Our background rendering is a special case that we'll come to at the end. For now, let's look at the delegates.
Our `logic` function is simple indeed:
static void logic(void)
{
	doStage();
}
We're just calling doStage. The reason for this is so that we can later on write code to handle pausing the game and a bunch of other things more easily; we won't have lots of nested if-statements, so our code will be a lot more readable and maintainable.
The doStage function is easy enough to understand:
static void doStage(void)
{
	stage.engineEffectTimer -= app.deltaTime;

	doEntities();

	doEffects();

	doStarfield(stage.ssx * 0.75, stage.ssy * 0.75);

	doCamera();

	doBackground(stage.ssx * 0.125 * app.deltaTime, stage.ssy * 0.125 * app.deltaTime);

	if (stage.engineEffectTimer <= 0)
	{
		stage.engineEffectTimer = 1;
	}
}
We're decreasing the value of Stage's engineEffectTimer, so we can know when to add engine effects, and we're processing our entities and effects. We're then calling doStarfield. Notice how we're using the value of Stage's `ssx` and `ssy` multiplied by 0.75. This is just to make the stars move a little slower than the player's own velocity. Calls to handle the camera and background follow. We want our background to move slower than the player and starfield, and so we're moving it at a quarter of `ssx` and `ssy`. Finally, we're resetting engineEffectTimer to 1 if it's fallen to 0 or less.
Now onto draw:
static void draw(void)
{
	drawBackground(background);

	drawStarfield();

	drawEntities();

	drawEffects();
}
We're just calling out to our various functions for drawing all our elements. Nothing special here, other than passing over the background we loaded to drawBackground.
That's all for stage.c. We're almost done..! Before finishing, we'll look at how the background is handled. Moving over to draw.c in system, we'll start with the initDraw function:
void initDraw(void)
{
	backgroundPoint[0].x = -SCREEN_WIDTH / 2;
	backgroundPoint[0].y = -SCREEN_HEIGHT / 2;

	backgroundPoint[1].x = SCREEN_WIDTH / 2;
	backgroundPoint[1].y = -SCREEN_HEIGHT / 2;

	backgroundPoint[2].x = -SCREEN_WIDTH / 2;
	backgroundPoint[2].y = SCREEN_HEIGHT / 2;

	backgroundPoint[3].x = SCREEN_WIDTH / 2;
	backgroundPoint[3].y = SCREEN_HEIGHT / 2;
}
As we've seen before, SDL2 doesn't allow us to directly play with texture offsets, so to make our background scroll we have to render multiple copies at various positions. We've seen this in the previous two shooter games. Here, things need a little more consideration. We're setting up four positions, using a PointF struct (containing x and y doubles), based around the centre of the screen. Each of the four corners is offset by half the screen width and height, so that they join up. Consider the two images below:
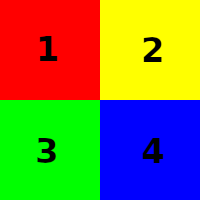
How our background positions will start.
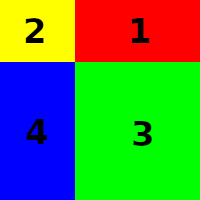
How our background positions may be rearranged, as they scroll.
The doBackground function itself is very straightforward:
void doBackground(double x, double y)
{
	int i;

	for (i = 0; i < 4; i++)
	{
		backgroundPoint[i].x += x;
		backgroundPoint[i].y += y;

		if (backgroundPoint[i].x < 0)
		{
			backgroundPoint[i].x += (SCREEN_WIDTH * 2);
		}

		if (backgroundPoint[i].x >= SCREEN_WIDTH)
		{
			backgroundPoint[i].x -= (SCREEN_WIDTH * 2);
		}

		if (backgroundPoint[i].y < 0)
		{
			backgroundPoint[i].y += (SCREEN_HEIGHT * 2);
		}

		if (backgroundPoint[i].y >= SCREEN_HEIGHT)
		{
			backgroundPoint[i].y -= (SCREEN_HEIGHT * 2);
		}
	}
}
For each of our four background positions, we're adding the `x` and `y` values passed into the function to the position's `x` and `y` values. Next, we're checking if the positions have moved beyond the screen edges and wrapping them around. Crucially, we're adding or subtracting twice the screen height or width, to ensure the rendering will begin from the correct location.
Finally, we come to drawBackground:
void drawBackground(SDL_Texture *texture)
{
	int      i;
	SDL_Rect dstRect;

	for (i = 0; i < 4; i++)
	{
		dstRect.x = backgroundPoint[i].x;
		dstRect.y = backgroundPoint[i].y;
		dstRect.w = SCREEN_WIDTH;
		dstRect.h = SCREEN_HEIGHT;

		SDL_RenderCopy(app.renderer, texture, NULL, &dstRect);
	}
}
Here, we're passing through the background we wish to draw. For each of our background points, we're drawing a rectangle the size of the screen's width and height. There is scope for some optimisation here, as there will be considerable overdraw. The maths is complicated, however, and with so much else to do it's best not to get too caught up with issues such as this. Our game is light on requirements, so we have the bandwidth to allow this for now.
And there we go, part one is complete! As you can see, this part was very high level, mainly due to it repeating and drawing upon things seen in tutorials before. But even with that, we have a rock solid foundation for the rest of our game - we can fly our craft around, scroll our starfield and background, and we already have control settings in place for use later.
In our next part, we'll look at adding in our main guns, so we can shoot.
Purchase
The source code for all parts of this tutorial (including assets) is available for purchase:
From itch.io
It is also available as part of the SDL2 tutorial bundle: