PC Games
• Orb
• Lasagne Monsters
• Three Guys Apocalypse
• Water Closet
• Blob Wars : Attrition
• The Legend of Edgar
• TBFTSS: The Pandoran War
• Three Guys
• Blob Wars : Blob and Conquer
• Blob Wars : Metal Blob Solid
• Project: Starfighter
• TANX Squadron
Tutorials
• 2D shoot 'em up
• 2D top-down shooter
• 2D platform game
• Sprite atlas tutorial
• Working with TTF fonts
• 2D adventure game
• Widget tutorial
• 2D shoot 'em up sequel
• 2D run and gun
• Roguelike
• Medals (Achievements)
• 2D turn-based strategy game
• 2D isometric game
• 2D map editor
• 2D mission-based shoot 'em up
• 2D Santa game
• 2D split screen game
• 2D quest game
• SDL 1 tutorials (outdated)
Latest Updates
The Legend of Edgar 1.38
Thu, 1st January 2026
SDL2 Quest game tutorial
Wed, 7th May 2025
SDL2 Versus game tutorial
Wed, 20th March 2024
Download keys for SDL2 tutorials on itch.io
Sat, 16th March 2024
The Legend of Edgar 1.37
Mon, 1st January 2024
Tags
• battle-for-the-solar-system (10)
• blob-wars (10)
• brexit (1)
• code (6)
• edgar (10)
• games (45)
• lasagne-monsters (1)
• making-of (5)
• match3 (1)
• numberblocksonline (1)
• orb (2)
• site (1)
• tanx (4)
• three-guys (3)
• three-guys-apocalypse (3)
• tutorials (18)
• water-closet (4)
Books

Firmware
HF-Tech's chips have changed the world. Embedded into the heads of over 90% of the world's population, they have cured autism, dementia, provided intelligence boosts, and helped to ease some of the more mundane tasks in life. Daniel Blair, hacker and Workshop member, however is not convinced that everything is as rosy as it seems. But is he looking in all the wrong places..?
— Creating a basic widget system —
Part 7: Control widget
Note: this tutorial assumes knowledge of C, as well as prior tutorials.


Introduction
The final widget we're going to create is one that will allow us to configure controls. Being able to redefine the controls of a game is a very common desire, so we'll create a widget that allow us to set a value based on a key press.
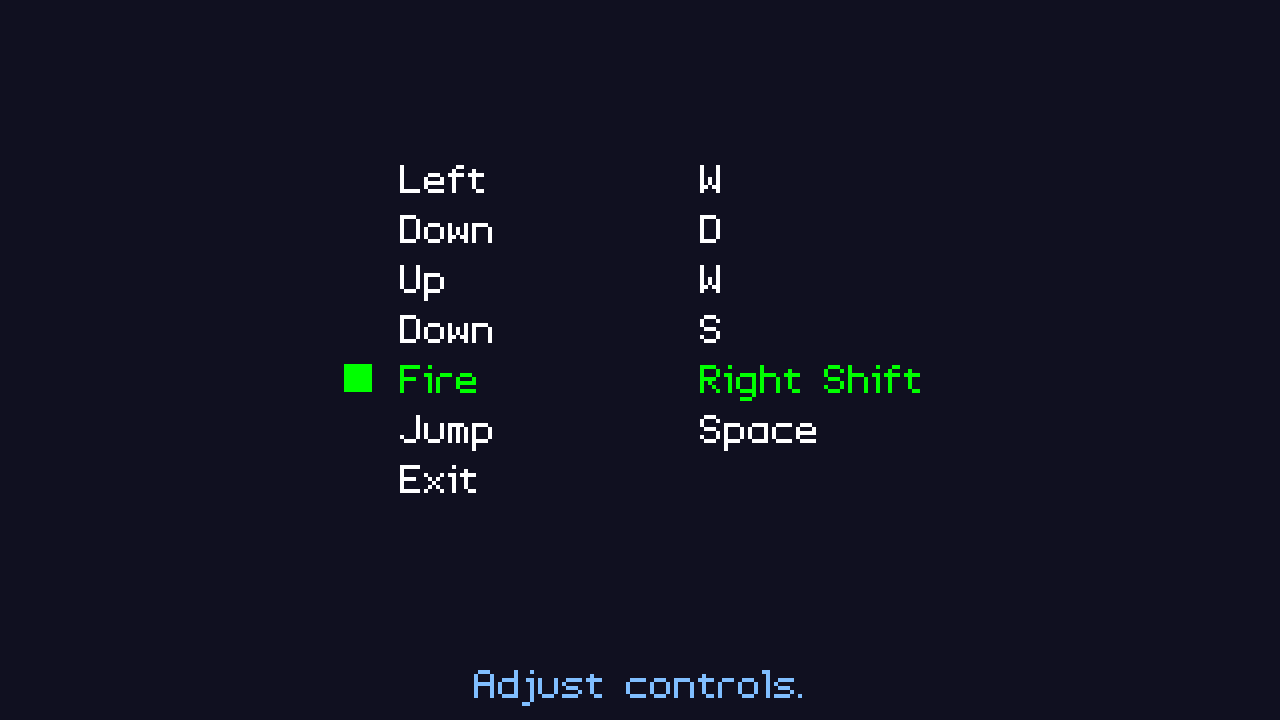
Extract the archive, run cmake CMakeLists.txt, followed by make, and then use ./widgets07 to run the code. You will see a window open like the one above. Use the Up and Down arrows on you keyboard to change the highlighted menu option. Select any of Left, Right, Up, Down, Fire, or Jump, and press Return or Space to edit the value. The value to change to ... (three dots). Press any key to set the new value, or press Escape to cancel. When you're done, either select Exit or close the window.
Inspecting the code
As usual, we're defining our Widget in JSON. For this tutorial, we've made a new JSON file: options.json. Our control widget looks like this:
{
	"type" : "WT_CONTROL",
	"name" : "left",
	"x" : 0,
	"y" : 150,
	"label" : "Left"
}
Again, nothing we've not seen before. It only defines the basics. Once again, we've also added a new enum to defs.h:
enum {
	WT_BUTTON,
	WT_SELECT,
	WT_SLIDER,
	WT_INPUT,
	WT_CONTROL
};
WT_CONTROL will be the type of our control widget. The widget itself is defined in structs.h:
typedef struct {
	int x;
	int y;
	int value;
} ControlWidget;
Again, not a lot to it, just x and y coordinates and a value. One other update we've made to structs.h is adding a new field to App:
typedef struct {
	struct {
		void (*logic)(void);
		void (*draw)(void);
	} delegate;
	SDL_Renderer *renderer;
	SDL_Window *window;
	int keyboard[MAX_KEYBOARD_KEYS];
	double deltaTime;
	Widget *activeWidget;
	char inputText[MAX_INPUT_LENGTH];
	int lastKeyPressed;
	struct {
		int fps;
	} dev;
} App;
We've added a field called lastKeyPressed, that will be used to track the last keyboard key that was pressed. We'll be using this when we come to update our ControlWidget. Now, let's look at widgets.c. As expected, all the major logic changes have gone into this file. Starting with initWidgets:
void initWidgets(void)
{
	memset(&widgetHead, 0, sizeof(Widget));
	widgetTail = &widgetHead;

	loadWidgets("data/widgets/controls.json");

	sliderDelay = 0;

	cursorBlink = 0;

	handleInputWidget = 0;

	handleControlWidget = 0;
}
Alongside handleInputWidget, we've introduced a new variable called handleControlWidget. This will be used in our logic phase to tell the code that we're currently working with an InputWidget and want to disregard everything else.
Our createWidget function has been tweaked handle WT_CONTROL:
static void createWidget(cJSON *root)
{
	Widget *w;
	int type;

	type = getWidgetType(cJSON_GetObjectItem(root, "type")->valuestring);

	if (type != -1)
	{
		w = malloc(sizeof(Widget));
		memset(w, 0, sizeof(Widget));
		widgetTail->next = w;
		w->prev = widgetTail;
		widgetTail = w;

		STRCPY(w->name, cJSON_GetObjectItem(root, "name")->valuestring);
		STRCPY(w->label, cJSON_GetObjectItem(root, "label")->valuestring);
		w->type = getWidgetType(cJSON_GetObjectItem(root, "type")->valuestring);
		w->x = cJSON_GetObjectItem(root, "x")->valueint;
		w->y = cJSON_GetObjectItem(root, "y")->valueint;

		switch (w->type)
		{
			case WT_BUTTON:
				createButtonWidget(w, root);
				break;

			case WT_SELECT:
				createSelectWidget(w, root);
				break;

			case WT_SLIDER:
				createSliderWidget(w, root);
				break;

			case WT_INPUT:
				createInputWidget(w, root);
				break;

			case WT_CONTROL:
				createControlWidget(w, root);
				break;

			default:
				break;
		}
	}
}
For WT_CONTROL types, we'll be calling createControlWidget:
static void createControlWidget(Widget *w, cJSON *root)
{
	ControlWidget *c;

	c = malloc(sizeof(ControlWidget));
	memset(c, 0, sizeof(ControlWidget));
	w->data = c;

	calcTextDimensions(w->label, &w->w, &w->h);
}
An easy function to understand. We're mallocing a ControlWidget and assigning it to the widget's data field. We're also calculating the widget's width and height, according to its label.
Our doWidgets function is next. This function has gotten quite large now; any larger, and it might be worth splitting into subfunction, to make it easier to read. Let's look at what's changed:
void doWidgets(void)
{
	sliderDelay = MAX(sliderDelay - app.deltaTime, 0);

	cursorBlink += app.deltaTime;

	if (!handleInputWidget && !handleControlWidget)
	{
		if (app.keyboard[SDL_SCANCODE_UP])
		{
			app.keyboard[SDL_SCANCODE_UP] = 0;

			app.activeWidget = app.activeWidget->prev;

			if (app.activeWidget == &widgetHead)
			{
				app.activeWidget = widgetTail;
			}
		}

		if (app.keyboard[SDL_SCANCODE_DOWN])
		{
			app.keyboard[SDL_SCANCODE_DOWN] = 0;

			app.activeWidget = app.activeWidget->next;

			if (app.activeWidget == NULL)
			{
				app.activeWidget = widgetHead.next;
			}
		}

		if (app.keyboard[SDL_SCANCODE_LEFT])
		{
			changeWidgetValue(-1);
		}

		if (app.keyboard[SDL_SCANCODE_RIGHT])
		{
			changeWidgetValue(1);
		}

		if (app.keyboard[SDL_SCANCODE_SPACE] || app.keyboard[SDL_SCANCODE_RETURN])
		{
			app.keyboard[SDL_SCANCODE_SPACE] = app.keyboard[SDL_SCANCODE_RETURN] = 0;

			if (app.activeWidget->type == WT_INPUT)
			{
				cursorBlink = 0;

				handleInputWidget = 1;

				memset(app.inputText, 0, sizeof(app.inputText));
			}
			else if (app.activeWidget->type == WT_CONTROL)
			{
				app.lastKeyPressed = -1;

				handleControlWidget = 1;
			}
			else if (app.activeWidget->action != NULL)
			{
				app.activeWidget->action();
			}
		}
	}
	else if (handleInputWidget)
	{
		doInputWidget();
	}
	else if (handleControlWidget)
	{
		doControlWidget();
	}
}
To start with, we're now testing that both handleInputWidget and handleControlWidget are 0. Should they be (meaning we're not processing a text input widget or a control widget), we'll process the logic for our standard widgets. The change we're most interested in is if we press Space or Return when the activeWidget is WT_CONTROL. We're setting app.lastKeyPressed to -1 and handleControlWidget to 1. Setting handleControlWidget to 1 will mean that doWidgets will now call out to doControlWidget (according to the if-else control flow).
doControlWidget is where we'll be processing the user input for setting a new control:
static void doControlWidget(void)
{
	if (app.lastKeyPressed != -1)
	{
		if (app.lastKeyPressed != SDL_SCANCODE_ESCAPE)
		{
			((ControlWidget*) app.activeWidget->data)->value = app.lastKeyPressed;

			if (app.activeWidget->action != NULL)
			{
				app.activeWidget->action();
			}
		}

		handleControlWidget = 0;

		app.keyboard[app.lastKeyPressed] = 0;
	}
}
The first thing we'll do is test the value of app.lastKeyPressed. We'll do nothing if it's -1 (which is the value it is set to when we press Return or Space on the widget in doWidgets). If it's not -1, we'll further test that we've not pressed Escape. If not, we'll extract the ControlWidget from the widget's data field, and set its value to that of app.lastKeyPressed. With the contrl now updated, we'll call the widget's action function pointer, if one is set. Whether Escape was pressed or not, we'll then set handleControlWidget to 0, to restore normal widget logic flow, and then clear the key that was pressed (app.keyboard). This step is important to ensure our doWidgets flow doesn't immediately process the key, in case it was one of our control keys (arrow keys, Return, Space, etc).
And that's all we need to do to accept key configuration for the widget. Rendering the ControlWidget is just as simple. First, we update drawWidgets:
void drawWidgets(void)
{
	Widget *w;
	int h;

	for (w = widgetHead.next ; w != NULL ; w = w->next)
	{
		switch (w->type)
		{
			case WT_BUTTON:
				drawButtonWidget(w);
				break;

			case WT_SELECT:
				drawSelectWidget(w);
				break;

			case WT_SLIDER:
				drawSliderWidget(w);
				break;

			case WT_INPUT:
				drawInputWidget(w);
				break;

			case WT_CONTROL:
				drawControlWidget(w);
				break;

			default:
				break;
		}

		if (w == app.activeWidget)
		{
			h = w->h / 2;

			drawRect(w->x - (h * 2), w->y + (h / 2), h, h, 0, 255, 0, 255);
		}
	}
}
We've added in a call to drawControlWidget for WT_CONTROL type widgets. drawControlWidget is quite similar to other widget rendering functions:
static void drawControlWidget(Widget *w)
{
	SDL_Color c;
	ControlWidget *cw;
	char text[32];

	cw = (ControlWidget*) w->data;

	if (w == app.activeWidget)
	{
		c.g = 255;
		c.r = c.b = 0;
	}
	else
	{
		c.r = c.g = c.b = 255;
	}

	drawText(w->label, w->x, w->y, c.r, c.g, c.b, TEXT_ALIGN_LEFT, 0);

	if (handleControlWidget && app.activeWidget == w)
	{
		drawText("...", cw->x, cw->y, c.r, c.g, c.b, TEXT_ALIGN_LEFT, 0);
	}
	else
	{
		sprintf(text, "%s", SDL_GetScancodeName(cw->value));

		drawText(text, cw->x, cw->y, c.r, c.g, c.b, TEXT_ALIGN_LEFT, 0);
	}
}
We're rendering widget in green or white, depending on whether it's the active widget. Next, we're rendering the label. After this, we're testing whether handleControlWidget is set and if our widget is the active one. If so, this means we're currently editing the widget's value. We'll reflect this by drawing ... (three dots) in place of its value, as a visual prompt to the user to press a key. If we're not editing the ControlWidget, we'll want to render the key it is set to. For this, we're going to call SDL_GetScancodeName, passing in the value of the ControlWidget. SDL_GetScancodeName will return the name of the key, according to its scan code. Since our ControlWidget's value is set using the scan code, we'll see the name of the key displayed. Easy!
The usage of our ControlWidgets is once again done in demo.c, setting up in initDemo:
void initDemo(void)
{
	Widget *w;
	ControlWidget *c;

	w = getWidget("left");
	w->x = 400;
	c = (ControlWidget*) w->data;
	c->x = 700;
	c->y = w->y;
	c->value = SDL_SCANCODE_W;

	app.activeWidget = w;

	w = getWidget("right");
	w->x = 400;
	c = (ControlWidget*) w->data;
	c->x = 700;
	c->y = w->y;
	c->value = SDL_SCANCODE_D;

	w = getWidget("up");
	w->x = 400;
	c = (ControlWidget*) w->data;
	c->x = 700;
	c->y = w->y;
	c->value = SDL_SCANCODE_W;

	w = getWidget("down");
	w->x = 400;
	c = (ControlWidget*) w->data;
	c->x = 700;
	c->y = w->y;
	c->value = SDL_SCANCODE_S;

	w = getWidget("fire");
	w->x = 400;
	c = (ControlWidget*) w->data;
	c->x = 700;
	c->y = w->y;
	c->value = SDL_SCANCODE_J;

	w = getWidget("jump");
	w->x = 400;
	c = (ControlWidget*) w->data;
	c->x = 700;
	c->y = w->y;
	c->value = SDL_SCANCODE_I;

	w = getWidget("exit");
	w->x = 400;
	w->action = quit;

	STRCPY(message, "Adjust controls.");

	app.delegate.logic = &logic;
	app.delegate.draw = &draw;
}
We're grabbing each of our ControlWidgets (left, right, up, down, fire, jump), and setting their coordinates and default keys. We're not setting any actions this time, but one such action could be to prevent the same key from being set to different widgets. As this is just a demo and we're not really making use of the controls, we're not too bothered by that.
That's almost we need to do for our ControlWidgets. One final thing to look at is another update to input.c:
void doKeyDown(SDL_KeyboardEvent *event)
{
	if (event->repeat == 0 && event->keysym.scancode < MAX_KEYBOARD_KEYS)
	{
		app.keyboard[event->keysym.scancode] = 1;

		app.lastKeyPressed = event->keysym.scancode;
	}
}
We've updated the doKeyDown function to grab the lastKeyPressed variable. When a key is pressed down, we're grabbing the event's keysym.scancode and assigning it to lastKeyPressed. This, as we've already seen, is used in widgets.c for checking which key was pressed.
And that's all our widgets defined! In the next part, we'll look at how to implement our widgets into a short demo game, by bringing up an in-game menu, and changing some options.
Purchase
The source code for all parts of this tutorial (including assets) is available for purchase:
From itch.io
It is also available as part of the SDL2 tutorial bundle: