PC Games
• Orb
• Lasagne Monsters
• Three Guys Apocalypse
• Water Closet
• Blob Wars : Attrition
• The Legend of Edgar
• TBFTSS: The Pandoran War
• Three Guys
• Blob Wars : Blob and Conquer
• Blob Wars : Metal Blob Solid
• Project: Starfighter
• TANX Squadron
Tutorials
• 2D shoot 'em up
• 2D top-down shooter
• 2D platform game
• Sprite atlas tutorial
• Working with TTF fonts
• 2D adventure game
• Widget tutorial
• 2D shoot 'em up sequel
• 2D run and gun
• Roguelike
• Medals (Achievements)
• 2D turn-based strategy game
• 2D isometric game
• 2D map editor
• 2D mission-based shoot 'em up
• 2D Santa game
• 2D split screen game
• 2D quest game
• SDL 1 tutorials (outdated)
Latest Updates
The Legend of Edgar 1.38
Thu, 1st January 2026
SDL2 Quest game tutorial
Wed, 7th May 2025
SDL2 Versus game tutorial
Wed, 20th March 2024
Download keys for SDL2 tutorials on itch.io
Sat, 16th March 2024
The Legend of Edgar 1.37
Mon, 1st January 2024
Tags
• battle-for-the-solar-system (10)
• blob-wars (10)
• brexit (1)
• code (6)
• edgar (10)
• games (45)
• lasagne-monsters (1)
• making-of (5)
• match3 (1)
• numberblocksonline (1)
• orb (2)
• site (1)
• tanx (4)
• three-guys (3)
• three-guys-apocalypse (3)
• tutorials (18)
• water-closet (4)
Books

Firmware
HF-Tech's chips have changed the world. Embedded into the heads of over 90% of the world's population, they have cured autism, dementia, provided intelligence boosts, and helped to ease some of the more mundane tasks in life. Daniel Blair, hacker and Workshop member, however is not convinced that everything is as rosy as it seems. But is he looking in all the wrong places..?
— Creating a basic widget system —
Part 4: Select widget
Note: this tutorial assumes knowledge of C, as well as prior tutorials.


Introduction
So far, we've been able to create simple button widgets, that perform an action when invoked. Another common widget seen in games is one where the user is able to cycle through a number of options, such as changing the game difficulty, the language, the colour of their player character, etc. In this part of the tutorial, we'll look at how we can create an option widget.
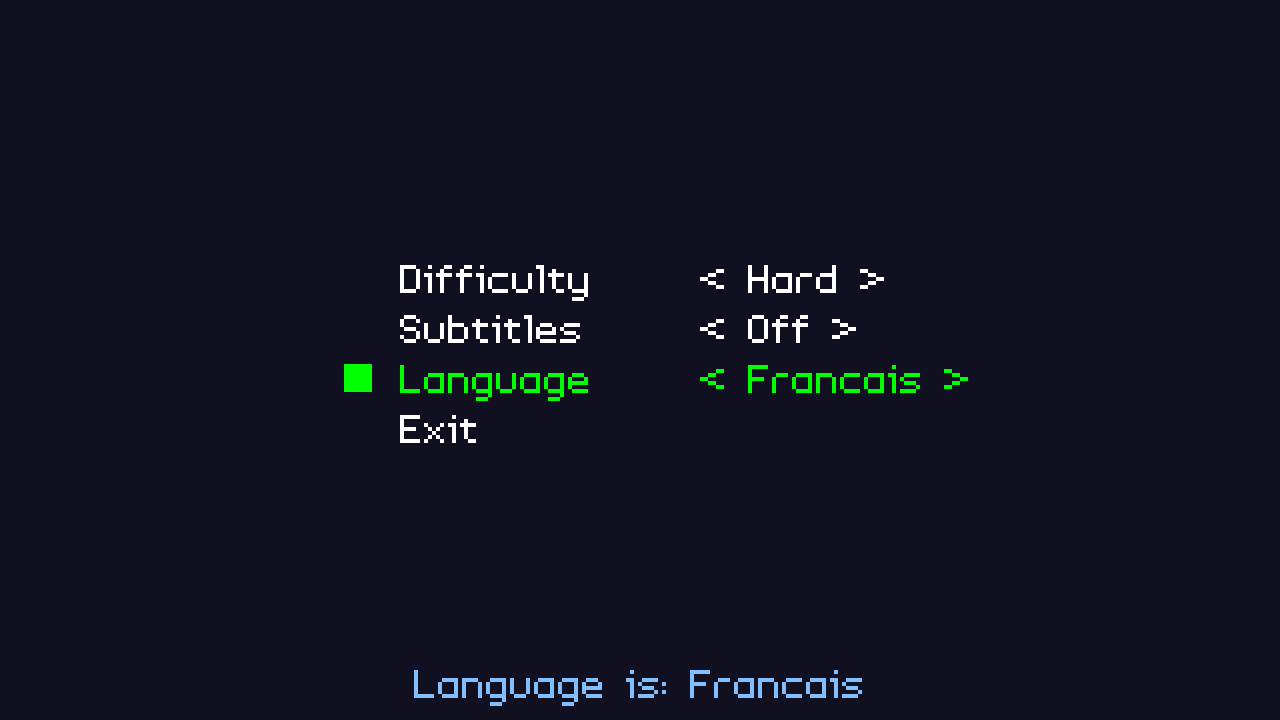
Extract the archive, run cmake CMakeLists.txt, followed by make, and then use ./widgets04 to run the code. You will see a window open like the one above. Use the Up and Down arrows on you keyboard to change the highlighted menu option. Press Left and Right to cycle through the options on the Select widgets (difficulty, language, subtitles). When you're done, either select Exit or close the window.
Inspecting the code
Our select widget is defines in JSON, and looks a little different to our regular widget. It now features an "options" array:
{
	"type" : "WT_SELECT",
	"name" : "difficulty",
	"x" : 0,
	"y" : 250,
	"label" : "Difficulty",
	"options" : [
		"Very easy",
		"Easy",
		"Normal",
		"Hard",
		"Very hard"
	]
}
We'll see how this all works when we come to creating the widget. For now, let's look at structs.h, and see what changes have been made there. Starting with our Widget struct:
struct Widget {
	int type;
	char name[MAX_NAME_LENGTH];
	int x;
	int y;
	int w;
	int h;
	char label[MAX_NAME_LENGTH];
	Widget *prev;
	Widget *next;
	void (*action)(void);
	void (*data);
};
We've added a data pointer, which we're going to use to extend our Widget with additional data. Our select widget (and other widgets to come) will feature data that is only used by them, and rather than clutter up the base widget, we're going to optionally extend it. This technique was used in the SDL2 Adventure tutorial, for all the entities.
Our SelectWidget is defined below:
typedef struct {
	int numOptions;
	char **options;
	int x;
	int y;
	int value;
} SelectWidget;
The SelectWidget will hold the count of the number of options available; a char array pointer, of the actual options themselves; x and y values, to say where the options should be drawn; and a value variable, to hold the index of the currently selected option.
Since our SelectWidget is a new type, we've also updated defs.h and added its type to our enum:
enum {
	WT_BUTTON,
	WT_SELECT
};
Our SelectWidget will have a type of WT_SELECT. Now, let's move onto actually loading and configuring the widget. We've made a lot of changes to widgets.c to support this new widget, so we'll go from the start. Our initWidgets function has a minor change:
void initWidgets(void)
{
	memset(&widgetHead, 0, sizeof(Widget));
	widgetTail = &widgetHead;

	loadWidgets("data/widgets/options.json");
}
We're going to load a different widget file from before, as we've defined all our select widgets in options.json. Our createWidget function has also been updated to handle the new type:
static void createWidget(cJSON *root)
{
	Widget *w;
	int type;

	type = getWidgetType(cJSON_GetObjectItem(root, "type")->valuestring);

	if (type != -1)
	{
		w = malloc(sizeof(Widget));
		memset(w, 0, sizeof(Widget));
		widgetTail->next = w;
		w->prev = widgetTail;
		widgetTail = w;

		STRCPY(w->name, cJSON_GetObjectItem(root, "name")->valuestring);
		STRCPY(w->label, cJSON_GetObjectItem(root, "label")->valuestring);
		w->type = getWidgetType(cJSON_GetObjectItem(root, "type")->valuestring);
		w->x = cJSON_GetObjectItem(root, "x")->valueint;
		w->y = cJSON_GetObjectItem(root, "y")->valueint;

		switch (w->type)
		{
			case WT_BUTTON:
				createButtonWidget(w, root);
				break;

			case WT_SELECT:
				createSelectWidget(w, root);
				break;

			default:
				break;
		}
	}
}
When we encounter a WT_SELECT widget type, we'll call createSelectWidget, to build our widget. createSelectWidget is quite a bit more involved than when we create a simple button, as you'll see:
static void createSelectWidget(Widget *w, cJSON *root)
{
	cJSON *options, *node;
	int i, len;
	SelectWidget *s;

	s = malloc(sizeof(SelectWidget));
	memset(s, 0, sizeof(SelectWidget));
	w->data = s;

	options = cJSON_GetObjectItem(root, "options");

	s->numOptions = cJSON_GetArraySize(options);

	if (s->numOptions > 0)
	{
		i = 0;

		s->options = malloc(sizeof(char*) * s->numOptions);

		for (node = options->child ; node != NULL ; node = node->next)
		{
			len = strlen(node->valuestring) + 1;

			s->options[i] = malloc(len);

			STRNCPY(s->options[i], node->valuestring, len);

			i++;
		}
	}

	calcTextDimensions(w->label, &w->w, &w->h);

	s->x = w->x + 50;
	s->y = w->y;
}
The first thing the function does to malloc and memset a SelectWidget struct, and assign it to the Widget's data pointer. After that, it extracts the options JSON array from the JSON object. We'll call cJSON_GetArraySize on the options array to find out its size, and assign the value to our SelectWidget's numOptions. If the array isn't empty (it has at least 1 element), we'll want to grab all the options and add them into our SelectWidget's options array. We do this by mallocing an array of char* the same size as the number of options available. With that done, we'll then loop through the options defined in our JSON array. For each one, we'll allocate some memory the same length as the text string (adding one, to allow for the null terminator) and copy that into the SelectWidget's current option index. We're making use of a macro called STRNCPY, which will limit the number of characters copied and also add the null terminator (a very useful macro).
With that done, we'll assign calculate the size of the widget, according to its label. We'll finally also default the x and y of the select options to lie 50 pixels to the right-hand side of the widget label.
Before moving onto how the logic and rendering are done for the Select widget, here's a quick look at getWidgetType, that was also updated:
static int getWidgetType(char *type)
{
	if (strcmp(type, "WT_BUTTON") == 0)
	{
		return WT_BUTTON;
	}
	else if (strcmp(type, "WT_SELECT") == 0)
	{
		return WT_SELECT;
	}

	SDL_LogMessage(SDL_LOG_CATEGORY_APPLICATION, SDL_LOG_PRIORITY_WARN, "Unknown widget type: '%s'", type);

	return -1;
}
Nothing that wasn't expected, but I've included it for completeness. Now we can look at how our logic has changed, now that we've introduced SelectWidgets. Starting with doWidgets:
void doWidgets(void)
{
	if (app.keyboard[SDL_SCANCODE_UP])
	{
		app.keyboard[SDL_SCANCODE_UP] = 0;

		app.activeWidget = app.activeWidget->prev;

		if (app.activeWidget == &widgetHead)
		{
			app.activeWidget = widgetTail;
		}
	}

	if (app.keyboard[SDL_SCANCODE_DOWN])
	{
		app.keyboard[SDL_SCANCODE_DOWN] = 0;

		app.activeWidget = app.activeWidget->next;

		if (app.activeWidget == NULL)
		{
			app.activeWidget = widgetHead.next;
		}
	}

	if (app.keyboard[SDL_SCANCODE_LEFT])
	{
		app.keyboard[SDL_SCANCODE_LEFT] = 0;

		changeWidgetValue(-1);
	}

	if (app.keyboard[SDL_SCANCODE_RIGHT])
	{
		app.keyboard[SDL_SCANCODE_RIGHT] = 0;

		changeWidgetValue(1);
	}

	if (app.keyboard[SDL_SCANCODE_SPACE] || app.keyboard[SDL_SCANCODE_RETURN])
	{
		if (app.activeWidget->action != NULL)
		{
			app.activeWidget->action();
		}
	}
}
The main thing to note here is that we're now testing if Left and Right have been pressed on the keyboard. If so, we'll be calling a new function called changeWidgetValue, passing over -1 or 1 depending on the key pressed. changeWidgetValue is a fairly simple function, as we'll see:
static void changeWidgetValue(int dir)
{
	SelectWidget *s;

	switch (app.activeWidget->type)
	{
		case WT_SELECT:
			s = (SelectWidget*) app.activeWidget->data;

			s->value += dir;

			if (s->value < 0)
			{
				s->value = s->numOptions - 1;
			}

			if (s->value >= s->numOptions)
			{
				s->value = 0;
			}

			if (app.activeWidget->action != NULL)
			{
				app.activeWidget->action();
			}

			break;

		default:
			break;
	}
}
We test the widget, to see what type it is. If it's a WT_SELECT widget, we'll change the SelectWidget's value variable by dir. So, if dir is -1, we'll decrease. If it's 1, we'll increase. We next test to see if value is less than 0. If so, we'll wrap around to numOptions - 1 (returning to the top of the list). If it's more than or equal to numOptions, we'll return to 0 (start of the list). In effect, pushing left and right, will move backwards and forwards through our list of options, wrapping around when it come to the start or end of the list. Finally, we'll test if the widget has an action assigned. If so, we'll invoke it.
That's the logic handled. Now, we can look at how we're drawing our SelectWidgets. First, we'll update drawWidgets to handle the type:
void drawWidgets(void)
{
	Widget *w;
	int h;

	for (w = widgetHead.next ; w != NULL ; w = w->next)
	{
		switch (w->type)
		{
			case WT_BUTTON:
				drawButtonWidget(w);
				break;

			case WT_SELECT:
				drawSelectWidget(w);
				break;

			default:
				break;
		}

		if (w == app.activeWidget)
		{
			h = w->h / 2;

			drawRect(w->x - (h * 2), w->y + (h / 2), h, h, 0, 255, 0, 255);
		}
	}
}
If our widget is a WT_SELECT type, we'll be calling drawSelectWidget, a new function we've defined to handle the rendering of SelectWidgets:
static void drawSelectWidget(Widget *w)
{
	SDL_Color c;
	char text[128];
	SelectWidget *s;

	s = (SelectWidget*) w->data;

	if (w == app.activeWidget)
	{
		c.g = 255;
		c.r = c.b = 0;
	}
	else
	{
		c.r = c.g = c.b = 255;
	}

	drawText(w->label, w->x, w->y, c.r, c.g, c.b, TEXT_ALIGN_LEFT, 0);

	sprintf(text, "< %s >", s->options[s->value]);

	drawText(text, s->x, s->y, c.r, c.g, c.b, TEXT_ALIGN_LEFT, 0);
}
drawSelectWidget isn't too different from drawButtonWidget. We're testing to see if the widget is the currently active widget, in order to choose the colour that it should be drawn (green if active, otherwise white). Next, we'll draw the widget's label. After that, we'll draw the SelectWidget's currently selected option. We'll do so with a formatted string, adding > and < chevons to the left and right of the text, to give an indication that they can be cycled through. Somewhat crude, yes. It might be more visually appealing to use an image of an arrow, which we'll likely do in future. Right now, this will do the job. With the chevrons applied, we draw the text, according to the x and y positions of the SelectWidget. As you can see, giving the SelectWidget its own x and y values allows use to render the options wherever we want. We could draw them beneath the label, for example.
That's our widget logic and rendering done, so we can now look at how we're setting up the widgets, in demo.c. Since we're using some different widgets, we've updated initDemo:
void initDemo(void)
{
	Widget *w;

	w = getWidget("difficulty");
	w->action = difficulty;
	w->x = 400;
	((SelectWidget*) w->data)->x = 700;

	app.activeWidget = w;

	w = getWidget("subtitles");
	w->action = subtitles;
	w->x = 400;
	((SelectWidget*) w->data)->x = 700;

	w = getWidget("language");
	w->action = language;
	w->x = 400;
	((SelectWidget*) w->data)->x = 700;

	w = getWidget("exit");
	w->x = 400;
	w->action = quit;

	STRCPY(message, "Adjust options.");

	app.delegate.logic = &logic;
	app.delegate.draw = &draw;
}
As we've seen in our previous tutorials, we're looking up the widgets by name, before assigning their actions and positions. In the case of our SelectWidget, we're extracting the SelectWidget from the widget's data variable and updating its x value, so that the options lie to the right of the widgets' labels. The actions for each of the widgets are, again, quite simple in their nature. Starting with difficulty:
static void difficulty(void)
{
	char *value;
	SelectWidget *s;

	s = (SelectWidget*) app.activeWidget->data;

	value = s->options[s->value];

	sprintf(message, "Difficulty set to: %s", value);
}
The function just grabs the text of the SelectWidget's current option and uses it in a formatted string, to show what the difficulty has been set to. We do a similar thing with the subtitles:
static void subtitles(void)
{
	char *value;
	SelectWidget *s;

	s = (SelectWidget*) app.activeWidget->data;

	value = s->options[s->value];

	sprintf(message, "Subtitles are: %s", value);
}
And again with language:
static void language(void)
{
	char *value;
	SelectWidget *s;

	s = (SelectWidget*) app.activeWidget->data;

	value = s->options[s->value];

	sprintf(message, "Language is: %s", value);
}
That's our select widget done! We now have the ability to offer buttons and cycle through a series of options. What we'll look at next is how to create a widget that allows for smooth value change, such as for use with volume levels of sound and music.
Purchase
The source code for all parts of this tutorial (including assets) is available for purchase:
From itch.io
It is also available as part of the SDL2 tutorial bundle: