PC Games
• Orb
• Lasagne Monsters
• Three Guys Apocalypse
• Water Closet
• Blob Wars : Attrition
• The Legend of Edgar
• TBFTSS: The Pandoran War
• Three Guys
• Blob Wars : Blob and Conquer
• Blob Wars : Metal Blob Solid
• Project: Starfighter
• TANX Squadron
Tutorials
• 2D shoot 'em up
• 2D top-down shooter
• 2D platform game
• Sprite atlas tutorial
• Working with TTF fonts
• 2D adventure game
• Widget tutorial
• 2D shoot 'em up sequel
• 2D run and gun
• Roguelike
• Medals (Achievements)
• 2D turn-based strategy game
• 2D isometric game
• 2D map editor
• 2D mission-based shoot 'em up
• 2D Santa game
• 2D split screen game
• 2D quest game
• SDL 1 tutorials (outdated)
Latest Updates
The Legend of Edgar 1.38
Thu, 1st January 2026
SDL2 Quest game tutorial
Wed, 7th May 2025
SDL2 Versus game tutorial
Wed, 20th March 2024
Download keys for SDL2 tutorials on itch.io
Sat, 16th March 2024
The Legend of Edgar 1.37
Mon, 1st January 2024
Tags
• battle-for-the-solar-system (10)
• blob-wars (10)
• brexit (1)
• code (6)
• edgar (10)
• games (45)
• lasagne-monsters (1)
• making-of (5)
• match3 (1)
• numberblocksonline (1)
• orb (2)
• site (1)
• tanx (4)
• three-guys (3)
• three-guys-apocalypse (3)
• tutorials (18)
• water-closet (4)
Books

Project Starfighter
In his fight back against the ruthless Wade-Ellen Asset Protection Corporation, pilot Chris Bainfield finds himself teaming up with the most unlikely of allies - a sentient starfighter known as Athena.
— Creating a basic widget system —
Part 1: Basic non-functional menu
Note: this tutorial assumes knowledge of C, as well as prior tutorials.


Introduction
Start up any modern game today and the first thing you'll be met with is a title screen with a menu system, offering the chance to start a new game, load a saved game, continue, visit the options page, etc. Up until now, none of the tutorials have featured any such menu system; they just prompt the player to press Space to start, and there's no way to adjust the options or anything else. In this tutorial series, we'll see how we can create a simple, yet functional, menu system using some widgets.
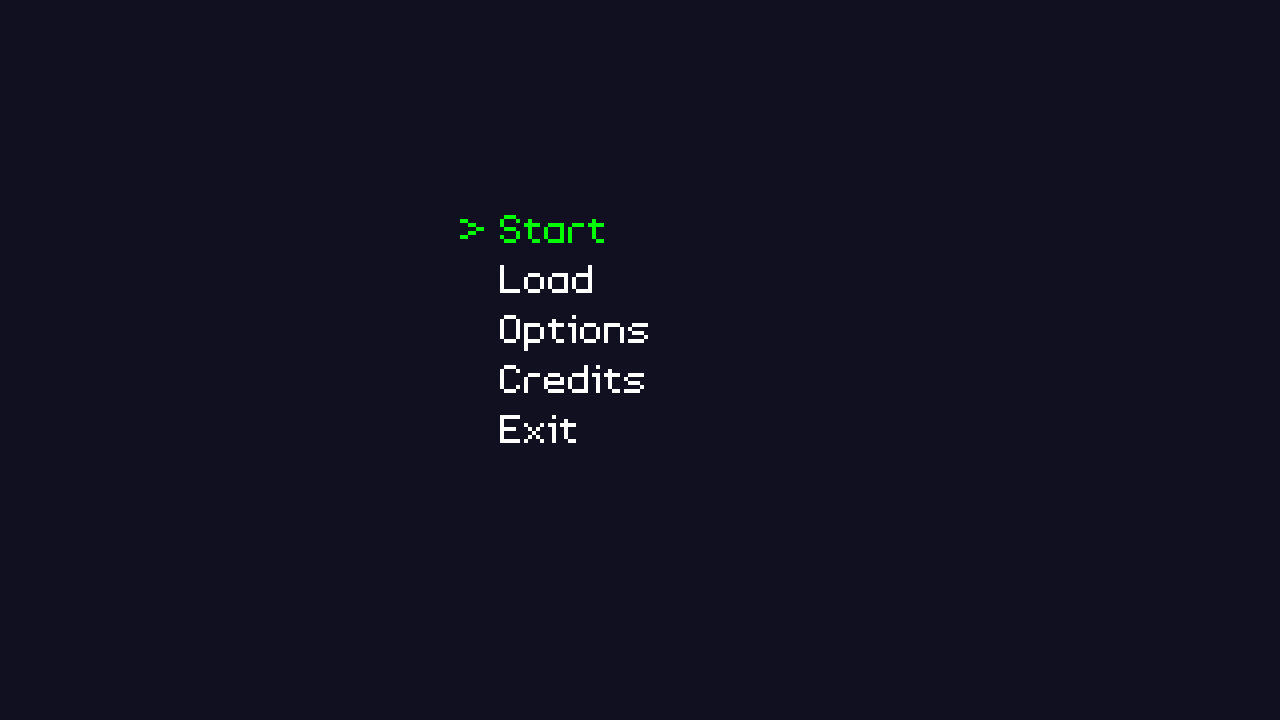
Extract the archive, run cmake CMakeLists.txt, followed by make, and then use ./widgets01 to run the code. You will see a window open like the one above. Use the Up and Down arrows on you keyboard to change the highlighted menu option. There's no much else to do at this point, so once you're done close the window to exit.
Inspecting the code
Starting out, let's look at structs.h, where our Widget struct is defined:
struct Widget {
	char name[MAX_NAME_LENGTH];
	int x;
	int y;
	char label[MAX_NAME_LENGTH];
	Widget *prev;
	Widget *next;
};
All our widgets will have a name, which will be used to uniquely identify them. They also have x and y coordinates, for drawing, and a label, which will be the text display. Something of note is that our widgets are double-linked lists, so they have pointers to the previous widget, as well as the next in the chain. This is to allow us to move back and forth through the list more easily. We'll see more on this when we come to handling the widget logic.
Also of note is the addition we've made to the App structure (this is a common structure in these tutorials). We've added in a pointer called activeWidget:
typedef struct {
	struct {
		void (*logic)(void);
		void (*draw)(void);
	} delegate;
	SDL_Renderer *renderer;
	SDL_Window *window;
	int keyboard[MAX_KEYBOARD_KEYS];
	double deltaTime;
	Widget *activeWidget;
	struct {
		int fps;
	} dev;
} App;
This will be used to point at our currently selected widget. We're doing this so that we can change it from anywhere in the application, as needed.
Our main widget code lives in widgets.c. We've got four function here, which handle everything to do with our widgets. We'll start with initWidgets:
void initWidgets(void)
{
	memset(&widgetHead, 0, sizeof(Widget));
	widgetTail = &widgetHead;
}
widgetHead and widgetTail are static variables within the file. Here, we're just setting up the linked list of widgets, by memsetting widgetHead, and assigning the widgetTail to widgetHead. Nothing complex. Next, let's look at createWidget:
Widget *createWidget(char *name)
{
	Widget *w;

	w = malloc(sizeof(Widget));
	memset(w, 0, sizeof(Widget));
	widgetTail->next = w;
	w->prev = widgetTail;
	widgetTail = w;

	STRCPY(w->name, name);

	return w;
}
createWidget is a factory function, for creating our widgets. It takes care of a lot of the boiler plate for us. In this function, we're mallocing a Widget, memsetting it to zero all the data, then setting up the linked list info. First, we want the widgetTail's next to point at our newly created widget. Then, we need the newly created widget's prev to point at widgetTail. Finally, we set the widgetTail to be w. Basically, we're creating a new widget, appending it to the existing list, and telling our new widget's ancestor was the original tail. With that done, we use our STRCPY macro to set the name of the widget. Finally, we return the created widget.
All good so far. The next function to consider is doWidgets. This is where we'll handle all our widget processing:
void doWidgets(void)
{
	if (app.keyboard[SDL_SCANCODE_UP])
	{
		app.keyboard[SDL_SCANCODE_UP] = 0;

		app.activeWidget = app.activeWidget->prev;

		if (app.activeWidget == &widgetHead)
		{
			app.activeWidget = widgetTail;
		}
	}

	if (app.keyboard[SDL_SCANCODE_DOWN])
	{
		app.keyboard[SDL_SCANCODE_DOWN] = 0;

		app.activeWidget = app.activeWidget->next;

		if (app.activeWidget == NULL)
		{
			app.activeWidget = widgetHead.next;
		}
	}
}
Not a lot going on in this function right now. We're testing to see if Up has been pushed on the keyboard. If so, we're zeroing the Up key (to force it to be pressed again), and then setting app.activeWidget to the active widget's prev. In other words, when we press the Up key, we're going to move backwards through our linked list. We then test to see if the active widget has been set to widgetHead. If so, we've reached the top of the list, and so set activeWidget to the widgetTail. This causes the active widget to wrap around to the end of the list when we reach the top.
We're also testing the Down key, zeroing that, and moving the active widget onto the next in the list. If our active widget is NULL, we know we've reached the end of the list, and so set the widget to the top of the list (widgetHead's next).
This simple bit of logic allows us to walk our widget list forward and backwards by simply pressing Up and Down on the keyboard, wrapping around to the top or bottom of the list, as needed. The last function to look at in this file is drawWidgets:
void drawWidgets(void)
{
	Widget *w;
	SDL_Color c;

	for (w = widgetHead.next ; w != NULL ; w = w->next)
	{
		if (w == app.activeWidget)
		{
			c.g = 255;
			c.r = c.b = 0;

			drawText(">", w->x - 40, w->y, c.r, c.g, c.b, TEXT_ALIGN_LEFT, 0);
		}
		else
		{
			c.r = c.g = c.b = 255;
		}

		drawText(w->label, w->x, w->y, c.r, c.g, c.b, TEXT_ALIGN_LEFT, 0);
	}
}
Again, a simple function. We're looping through all the widgets in our linked list, and caling drawText for each, using the widget's label, and x and y coordinates. Something we're also doing is testing whether the widget we're drawing is the active widget. Depending on this, we want to change the colour of the text. If the widget is the active one, we'll set our SDL_Color variable (c) to be green, and also draw a right chevron symbol on the left-hand side, to add further visual clarity. Otherwise, we'll draw it in white.
That's it for widgets.c. For this tutorial, we'll be making use of a file called demo.c to handle all our main logic and drawing. Starting with initDemo:
void initDemo(void)
{
	Widget *w;
	int x;

	x = 500;

	w = createWidget("start");
	w->x = x;
	w->y = 200;
	STRCPY(w->label, "Start");

	app.activeWidget = w;

	w = createWidget("load");
	w->x = x;
	w->y = 250;
	STRCPY(w->label, "Load");

	w = createWidget("options");
	w->x = x;
	w->y = 300;
	STRCPY(w->label, "Options");

	w = createWidget("credits");
	w->x = x;
	w->y = 350;
	STRCPY(w->label, "Credits");

	w = createWidget("exit");
	w->x = x;
	w->y = 400;
	STRCPY(w->label, "Exit");

	app.delegate.logic = &logic;
	app.delegate.draw = &draw;
}
Here, we're calling our createWidget function several times, to create 5 widgets: start, load, options, credits, and exit. For each one, we're setting the label, x, and y variables. Notice also that we're assigning app.activeWidget as the first widget we create: start. This will mean that our start widget is the one selected when our logic phase begins. Without this, nothing would be highlighted when drawing widgets (and it would also crash as soon as we push up, since we're next expecting the activeWidget to ever be NULL).
We're also assigning the app delegates to demo.c's logic and draw. These two functions are extremely basic, as we'll see, starting with logic:
static void logic(void)
{
	doWidgets();
}
logic does nothing but call doWidgets. Likewise, draw does nothing but call drawWidgets:
static void draw(void)
{
	drawWidgets();
}
We've nothing else going on in demo.c right now, as all the widget processing is handled in widgets.c.
We're almost done with this short introduction, so let's quickly look at where the main setup happens. We're calling initWidgets in initGameSystem, in init.c:
void initGameSystem(void)
{
	initFonts();

	initWidgets();
}
We also need to call initFonts (done in text.c), so that we can draw our text. Finally, our call to initDemo happens in main (in main.c):
int main(int argc, char *argv[])
{
	long then;

	memset(&app, 0, sizeof(App));

	initSDL();

	initGameSystem();

	initDemo();

	atexit(cleanup);

	nextFPS = SDL_GetTicks() + 1000;

	while (1)
	{
		then = SDL_GetTicks();

		prepareScene();

		doInput();

		logic();

		app.delegate.draw();

		presentScene();

		/* allow the CPU/GPU to breathe */
		SDL_Delay(1);

		app.deltaTime = LOGIC_RATE * (SDL_GetTicks() - then);

		doFPS();
	}

	return 0;
}
We're done with this very basic start to our widget system. Not a lot happens right now, but in the next tutorial, we'll look into allowing the widgets to invoke actions when they are selected.
Purchase
The source code for all parts of this tutorial (including assets) is available for purchase:
From itch.io
It is also available as part of the SDL2 tutorial bundle: