PC Games
• Orb
• Lasagne Monsters
• Three Guys Apocalypse
• Water Closet
• Blob Wars : Attrition
• The Legend of Edgar
• TBFTSS: The Pandoran War
• Three Guys
• Blob Wars : Blob and Conquer
• Blob Wars : Metal Blob Solid
• Project: Starfighter
• TANX Squadron
Tutorials
• 2D shoot 'em up
• 2D top-down shooter
• 2D platform game
• Sprite atlas tutorial
• Working with TTF fonts
• 2D adventure game
• Widget tutorial
• 2D shoot 'em up sequel
• 2D run and gun
• Roguelike
• Medals (Achievements)
• 2D turn-based strategy game
• 2D isometric game
• 2D map editor
• 2D mission-based shoot 'em up
• 2D Santa game
• 2D split screen game
• 2D quest game
• SDL 1 tutorials (outdated)
Latest Updates
The Legend of Edgar 1.38
Thu, 1st January 2026
SDL2 Quest game tutorial
Wed, 7th May 2025
SDL2 Versus game tutorial
Wed, 20th March 2024
Download keys for SDL2 tutorials on itch.io
Sat, 16th March 2024
The Legend of Edgar 1.37
Mon, 1st January 2024
Tags
• battle-for-the-solar-system (10)
• blob-wars (10)
• brexit (1)
• code (6)
• edgar (10)
• games (45)
• lasagne-monsters (1)
• making-of (5)
• match3 (1)
• numberblocksonline (1)
• orb (2)
• site (1)
• tanx (4)
• three-guys (3)
• three-guys-apocalypse (3)
• tutorials (18)
• water-closet (4)
Books

The Battle for the Solar System (Complete)
The Pandoran war machine ravaged the galaxy, driving the human race to the brink of destruction. Seven men and women stood in its way. This is their story.
— Making a 2D split screen game —
Part 7: Heads Up!
Note: this tutorial assumes knowledge of C, as well as prior tutorials.


Introduction
Okay, let's cut straight to the chase - we're going to be adding in a HUD, to provide some essential on-screen information.
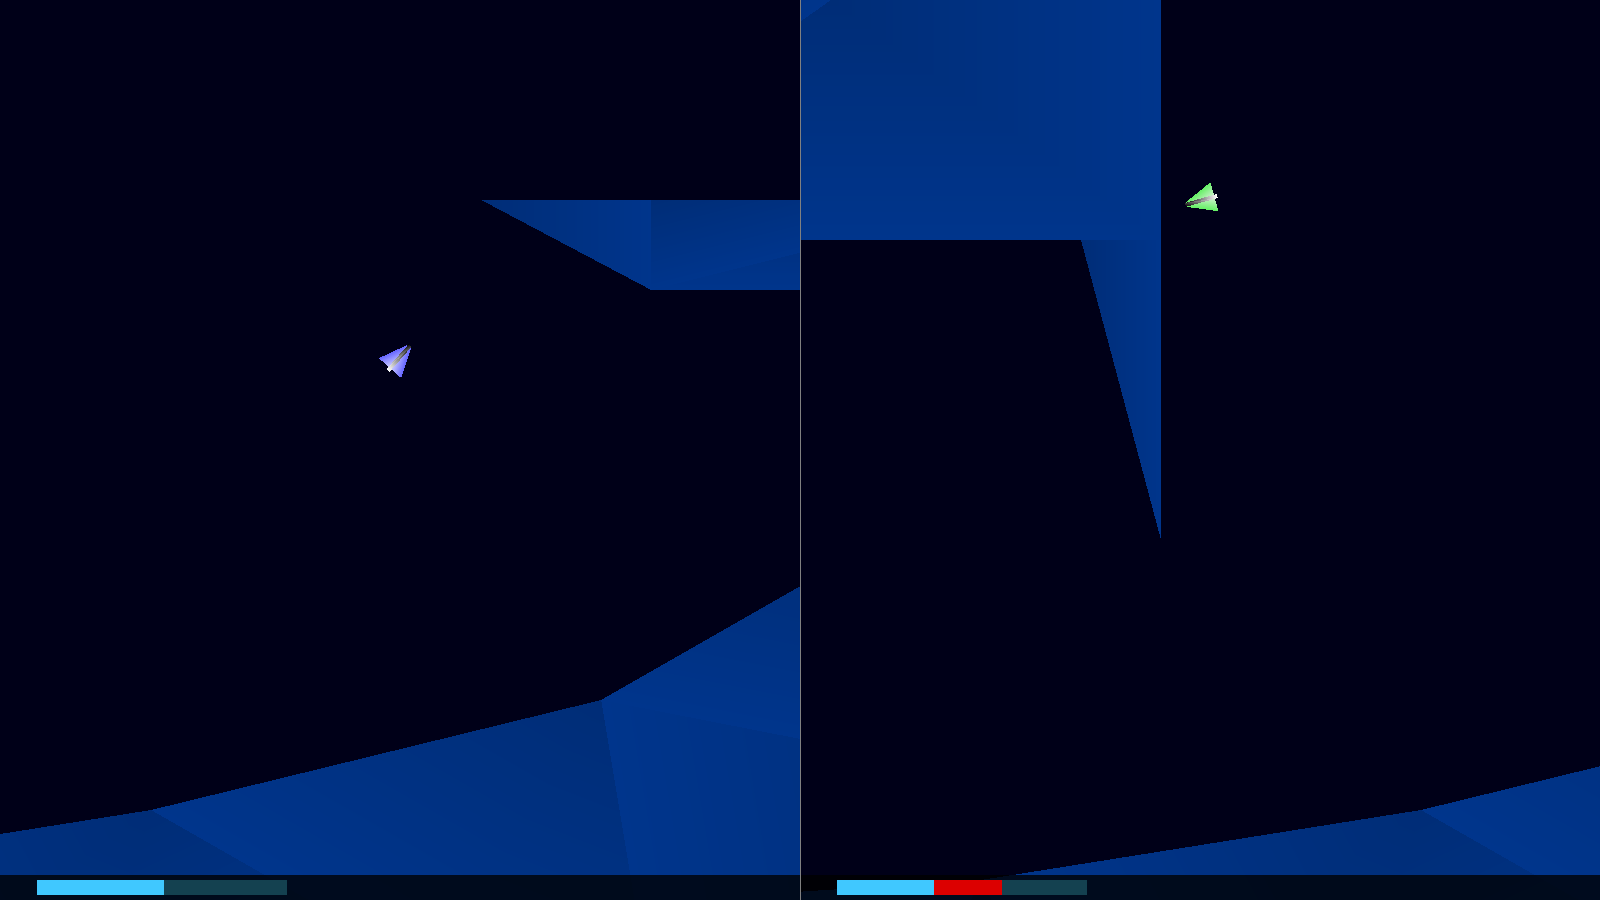
Extract the archive, run cmake CMakeLists.txt, followed by make, and then use ./versus07 to run the code. You will see a window open like the one above, with each player on either side of our zone. Use the default controls (or, at your option, copy the config.json file from a previous tutorial, to use that - remember to exit the game before copying the replacement file). Play the game as normal. Take note of the health bars for the two players at the bottom of the screen, and how damage received it reflected in the form of red bars, that quickly drain. Once you're finished, close the window to exit.
Inspecting the code
Our HUD is pretty bland right now, containing just each of the players' health bars. What it does provide though is scope to grow in future. Let's take a look at how we're handling it.
Starting with structs.h, we've updated Zone:
typedef struct
{
	Entity     entityHead, *entityTail;
	Entity    *players[NUM_PLAYERS];
	SDL_FPoint cameras[NUM_PLAYERS];
	SDL_Rect   bounds;
	Entity     WORLD;
} Zone;
We've added in a array of Entity pointers here called `players`, that will contain the two players. These can be referenced from anywhere in our game, simply by extracting the data from Zone.
With that in mind, let's head over to player.c now, where we've updated initPlayer:
void initPlayer(int num, int x, int y)
{
	// snipped

	respawn(e);

	p->shield = 0;

	zone.players[num] = e;
}
At the end of the function, we're setting the appropriate index of Zone's `players` entity pointer to `e` (being the player Entity we setup). That's all that's needed to be able to reference our player.
With that done, we can move across to hud.c, that will contain all the code we need to handle the HUD itself. Starting with initHUD:
void initHUD(void)
{
	int i;

	for (i = 0; i < NUM_PLAYERS; i++)
	{
		healthTimer[i] = 0;

		prevHealth[i] = ((Player *)zone.players[i]->data)->health;
	}
}
As expected, we're doing some setup here. For each of our players, we're setting the value of healthTimer (a static double array in hud.c) to 0, and also settting the value of prevHealth (another static double array) to the current value of the player's `health`.
These two variables are used to control the display of the on-screen health of the current player, and control the duration of the red bar that appears whenever damage is taken. We'll see this in action in a bit.
Next, we have a function named doHUD:
void doHUD(void)
{
	doBottomBar();
}
Right now, this does nothing more than calls doBottomBar:
static void doBottomBar(void)
{
	int     i;
	Player *p;

	for (i = 0; i < NUM_PLAYERS; i++)
	{
		p = (Player *)zone.players[i]->data;

		if (healthTimer[i] == 0)
		{
			if (prevHealth[i] > p->health)
			{
				healthTimer[i] = FPS * 0.75;
			}
			else
			{
				prevHealth[i] = p->health;
			}
		}
		else if (healthTimer[i] == 1)
		{
			prevHealth[i] = MAX(prevHealth[i] - 2 * app.deltaTime, p->health);

			if (prevHealth[i] == p->health)
			{
				healthTimer[i] = 0;
			}
		}
		else
		{
			healthTimer[i] = MAX(healthTimer[i] - app.deltaTime, 1);
		}
	}
}
This function is responsible for handling the bottom portion of the HUD, where the health bars are. Using a for-loop, we'll handle the bars for each player. The healthTimer value is used both as a timer and also as a type of state control. We'll describe how this works, from top to bottom. First of all, if our healthTimer is 0, we'll do one of two things - if the value of prevHealth is greater than the player's current `health`, we'll set the value of healthTimer to 3/4 of a second. Otherwise, the value of prevHealth will be set to the value of the player's `health`. What this means is that we're essentially monitoring the player's `health`, to see if it's fallen compared to our last recorded value. If it has, we'll prepare to animate the difference.
Next, if the value of healthTimer is 1, we'll start to reduce the value of prevHealth, limiting it to value of the player's current health. If the values become equal, we'll set the value of healthTimer to 0. Again, what this means is that we'll keep decreasing the value of prevHealth until it hits the new health value.
Finally, if healthTimer not 0 or 1, we'll just decrease the value of healthTimer, limiting it to 1. This limit value of 1 is important for our control state to work.
Let's recap - we'll monitor the value of player's `health`, and store it in a value of prevHealth. If we notice that the player's health has fallen below this value, we'll start to reduce the value of prevHealth, but only after a set time (3/4 of a second). This generates a small window in which the reduction of the player's `health` can be made known, before we take steps to make the two equal.
You may have seen this effect being used in modern games, such as one-on-one fighting games, where it provides the player with visual feedback on the amount of damage they just received.
Let's move onto the rendering phase now, starting with drawHUD:
void drawHUD(void)
{
	drawBottomBars();
}
For now, we're delegating to drawBottomBars:
static void drawBottomBars(void)
{
	int     i;
	Player *p;

	drawRect(0, SCREEN_HEIGHT - 25, SCREEN_WIDTH, 30, 0, 0, 0, 200);

	for (i = 0; i < NUM_PLAYERS; i++)
	{
		p = (Player *)zone.players[i]->data;

		drawHealth(p);
	}
}
We're drawing a dark rectangle across the width of the screen, at the bottom, and then calling drawHealth, passing over each of our Players, via a for-loop:
static void drawHealth(Player *p)
{
	SDL_Rect r;
	int w;

	r.x = ((SCREEN_WIDTH / 2) * p->num) + PADDING + 32;
	r.y = SCREEN_HEIGHT - 20;
	r.w = 250;
	r.h = 15;

	drawRect(r.x, r.y, r.w, r.h, 20, 65, 80, 255);

	w = r.w * (prevHealth[p->num] / MAX_PLAYER_HEALTH);

	drawRect(r.x, r.y, w, r.h, 220, 0, 0, 255);

	w = r.w * (p->health / MAX_PLAYER_HEALTH);

	drawRect(r.x, r.y, w, r.h, 64, 200, 255, 255);
}
To begin with, we setup an SDL_Rect (`r`), to define the position and size of our health bar (including the overall width). We first draw a dark turquoise rectangle at this position. Next, we set a variable called `w` the width of our SDL_Rect, adjusted by the percentage of prevHealth for the player, divided by MAX_PLAYER_HEALTH (to give us a value between 0 and 1). This we'll use to render a red bar, that will show our "old" health (controlled by the timer in doHUD). Finally, we assign `w` a value based on the real player health (which may be smaller than the previous health). We render a light blue bar with this value.
This layering of rectangles results in a red bar that appears when we take damage, and then "drains" after a short period, as the value of prevHealth lowers to the new value of the player's health.
If that's not entirely clear, take another look at doBottomBar again, to consider how the value of prevHealth will change.
That's all for hud.c. We now just have to update zone.c, and we're all finished with this part. These updates will be extremely easy.
Starting with initZone:
void initZone(void)
{
	// snipped

	initPlayer(0, 100, 400);
	initPlayer(1, 1800, 100);

	initHUD();

	// snipped
}
We're just calling initHUD. We next update `logic`:
static void logic(void)
{
	doBullets();

	doEntities();

	doHUD();

	// snipped
}
Here, we're calling doHUD. Finally, we have `draw`:
static void draw(void)
{
	int         i;
	SDL_FPoint *c;

	// snipped

	if (!showOptions)
	{
		drawHUD();

		drawRect(SCREEN_WIDTH / 2, 0, 1, SCREEN_HEIGHT, 128, 128, 128, 255);
	}
}
We're calling drawHUD, so long as our options aren't being displayed. We want to hide the HUD if we're showing our options, else it could get messy to read with text overlaying each other.
Another part done. A short part, that on the surface might not look like it's done much, but has infact added in a place to display vital information pertinent to our game. We'll be adding to the HUD as we continue the next several parts, and some of the details displayed within will be essential.
So, where do we go from here? I think it's about time we completed the combat portion of our game. Now that we can display the player details, and also respawn them, we can move over to the phase where it is actually possible for the players to destroy one another, using their weapons. So, in our next part, prepare to die!
Purchase
The source code for all parts of this tutorial (including assets) is available for purchase, as part of the SDL2 tutorials bundle:
From itch.io