PC Games
• Orb
• Lasagne Monsters
• Three Guys Apocalypse
• Water Closet
• Blob Wars : Attrition
• The Legend of Edgar
• TBFTSS: The Pandoran War
• Three Guys
• Blob Wars : Blob and Conquer
• Blob Wars : Metal Blob Solid
• Project: Starfighter
• TANX Squadron
Tutorials
• 2D shoot 'em up
• 2D top-down shooter
• 2D platform game
• Sprite atlas tutorial
• Working with TTF fonts
• 2D adventure game
• Widget tutorial
• 2D shoot 'em up sequel
• 2D run and gun
• Roguelike
• Medals (Achievements)
• 2D turn-based strategy game
• 2D isometric game
• 2D map editor
• 2D mission-based shoot 'em up
• 2D Santa game
• 2D split screen game
• 2D quest game
• SDL 1 tutorials (outdated)
Latest Updates
The Legend of Edgar 1.38
Thu, 1st January 2026
SDL2 Quest game tutorial
Wed, 7th May 2025
SDL2 Versus game tutorial
Wed, 20th March 2024
Download keys for SDL2 tutorials on itch.io
Sat, 16th March 2024
The Legend of Edgar 1.37
Mon, 1st January 2024
Tags
• battle-for-the-solar-system (10)
• blob-wars (10)
• brexit (1)
• code (6)
• edgar (10)
• games (45)
• lasagne-monsters (1)
• making-of (5)
• match3 (1)
• numberblocksonline (1)
• orb (2)
• site (1)
• tanx (4)
• three-guys (3)
• three-guys-apocalypse (3)
• tutorials (18)
• water-closet (4)
Books
The Honour of the Knights (First Edition) (The Battle for the Solar System)
When starfighter pilot Simon Dodds is enrolled in a top secret military project, he and his wingmates begin to suspect that there is a lot more to the theft of a legendary battleship and an Imperial nation's civil war than either the Confederation Stellar Navy or the government are willing to let on.
— Making a 2D split screen game —
Part 16: Game options
Note: this tutorial assumes knowledge of C, as well as prior tutorials.


Introduction
It's finally time for us to allow the player to configure the type of game they want to play, such as deciding how many lives each player should have. This step in making our game is all about widgets and configuration, and will be done within the new title.c file (which will further be expanded upon in the next part).
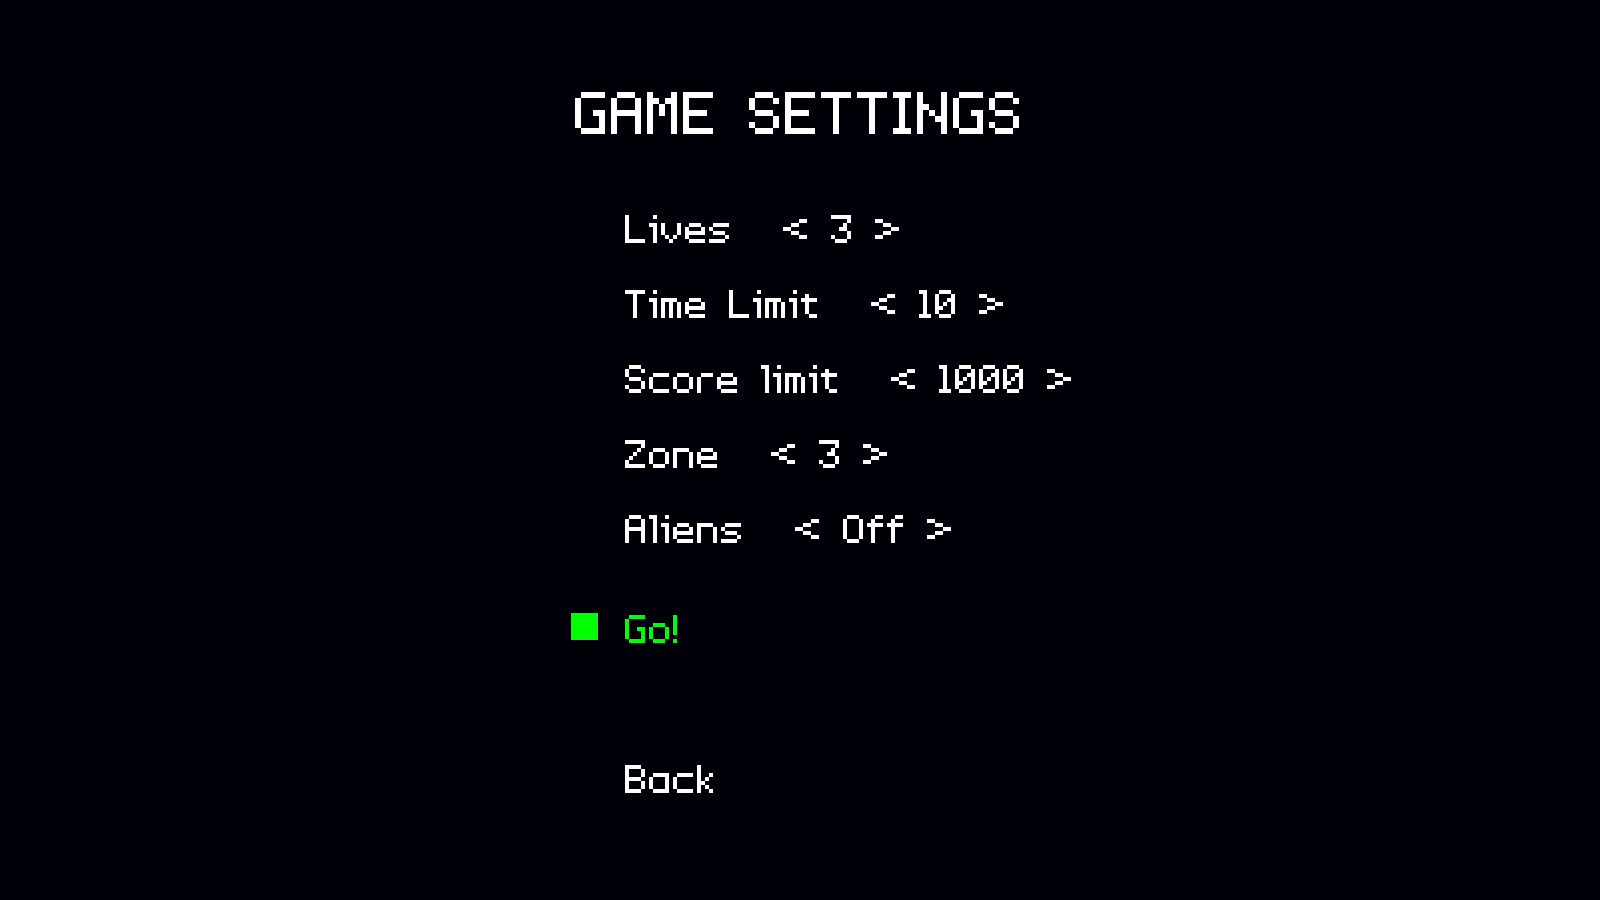
Extract the archive, run cmake CMakeLists.txt, followed by make, and then use ./versus16 to run the code. You will see three text options: Start, Options, and Quit. As with the Options menu, use the arrow keys and the Enter key to navigate. Choosing Start will display a screen like the one above. Use the arrow keys to navigate the options and change the settings. Once you are finished, choose Go! to start the game properly. The game will play as normal, now using the win conditions set in the menu. Pressing Escape to choose an option to return to the title, and change the setup if you desire. Once you're finished, close the window to exit, or Choose Quit from the main title options.
Inspecting the code
Our game options will be (almost) the first thing we see when the game starts. They will form part of the title screen, and so we'll partly implement our title screen in this part. We'll do it properly in the next part. As already stated, all our game options are is a collection of widgets that allow us to set certain conditions. The values will be plucked from these widgets upon starting the game. It shouldn't be too tough to understand.
So, over to title.c, where the vast majority of the updates live. First up, we have to initTitle function:
void initTitle(void)
{
	if (!wasInit)
	{
		setupWidgets();

		wasInit = 1;
	}

	app.activeWidget = getWidget("start", "title");

	show = SHOW_TITLE;

	app.transitionTimer = FPS / 2;
	app.delegate.logic = logic;
	app.delegate.draw = draw;
}
First, we want to set up our widgets. We do this via a call to setupWidgets. We're using a control variable here called wasInit to ensure this only happens once (we'll be using this code block for other setup bits later). Next, we want to make sure we highlight the Start widget, and then set another variable called `show` to SHOW_TITLE, so that we know what we want to process and draw.
We can see show in use, as we move over to `logic`:
static void logic(void)
{
	switch (show)
	{
		case SHOW_TITLE:
			doWidgets("title");
			break;

		case SHOW_START:
			doWidgets("start");
			break;

		default:
			break;
	}
}
Here, we're deciding which of our widgets to process, based on the value of `show`. This doesn't require any further explaination!
Over next, to `draw`:
static void draw(void)
{
	drawRect(0, 0, SCREEN_WIDTH, SCREEN_HEIGHT, 0, 0, 24, 255);

	switch (show)
	{
		case SHOW_TITLE:
			drawWidgets("title");
			break;

		case SHOW_START:
			drawRect(0, 0, SCREEN_WIDTH, SCREEN_HEIGHT, 0, 0, 0, 160);
			app.font.scale = 1.5;
			drawText("GAME SETTINGS", SCREEN_WIDTH / 2, 70, 255, 255, 255, TEXT_ALIGN_CENTER, 0);
			app.font.scale = 1.0;
			drawWidgets("start");
			break;

		default:
			break;
	}
}
As with `logic`, we're deciding which widgets we want to draw, based on the value of `show`. When in SHOW_START state, we're also drawing some text at the top of the screen saying "GAME SETTINGS". Again, a very simple function.
Now, we're going to look at the functions used by the widgets themselves. These are all very standard, so we'll go over them quickly. Starting with `start`:
static void start(void)
{
	show = SHOW_START;

	app.activeWidget = getWidget("go", "start");
}
This function is invoked when we select the Start menu option. We update `show` to SHOW_START, to display the game options, and then set the active widget as "Go".
The `back` function follows:
static void back(void)
{
	show = SHOW_TITLE;

	app.activeWidget = getWidget("start", "title");
}
Rather like `start`, but we're returning to display the main title widgets. We're also highlighting the "Start" option.
Next, we have the `options` function:
static void options(void)
{
	show = SHOW_OPTIONS;

	initOptions(logic, draw, returnFromOptions);

	getWidget("quit", "options")->invisible = 1;
}
Here, we're just preparing to show our options menu, rather like in zone.c.
`quit` follows:
static void quit(void)
{
	exit(0);
}
Nothing much to say here..!
Those are the simple function done, so now we can look at the more interesting one. We'll start with the `go` function:
static void go(void)
{
	int           i;
	SelectWidget *s;

	game.zoneNum = -1;
	game.livesLimit = ZONE_UNLIMITED_TARGET;
	game.scoreLimit = ZONE_UNLIMITED_TARGET;
	game.timeLimit = ZONE_UNLIMITED_TARGET;

	s = (SelectWidget *)getWidget("zone", "start")->data;
	if (strcmp(s->options[s->value], "Random"))
	{
		game.zoneNum = atoi(s->options[s->value]);
	}

	s = (SelectWidget *)getWidget("lives", "start")->data;
	if (strcmp(s->options[s->value], "Unlimited"))
	{
		game.livesLimit = atoi(s->options[s->value]);
	}

	s = (SelectWidget *)getWidget("score", "start")->data;
	if (strcmp(s->options[s->value], "Unlimited"))
	{
		game.scoreLimit = atoi(s->options[s->value]);
	}

	s = (SelectWidget *)getWidget("time", "start")->data;
	if (strcmp(s->options[s->value], "Unlimited"))
	{
		game.timeLimit = atoi(s->options[s->value]);
	}

	s = (SelectWidget *)getWidget("aliens", "start")->data;
	game.aliens = strcmp(s->options[s->value], "On") == 0;

	saveConfig();

	for (i = 0; i < NUM_PLAYERS; i++)
	{
		game.wins[i] = 0;
	}

	if (game.zoneNum != -1)
	{
		initZone(game.zoneNum);
	}
	else
	{
		initZone(1 + (rand() % NUM_ZONES));
	}
}
This looks complicated, but it's not at all. This function is responsible for configuring the game conditions for the players. We start by settings our game's conditions to be a random zone, and all unlimited targets.
Next, we grab the value from the "zone" SelectWidget, test if the value is not "Random", and call atoi on the value, to convert it from a string into a number. The values in the zone's SelectWidget are "1", "2", "3", "4", "5", and "Random", so this will result us getting a numerical value. We set Game's zoneNum to this value, to tell the game which zone we wish to play (and continue playing).
We repeat this logic for our Game's livesLimit, scoreLimit, and timeLimit, testing that the associated widget's value is not "Unlimited" in these cases. For our aliens, we test if the SelectWidget value is "On", and set Game's `aliens` flag from the result of the strcmp.
Finally, we save our configuration, so the players don't need to choose their favourite settings each time, and then start the game by calling initZone.
Not overly complicated, but it does contain a few consideration. The returnFromOptions function follows:
static void returnFromOptions(void)
{
	show = SHOW_TITLE;

	app.activeWidget = getWidget("options", "title");

	app.delegate.logic = logic;
	app.delegate.draw = draw;
}
This is called when we return from our options screen. There's not much that needs describing here, so we'll move onto the setupWidget function:
static void setupWidgets(void)
{
	Widget *w;

	w = getWidget("start", "title");
	w->action = start;

	w = getWidget("options", "title");
	w->action = options;

	w = getWidget("quit", "title");
	w->action = quit;

	w = getWidget("go", "start");
	w->action = go;

	w = getWidget("back", "start");
	w->action = back;

	setGameplayWidgetValue("lives", game.livesLimit);
	setGameplayWidgetValue("time", game.timeLimit);
	setGameplayWidgetValue("score", game.scoreLimit);
	setGameplayWidgetValue("zone", game.zoneNum);

	setSelectWidgetValue(getWidget("aliens", "start")->data, game.aliens ? "On" : "Off");
}
We're mostly setting the actions for various widgets here, using the functions we looked at earlier. Of note is the call to setGameplayWidgetValue that is used for lives, time, score, and zone. This is where things get a bit trickier, as we'll see:
static void setGameplayWidgetValue(char *name, int value)
{
	char          text[16];
	SelectWidget *sw;

	if (value != -1)
	{
		sprintf(text, "%d", value);

		setSelectWidgetValue(getWidget(name, "start")->data, text);
	}
	else
	{
		sw = (SelectWidget *)getWidget(name, "start")->data;

		sw->value = sw->numOptions - 1;
	}
}
What this function does is sets the SelectWidget's value, based on the input value. If `value` is not -1, we'll make use of the setSelectWidgetValue function (in widgets.c) to set the SelectWidget's value, based on the `text` supplied - this function basically loops through all the values in the SelectWidget, searching for a text match. `text` will contain "1", "2", etc.
If the value is -1, we'll set the SelectWidget's value to the last one available. We're making an assumption here that the last option in our SelectWidget will be "Unlimited", "Random", etc., rather than an actual unknown value, such as "1", "2", "5", etc.
This is basically some widget management, to correctly show the player the selected values.
That's it for title.c. We're almost done with this part. Just two more changes to look at. Moving across to options.c, we've made a change to `quit`:
static void quit(void)
{
	saveConfig();

	clearZone();

	initTitle();
}
Now, instead of calling exit, we're saving our configuration, clearing down the zone data, and returning to the title screen.
Finally, we've updated main.c:
int main(int argc, char *argv[])
{
	long then;

	// snipped

	atexit(cleanup);

	initTitle();

	while (1)
	{
		// snipped
	}

	return 0;
}
We're now calling initTitle.
Another part done! We're now able to configure our game before playing, quit out of it, re-configure, and play again. Our settings are also saved, so we don't need to keep setting things up when we start the game. Our game is very nearly finished. What we're missing is a funky title screen, to add a bit of glam.
So, in our penultimate part, we'll be adding in the title screen!
Purchase
The source code for all parts of this tutorial (including assets) is available for purchase, as part of the SDL2 tutorials bundle:
From itch.io