PC Games
• Orb
• Lasagne Monsters
• Three Guys Apocalypse
• Water Closet
• Blob Wars : Attrition
• The Legend of Edgar
• TBFTSS: The Pandoran War
• Three Guys
• Blob Wars : Blob and Conquer
• Blob Wars : Metal Blob Solid
• Project: Starfighter
• TANX Squadron
Tutorials
• 2D shoot 'em up
• 2D top-down shooter
• 2D platform game
• Sprite atlas tutorial
• Working with TTF fonts
• 2D adventure game
• Widget tutorial
• 2D shoot 'em up sequel
• 2D run and gun
• Roguelike
• Medals (Achievements)
• 2D turn-based strategy game
• 2D isometric game
• 2D map editor
• 2D mission-based shoot 'em up
• 2D Santa game
• 2D split screen game
• 2D quest game
• SDL 1 tutorials (outdated)
Latest Updates
The Legend of Edgar 1.38
Thu, 1st January 2026
SDL2 Quest game tutorial
Wed, 7th May 2025
SDL2 Versus game tutorial
Wed, 20th March 2024
Download keys for SDL2 tutorials on itch.io
Sat, 16th March 2024
The Legend of Edgar 1.37
Mon, 1st January 2024
Tags
• battle-for-the-solar-system (10)
• blob-wars (10)
• brexit (1)
• code (6)
• edgar (10)
• games (45)
• lasagne-monsters (1)
• making-of (5)
• match3 (1)
• numberblocksonline (1)
• orb (2)
• site (1)
• tanx (4)
• three-guys (3)
• three-guys-apocalypse (3)
• tutorials (18)
• water-closet (4)
Books

H1NZ
Arriving on the back of a meteorite, an alien pathogen has spread rapidly around the world, infecting all living humans and animals, and killing off all insect life. Only a handful are immune, and these survivors cling desperately to life, searching for food, fresh water, and a means of escape, find rescue, and discover a way to rebuild.
— Making a 2D split screen game —
Part 1: Loading models
Note: this tutorial assumes knowledge of C, as well as prior tutorials.


Introduction
In this tutorial set, we're going to be looking at how to create a split screen two player game. The premise is simple - each player will pilot a ship, that can spin 360 degrees, fly in said direction, and fire guns and rockets. There will be items to collect, such as points pods, and the players can destroy each other's craft. The goal of the game is determined by the players themselves - either score more points than their opponent, or defeat their opponent by destroying their ship, so that they lose all their lives. A time limit can involve be set, if desired. All these things can be set by the player.
Sounds fun, eh? Well, for SDL2 Versus, we're going to be implementing the game is a different way from our others. Here, we're going to be using SDL's geometry APIs to render triangles. Our in-game sprites and environment will be created using polygons, only; there won't be any textures in the game (other than the font atlas).
We'll be working with SDL's SDL_Vertex a lot in this tutorial. It's a very simple struct that holds a 2D position, color, and texture coordinates (not that we'll be using these, as we don't have any textures). You can find out more about the struct itself at https://wiki.libsdl.org/SDL2/SDL_Vertex, and see a very basic example of using SDL_RenderGeometry at https://wiki.libsdl.org/SDL2/SDL_RenderGeometry. Naturally, our game will offer more advanced and interesting usage.
Ready to get started?
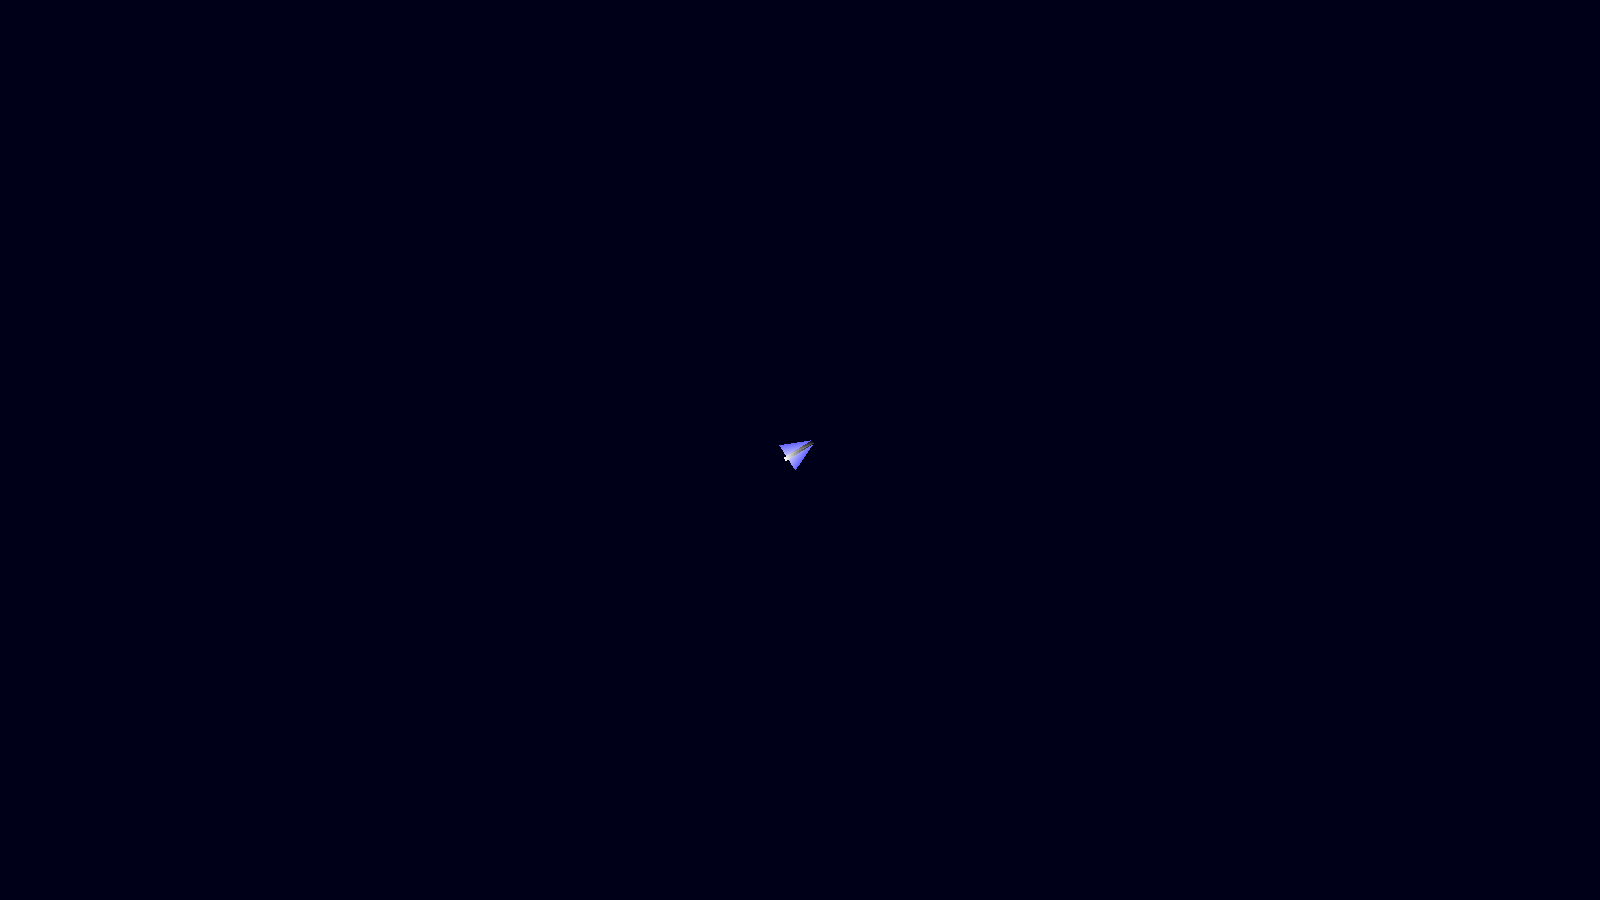
Extract the archive, run cmake CMakeLists.txt, followed by make, and then use ./versus01 to run the code. You will see a window open like the one above, with the player's ship rotating clockwise. Once you're finished, close the window to exit.
Inspecting the code
As we're now very far along in these tutorials, we'll be skipping over anything that has already been covered and seen multiple times, such as widgets, lookups, and all the rest. We'll refer back to the relevant tutorials and parts as needed, but otherwise won't be going into depth. This will allow us to focus on what makes this game different, and how the rendering, etc. works.
This first part is very simple, but will introduce some core fundamentals for us to work with.
Let's start first with structs.h:
struct Triangle
{
	SDL_FPoint points[3];
	SDL_Color  colors[3];
	Triangle  *next;
};
The Triangle struct is designed to represent a 2D triangle. `points` is an array of x and y coordinates, for each point of the triangle. `colors` is the color at each point (that can all be different, to create a gradient when drawing). Our Triangle is part of a linked list, hence the `next` variable.
Next up, we have Model:
struct Model
{
	char       filename[MAX_FILENAME_LENGTH];
	int        numTriangles;
	Triangle **triangles;
	Model     *next;
};
As stated before, we don't use textures / sprites in our game, since all our graphics are being created using triangles. Our Model struct will therefore represent a collection of triangles that will make up such as model. `filename` is the filename of the model, numTriangles is the number of triangles in the model, `triangles` is an array of triangles (that will be malloc'd upon loading). Our Model is also part of a linked list.
Next up is Entity:
struct Entity
{
	uint8_t    type;
	SDL_FPoint position;
	Model     *model;
	double     angle;
	void (*tick)(Entity *self);
	void (*draw)(Entity *self);
	Entity *next;
};
Most things here will be familiar. `position` is the x and y position of the entity, while `model` is a pointer to the Model the Entity will be using for rendering.
Finally, we have Zone:
typedef struct
{
	Entity entityHead, *entityTail;
} Zone;
This is like our standard "Stage" struct, that will hold all the data about the current environment / level. Here, we're just storing a linked list of Entities.
Moving on to draw.c next, in system. This is where we'll be performing our core geometry rendering. As with many (if not all) modern rendering systems that use hardware acceleration, SDL's geometry rendering API performs best when we batch the drawing requests. As such, we're going to build a system here to do so. Fear not, it's not complicated, at all. The basic idea is this:
Each time we wish to render a vertex (a point on a polygon), we'll adding it to an array. Once we're done, we'll push the entire array of vertices to SDL_RenderGeometry, to instruct it to draw all the points. This will result in a very fast operation, compared to rendering just a handful of triangles at a time. We'll be tracking the total number of vertices we wish to draw, so that we can also index these in our array. All will become clear shortly.
Let's first start with initDraw:
void initDraw(void)
{
	vIndex = 0;
}
vIndex is the current index in our array of SDL_Vertexes (we have an array of 3072 SDL_Vertexes, static in draw.c). We're setting this value to 0 to begin with, so that when we start drawing vertexes, they will be added to the front of the array.
Next up is presentScene:
void presentScene(void)
{
	flushGeometry();

	SDL_RenderPresent(app.renderer);
}
We're calling a function here named flushGeometry (we'll see this in a moment), to ensure we have completely finished outputting all our batched vertices before presenting the final scene.
Now for drawVertex. This is the most important function:
void drawVertex(SDL_Vertex *v)
{
	if (vIndex == VERTEX_CAPACITY)
	{
		flushGeometry();
	}

	vertices[vIndex++] = *v;
}
This function takes an SDL_Vertex (`v`) as a parameter. The first thing we do is find out if we are at the limit of our rendering batch, by testing if vIndex is equal to VERTEX_CAPACITY. If so, we'll call flushGeometry, to draw the current batch. With that done, we're adding the SDL_Vertex to our batch array (`vertices`). Notice how we're copying the data from `v`, rather than indexing the pointer itself. In a lot of cases, we'll be reusing the SDL_Vertex we passed into the drawVertex function, so we want to ensure we don't modify the data constantly!
All simple enough - we're adding SDL_Vertexes to our batch, and flushing if we've hit our limit.
Finally, we come to flushGeometry:
void flushGeometry(void)
{
	SDL_RenderGeometry(app.renderer, NULL, vertices, vIndex, NULL, 0);

	vIndex = 0;
}
Here, we're calling SDL_RenderGeometry. As you can see, we're passing over our `vertices` array, as well as vIndex, that will tell the function how many items in `vertices` to draw. We're not using a texture (first NULL), and we're also not specifying the order of the indices to use (second NULL). These are both optional values, which we're ignoring. The last parameter we set as 0, since we don't have any indices. With our geometry drawn, we're resetting vIndex to 0, so that we don't overwrite the end of our array when we continue adding to our batch.
You will notice later on how we call the flushGeometry function at various points in our code, as we conclude our geometry rendering operations (such as before drawing text or other 2D shapes). It seems SDL's internals need this to happen, to avoid odd graphical effects.
That's all for draw.c, so let's now turn our attention to models.c. This is where we'll add all our code for handling our "models".
First up, we have initModels:
void initModels(void)
{
	memset(&head, 0, sizeof(Model));
	tail = &head;
}
Nothing very complicated here. We're just setting up the linked list for our Models (`head` and `tail` being the head of the list and tail being the current end).
Next up, is drawModel:
void drawModel(Model *m, SDL_FPoint position, double angle)
{
	int        i, n;
	double     rot;
	SDL_Vertex v;
	Triangle  *t;

	rot = TO_RAIDANS(angle);

	for (i = 0; i < m->numTriangles; i++)
	{
		t = m->triangles[i];

		for (n = 0; n < 3; n++)
		{
			memset(&v, 0, sizeof(SDL_Vertex));

			v.position = position;
			v.position.x += t->points[n].x * cos(rot) - t->points[n].y * sin(rot);
			v.position.y += t->points[n].x * sin(rot) + t->points[n].y * cos(rot);

			v.color = t->colors[n];

			drawVertex(&v);
		}
	}
}
A simple function really, but we'll go through it bit by bit. First off, this function accepts three parameters: `m`, the Model to draw; `position`, the position on screen at which we want to draw it; and `angle`, the angle at which we want to rotate the model when we perform the rendering. You will have noticed that the player's ship currently rotates clockwise on screen. For that, we would pass over the desired angle to this function.
The first thing we do is convert our `angle` into raidans, and assign the result to a variable called `rot` (short for rotation). When it comes to drawing our model, we will be rotating all the points of the triangle about the origin (0,0). We need to do this in raidans, rather than degrees (our game otherwise uses degrees to store angles internally). With that done, we can start drawing our model.
Our Models are composed of a number of triangles (numTriangles), so we loop through all of those, grabbing a pointer (`t`) to each, to make things a bit easier to read. Next up, we loop through each of the triangle's points (3 of them..!). We're going to use the triangle point data (x and y), the `position` we passed in, and the angle (`rot`), to determine where our point resides. We start by memsetting an SDL_Vertex (`v`), which we'll be re-using throughout this loop, and first setting its `position` as the `position` we passed into the function. Next, we adjust the position with some basic trigonometry, to rotate the points according to `rot` (again, this is happening around the origin). We then set the vertex's `color` to the value of triangle's colour at this point. Finally, we pass the SDL_Vertex data to our drawVertex function.
And that's it! That's all we need to do in order to draw our model. That should all make sense - we're simply looping through the Model's triangles, setting the positions and colour of an SDL_Vertex, and drawing it. Couldn't get easier!
With our drawing done, we should look at how we load our models. This is done in the loadModel function, that's up next. Before we come to that function, however, we should take a look at the data structure of one of our model files. Below is the player 1 model file (data/models/player1):
4

-2 -15 0 0 0
2 -15 64 64 64
-2 18 255 255 255

-2 18 255 255 255
2 -15 0 0 0
2 18 255 255 255

-15 15 100 100 255
-2 -15 100 100 255
-2 15 200 200 255

2 -15 100 100 255
15 15 100 100 255
2 15 200 200 255
It's worth pointing out what this is and what this isn't! First of all, this is simply a text file containing some points and colour data. The first line tells us how many triangles are in the file (as a set of 3 points and 3 colours). Each line contains the x and y offset of the point from the origin, and the RGB values of the colour of that point. That's all this file is. What this file isn't is something that can be loaded in Blender or any other popular 3D modelling tool kit. It was produced using a basic tool that I wrote for visualizing triangles, and moving their points around (this editor isn't included in the tutorial, as it's very clunky, and was hacked together in under an hour..!).
As you can appreciate, it's a very basic format that was created just for our game.
With that detailed, we can move over to loadModel:
Model *loadModel(char *filename)
{
	int       i, numTriangles, n, r, g, b;
	FILE     *fp;
	Model    *model;
	Triangle *t;

	model = getModel(filename);

	if (model == NULL)
	{
		model = malloc(sizeof(Model));
		memset(model, 0, sizeof(Model));
		tail->next = model;
		tail = model;

		fp = openFile(filename);

		fscanf(fp, "%d", &numTriangles);

		STRCPY(model->filename, filename);
		model->numTriangles = numTriangles;
		model->triangles = malloc(sizeof(Triangle *) * numTriangles);

		memset(model->triangles, 0, sizeof(Triangle *) * numTriangles);

		for (i = 0; i < numTriangles; i++)
		{
			model->triangles[i] = malloc(sizeof(Triangle));

			t = model->triangles[i];

			memset(t, 0, sizeof(Triangle));

			for (n = 0; n < 3; n++)
			{
				fscanf(fp, "%f %f %d %d %d ", &t->points[n].x, &t->points[n].y, &r, &g, &b);

				t->colors[n].r = r;
				t->colors[n].g = g;
				t->colors[n].b = b;
				t->colors[n].a = 255;
			}
		}

		fclose(fp);
	}

	return model;
}
With what we already saw of the file format, this function should be very simple to understand. We're first calling a function named getModel, to see if a Model with this filename has already been loaded. If not (the result is NULL), we're creating a new Model (via malloc), and opening the file (`filename`) containing its data. We first read the number of triangles in the file (using fscanf), then set the Model's `filename`, the number of triangles (`numTriangles`), and malloc an array of Triangles (`triangles`) of the same size to hold the data.
We then use a for-loop to create a Triangle, and read its three points and colour data, once again using fscanf. With that done, we close the file, and return the model.
Once again, this couldn't get easier, as all we're doing is reading some data from a file, according to a fixed format.
The final function is getModel:
static Model *getModel(char *filename)
{
	Model *m;

	for (m = head.next; m != NULL; m = m->next)
	{
		if (strcmp(m->filename, filename) == 0)
		{
			return m;
		}
	}

	return NULL;
}
As one might expect, this just searches the linked list of Models for one with a matching filename and returns it. If one isn't found, we'll return NULL.
That's it for models.c! So far, things haven't been too bad, eh? It gets easier from here, too, as we're now moving onto things we've seen many times before.
Over to player.c, where we'll be handling all our player entity details. It's pretty basic right now. First up is initPlayer:
void initPlayer(int x, int y)
{
	Entity *e;

	e = spawnEntity(ET_PLAYER);
	e->position.x = x;
	e->position.y = y;
	e->model = loadModel("data/models/player1");

	e->tick = tick;
	e->draw = draw;
}
As you might expect, this is just setting up our player. Of note is that we're calling loadModel, to load and assign the model "data/models/player1" to the entity's `model` variable. The `tick` and `draw` functions we'll look at very briefly.
Frist up is `tick`:
static void tick(Entity *self)
{
	self->angle += app.deltaTime;
}
We're just increasing the entity's `angle`, to make it turn clockwise.
`draw` is equally simple:
static void draw(Entity *self)
{
	drawModel(self->model, self->position, self->angle);
}
We're just calling drawModel, passing over the entity's `model`, `position`, and `angle`.
That's all for player.c. We'll briefly cover entities.c and zone.c before we finish up (again, don't expect any surprises!).
First up is initEntities:
void initEntities(void)
{
	memset(&zone.entityHead, 0, sizeof(Entity));
	zone.entityTail = &zone.entityHead;
}
We're preparing out linked list here.
In doEntities, we're calling each entity's `tick` function:
void doEntities(void)
{
	Entity *e;

	for (e = zone.entityHead.next; e != NULL; e = e->next)
	{
		e->tick(e);
	}
}
And in drawEntities, we're calling their `draw` function:
void drawEntities(void)
{
	Entity *e;

	for (e = zone.entityHead.next; e != NULL; e = e->next)
	{
		e->draw(e);
	}
}
spawnEntity comes next:
Entity *spawnEntity(int type)
{
	Entity *e;

	e = malloc(sizeof(Entity));
	memset(e, 0, sizeof(Entity));

	e->type = type;

	zone.entityTail->next = e;
	zone.entityTail = e;

	return e;
}
We're just mallocing an entity, adding it to our entity linked list, assigning the `type`, and returning it.
Over in zone.c, we have just 3 functions to consider - initZone, `logic`, and `draw`. We'll start with initZone:
void initZone(void)
{
	memset(&zone, 0, sizeof(Zone));

	initEntities();

	initPlayer(SCREEN_WIDTH / 2, SCREEN_HEIGHT / 2);

	app.delegate.logic = logic;
	app.delegate.draw = draw;
}
We're memsetting `zone` (a global variable, to hold our Zone data), setting up our entities, creating a player entity (positioned in the middle of the screen), and assigning our `logic` and `draw` functions. Remember that our models (and therefore our entities) are drawn about their origin, meaning that we don't have to do any adjustments based on the size of the model to locate it in the center.
`logic` merely calls doEntities:
static void logic(void)
{
	doEntities();
}
while `draw` clears the screen and calls drawEntities:
static void draw(void)
{
	drawRect(0, 0, SCREEN_WIDTH, SCREEN_HEIGHT, 0, 0, 24, 255);

	drawEntities();
}
And there we have it, the first part of our new game! That was pretty simple, eh? Once you understand loading the triangles and pushing them over into our batch vertex rendering array, the rest is rather par for the course.
So, we're now able to position, rotate, and draw triangles. And we've got a nice looking player ship model, too (well, I think it is!). What we should do next is assume control of the craft, rather than just leave it spinning around in circles. So, in our next part we'll be looking into steering and shooting, since being able to fire our guns is not only an important part of our game, but also pretty simple to implement.
Purchase
The source code for all parts of this tutorial (including assets) is available for purchase, as part of the SDL2 tutorials bundle:
From itch.io