PC Games
• Orb
• Lasagne Monsters
• Three Guys Apocalypse
• Water Closet
• Blob Wars : Attrition
• The Legend of Edgar
• TBFTSS: The Pandoran War
• Three Guys
• Blob Wars : Blob and Conquer
• Blob Wars : Metal Blob Solid
• Project: Starfighter
• TANX Squadron
Tutorials
• 2D shoot 'em up
• 2D top-down shooter
• 2D platform game
• Sprite atlas tutorial
• Working with TTF fonts
• 2D adventure game
• Widget tutorial
• 2D shoot 'em up sequel
• 2D run and gun
• Roguelike
• Medals (Achievements)
• 2D turn-based strategy game
• 2D isometric game
• 2D map editor
• 2D mission-based shoot 'em up
• 2D Santa game
• 2D split screen game
• 2D quest game
• SDL 1 tutorials (outdated)
Latest Updates
The Legend of Edgar 1.38
Thu, 1st January 2026
SDL2 Quest game tutorial
Wed, 7th May 2025
SDL2 Versus game tutorial
Wed, 20th March 2024
Download keys for SDL2 tutorials on itch.io
Sat, 16th March 2024
The Legend of Edgar 1.37
Mon, 1st January 2024
Tags
• battle-for-the-solar-system (10)
• blob-wars (10)
• brexit (1)
• code (6)
• edgar (10)
• games (45)
• lasagne-monsters (1)
• making-of (5)
• match3 (1)
• numberblocksonline (1)
• orb (2)
• site (1)
• tanx (4)
• three-guys (3)
• three-guys-apocalypse (3)
• tutorials (18)
• water-closet (4)
Books
The Red Road
For Joe Crosthwaite, surviving school was about to become more than just a case of passing his exams ...
— Working with TTF fonts —
Part 3: Wrapping, aligning, and typewriter effect
Note: this tutorial assumes knowledge of C, as well as prior tutorials.


Introduction
So, we can draw text from a text atlas, and also grab it pre-made from a direct SDL2 TTF call. But what if we want to do extra things. You will have noticed in the last tutorial how the text from one line was too long to fit onto the screen; it should really wrap onto the line below and not overdraw. In this tutorial, we'll look at how we can achieve this, along with a few other things.
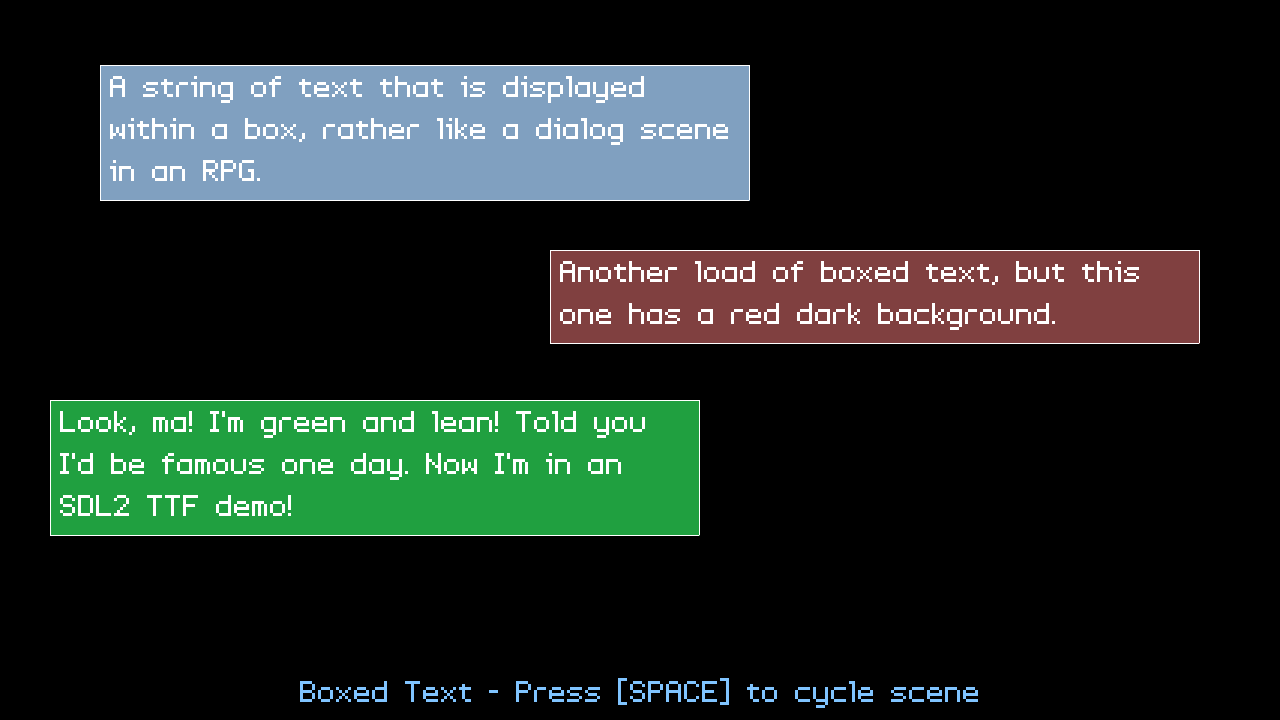
Extract the archive, run cmake CMakeLists.txt, followed by make, and then use ./ttf03 to run the code. You will see a window open like the one above, with a number of coloured boxes, each containing a line of text, wrapped to fit within its bounds. This demo contains a number of different scenes. Pressing the space bar will cycle through them. Close the window to exit.
Inspecting the code
Scrolling this page, you'll notice it's quite long. Yep, this is another somewhat complicated tutorial and we'll be going into a lot of detail. We'll make a start with defs.h where we've added a new enum:
enum {
	TEXT_ALIGN_LEFT,
	TEXT_ALIGN_CENTER,
	TEXT_ALIGN_RIGHT
};
This enum has been created to give a hint to our text drawing routines as to how we want to align our text, either left, center, or right. In all cases, the text will be aligned according to the x position. We'll see more on this in a bit. If we look next at text.c, we'll see that the drawText function signature has changed. There are now two more argument, and the function itself has been changed to delegate to two other functions:
void drawText(char *text, int x, int y, int r, int g, int b, int fontType, int align, int maxWidth)
{
	if (maxWidth > 0)
	{
		drawTextWrapped(text, x, y, r, g, b, fontType, align, maxWidth, 1);
	}
	else
	{
		drawTextLine(text, x, y, r, g, b, fontType, align);
	}
}
We're passing over two new parameters, align and maxWidth. The align parameter will be used to specify how we want to align our text, using one of the three enum values we saw earlier. The maxWidth value will be used to determine the maximum width of a line should be before it is wrapped and drawn on the line below. As we can see from the test above, if our maxWidth is greater than 0, we'll be rendering the text string wrapped, by calling drawTextWrapped. Otherwise, we're going to draw it normally, by calling drawTextLine.
We'll start by looking at drawTextWrapped. The idea behind this function is that we'll break our text string down into separate words and add them to a text buffer one word at a time, until the word we want to add won't fit within our defined limit any more and move onto the next line. It might look a bit complicated, but once we've gone through it, it should make a lot more sense. Have a look at the function and we'll then go through it:
static int drawTextWrapped(char *text, int x, int y, int r, int g, int b, int fontType, int align, int maxWidth, int doDraw)
{
	char word[MAX_WORD_LENGTH], line[MAX_LINE_LENGTH];
	int i, n, wordWidth, lineWidth, character, len;

	i = 0;

	memset(word, 0, MAX_WORD_LENGTH);
	memset(line, 0, MAX_LINE_LENGTH);

	character = text[i++];

	n = 0;

	lineWidth = wordWidth = 0;

	len = strlen(text);

	while (character)
	{
		wordWidth += glyphs[fontType][character].w;

		if (character != ' ')
		{
			word[n++] = character;
		}

		if (character == ' ' || i == len)
		{
			if (lineWidth + wordWidth >= maxWidth)
			{
				if (doDraw)
				{
					drawTextLine(line, x, y, r, g, b, fontType, align);
				}

				memset(line, 0, MAX_LINE_LENGTH);

				y += glyphs[fontType][' '].h;

				lineWidth = 0;
			}
			else if (lineWidth != 0)
			{
				strcat(line, " ");
			}

			strcat(line, word);

			lineWidth += wordWidth;

			memset(word, 0, MAX_WORD_LENGTH);

			wordWidth = 0;

			n = 0;
		}

		character = text[i++];
	}

	if (doDraw)
	{
		drawTextLine(line, x, y, r, g, b, fontType, align);
	}

	return y + glyphs[fontType][' '].h;
}
We're setting up a number of variables to begin with, the two important ones being word and line, which will hold the characters of the word we're currently working with and the line of text we've so far put together. We grab the first character in our text line and also calculate the total length of the line, then jump into a while loop that will continue so long as we're working with a valid character.
The first thing we do in the while loop is increment a variable called wordWidth by the width of the glyph of the font's character we're using. We then start to query the character and take action based on it. If the character isn't a space, we want to append it to our word buffer. However, if the character is a space or we're at the end of the line, we want to start doing a number of different things. Remember that we're breaking on spaces here, so a space or the end of the line will mean we've constructed a full word. We next want to know if we're exceeding the bounds of our defined limit. We do this by querying whether the width of the current line plus the width of the new word is going to exceed maxWidth. If it does, we want to wrap.
The first thing we'll do is draw the current text buffer (line), by calling drawTextLine (more on this later). After that, we'll memset the line to clear the data and increase the value of our y coordinate to by the height of a space glyph to jump down onto the next line. Somewhat crude, but it works in most cases. We also zero the lineWidth, effectively resetting our text buffer to empty.
If we didn't exceed the line then we don't draw anything. However, we might want to add a space to the current line before doing anything more, but only if we're not at the beginning of the line. This step is required because we're not adding spaces as we encounter them, and so need to manually add them back in. This might seem odd, but it gives our more control over the flow of the text and allows us to trim white space from the beginning and end of each line we create.
We now want to add our current word to our line. At this point, our line will either be empty or already contain words, hence the need to text if we want to add a space before adding the word. If we didn't do this, our text would be without gaps between the words.
You will have noticed there's a doDraw variable being passed into this function, and we're testing it before we draw our text. There is a reason for this what we'll come to a bit later on. For now, let's look at the drawTextLine function.
If you compare this version to the previous, you'll note that there hasn't been a huge number of things; in fact, there is now just an if statement in the first instance that tests the desired alignment.
static void drawTextLine(char *text, int x, int y, int r, int g, int b, int fontType, int align)
{
	int i, character, w, h;
	SDL_Rect *glyph, dest;

	if (align != TEXT_ALIGN_LEFT)
	{
		calcTextDimensions(text, fontType, &w, &h);

		if (align == TEXT_ALIGN_CENTER)
		{
			x -= (w / 2);
		}
		else if (align == TEXT_ALIGN_RIGHT)
		{
			x -= w;
		}
	}

	SDL_SetTextureColorMod(fontTextures[fontType], r, g, b);

	i = 0;

	character = text[i++];

	while (character)
	{
		glyph = &glyphs[fontType][character];

		dest.x = x;
		dest.y = y;
		dest.w = glyph->w;
		dest.h = glyph->h;

		SDL_RenderCopy(app.renderer, fontTextures[fontType], glyph, &dest);

		x += glyph->w;

		character = text[i++];
	}
}
Since we render our text from left to right be default, we only want to bother with an alignment adjustment if it's not TEXT_ALIGN_LEFT. Should it not be, we're calling a function called calcTextDimensions, passing over the text we want to draw, the type, an pointers to w and h variables, to hold our width and height. We'll cover it in a bit. All you need to know now is that the w variable will hold the rendered width of the string. Now we have that, we can check if we want to center align or right align the text. If we center, we subtract half of the value of w from x, to now position the text around the middle of x. If we're aligning to the right, we subject the entire value of w from x, so that our subsequent text drawing will finish rendering at the x coordinate, effectively positioning it to the right. The rest of the function remains the same as before.
We'll quickly look at the other two functions in text.c before we conclude with this file. Starting with calcTextDimensions:
void calcTextDimensions(char *text, int fontType, int *w, int *h)
{
	int i, character;
	SDL_Rect *g;

	*w = *h = 0;

	i = 0;

	character = text[i++];

	while (character)
	{
		g = &glyphs[fontType][character];

		*w += g->w;
		*h = MAX(g->h, *h);

		character = text[i++];
	}
}
What this function does is steps through each character in our string, grabs the appropriate glyph, and adds the width to the running total. It also tests the height of each glyph and will assign it to h if it is larger than the current value. This will give us the width and height dimensions of our string.
getWrappedTextHeight does what the name suggests: returns the height of a string of text after its been wrapped:
int getWrappedTextHeight(char *text, int fontType, int maxWidth)
{
	return drawTextWrapped(text, 0, 0, 255, 255, 255, fontType, TEXT_ALIGN_LEFT, maxWidth, 0);
}
Notice now that it's calling drawTextWrapped, but with the final parameter (doDraw) as 0. This is because we want to leverage the wrapping functionality of drawTextWrapped, but don't want it to output anything. drawTextWrapped always returned the y value (plus the height of a space character) at the end of the function. The reason for adding in the height of a space is to handle the fencepost (off-by-one) error.
That's all our new text rendering routined defined, so now we can demonstrate their usage. We'll turn again to demo.c, that has been tweaked to display several different scenes. We'll quickly touch on an enum that we've added to text.h, to define our scene type:
enum {
	SCENE_ALIGN,
	SCENE_WRAPPED,
	SCENE_BOXED,
	SCENE_TYPEWRITER,
	SCENE_MAX
};
Now let's look at initDemo. It is now setting our default scene variable to SCENE_BOXED and a variable called typeWriterPos to 0. This variable will be used to handle our typewriter scene.
void initDemo(void)
{
	scene = SCENE_BOXED;

	typeWriterPos = 0;

	app.delegate.logic = logic;
	app.delegate.draw = draw;
}
Moving onto the logic function, we can see it's rather straightforward:
static void logic(void)
{
	if (scene == SCENE_TYPEWRITER)
	{
		typeWriterPos++;
	}

	if (app.keyboard[SDL_SCANCODE_SPACE])
	{
		scene = (scene + 1) % SCENE_MAX;

		if (scene == SCENE_TYPEWRITER)
		{
			typeWriterPos = 0;
		}

		app.keyboard[SDL_SCANCODE_SPACE] = 0;
	}
}
If we're currently viewing the typewriter scene, we want to increment the value of typeWriterPos. In all cases, we want to check if the space bar has been pressed. If so, we want to move to a different scene. We're doing this by assigning the result of the modulo of the current scene value, plus 1, with SCENE_MAX (defined as 4). What this will do is make the scene variable move between 0, 1, 2, and 3 each time space is pressed. If we've moved onto the typewriter scene, we'll be reseting the typeWriterPos variable to 0. Finally, we'll clear the keyboard input, so that it doesn't keep cycling while space is pressed.
Our draw function is simple. It just tests the value of scene and draws the appropriate scene (and always renders the prompt to press space):
static void draw(void)
{
	switch (scene)
	{
		case SCENE_ALIGN:
			drawAlignedText();
			break;

		case SCENE_WRAPPED:
			drawWrappedText();
			break;

		case SCENE_BOXED:
			drawBoxedTexts();
			break;

		case SCENE_TYPEWRITER:
			drawTypeWriter();
			break;

		default:
			break;
	}

	drawScenePrompt();
}
drawAlignedText uses drawText to draw three text strings, one aligned to the left, one centered, and another aligned to the right, none of which should be wrapped:
static void drawAlignedText(void)
{
	drawText("Left aligned text.", 25, 25, 255, 255, 255, FONT_ENTER_COMMAND, TEXT_ALIGN_LEFT, 0);

	drawText("Center aligned text.", SCREEN_WIDTH / 2, 25, 255, 255, 255, FONT_ENTER_COMMAND, TEXT_ALIGN_CENTER, 0);

	drawText("Right aligned text.", SCREEN_WIDTH - 25, 25, 255, 255, 255, FONT_ENTER_COMMAND, TEXT_ALIGN_RIGHT, 0);
}
drawWrappedText draws two long lines of text at two different position, both wrapped to half the width of our screen. One will rendered left aligned and the other rendered right aligned. This function helps to show that our wrapping and aligning can work in conjunction with one another, without issue:
static void drawWrappedText(void)
{
	char *text;

	text = "A really long line of text that is too wide for the screen, but will actually now fit because we're wrapping it, and so can be read properly.";

	drawText(text, 25, 25, 255, 255, 255, FONT_LINUX, TEXT_ALIGN_LEFT, SCREEN_WIDTH / 2);

	drawText(text, SCREEN_WIDTH - 25, 350, 255, 255, 255, FONT_LINUX, TEXT_ALIGN_RIGHT, SCREEN_WIDTH / 2);
}
drawBoxedTexts is a function that delegates to another function, called drawBoxedText. It does this for three different strings of text, rendering them at different positions, with different coloured backgrounds:
static void drawBoxedTexts(void)
{
	drawBoxedText("A string of text that is displayed within a box, rather like a dialog scene in an RPG.", 100, 65, 128, 160, 192);

	drawBoxedText("Another load of boxed text, but this one has a red dark background.", 550, 250, 128, 64, 64);

	drawBoxedText("Look, ma! I'm green and lean! Told you I'd be famous one day. Now I'm in an SDL2 TTF demo!", 50, 400, 32, 160, 64);
}
The drawBoxedText function takes just a few parameters - the text string, the x and y coordinates,and the RGB values for the background to render the text against:
static void drawBoxedText(char *text, int x, int y, int r, int g, int b)
{
	int w, h;

	w = SCREEN_WIDTH / 2;
	h = getWrappedTextHeight(text, FONT_ENTER_COMMAND, w);

	w += 10;
	h += 10;

	drawRect(x, y, w, h, r, g, b);

	drawOutlineRect(x, y, w, h, 255, 255, 255);

	drawText(text, x + 10, y, 255, 255, 255, FONT_ENTER_COMMAND, TEXT_ALIGN_LEFT, w);
}
The function sets the maximum render width of the text to half the screen's width, then calls getWrappedTextHeight to determine how much vertical space the rendered text will occupy. With that discovered, we draw a filled rectangle, using the RGB values we specified (drawRect); an outlined rectangle, in white (drawOutlineRect); and then the text itself, in white. We made some minor adjustments to the width and height (w and h) values for the sake of padding, as well as the x value when drawing the text. It's not entirely accurate to say that we're constraining the text to the bounds of a box, since what we're actually doing is working out the dimensions of some wrapped text, and then first drawing some rectangles at that location, before drawing the text.
The final scene in this tutorial is the typewriter effect. This is again to simply demonstrate the advantage that the font atlas has over creating a text texture; the typewriter effect is obviously able to render the string letter by letter, something that, while not impossible with generating the texture, requires more management. To achieve our effect, we need only pass over a substring of the main text to the drawText function:
static void drawTypeWriter(void)
{
	char textBuffer[1024], *text;
	int n, len;

	text = "The greatest works of William Shakespeare, as written by an SDL TTF tutorial. A million monkeys using a million typewriters could manage the same thing in a few years. Perhaps?";

	len = strlen(text);

	n = MIN(typeWriterPos / 2, len);

	if (n > 0)
	{
		STRNCPY(textBuffer, text, n + 1);

		if (n < len)
		{
			strcat(textBuffer, "_");
		}

		drawText(textBuffer, 10, 100, 255, 255, 255, FONT_LINUX, TEXT_ALIGN_LEFT, 600);
	}
}
In the above, we're assigning a few sentences to the variable text. We're then assigning a variable call n the minimum value of our typeWriterPos (divided by 2) and len. If the value if n is greater than 0 (as won't be to begin with), we want to copy the n characters from text into textBuffer. We're also concatenating an underscore to the text buffer if it's less than the length of the string, just for effect. Finally, we're calling our drawText function as normal, using the textBuffer and a maximum width of 600. As we're increasing the value of typeWriterPos each frame, this will result in us copying an increasing amount of characters as time goes on. Note that we can decrease the speed of the typewriter by dividing typeWriterPos by a larger number than 2 (or we could change the system to use floats, for great flexibility).
The last function in demo.c is just to display the cycle prompt. It's nothing out of the ordinary, as we can see:
static void drawScenePrompt(void)
{
	char line[64];

	memset(line, 0, sizeof(line));

	sprintf(line, "%s - Press [SPACE] to cycle scene", sceneType[scene]);

	drawText(line, SCREEN_WIDTH / 2, SCREEN_HEIGHT - 50, 128, 196, 255, FONT_ENTER_COMMAND, TEXT_ALIGN_CENTER, 0);
}
We're just drawing a line of text, with the name of the scene included (indexed using the scene variable, from a char array called sceneType).
That's it for this tutorial. There's a lot to it, as you can see! In the final part of this tutorial series, we'll look at how to use unicode with SDL2 TTF.
Purchase
The source code for all parts of this tutorial (including assets) is available for purchase:
From itch.io
It is also available as part of the SDL2 tutorial bundle: