PC Games
• Orb
• Lasagne Monsters
• Three Guys Apocalypse
• Water Closet
• Blob Wars : Attrition
• The Legend of Edgar
• TBFTSS: The Pandoran War
• Three Guys
• Blob Wars : Blob and Conquer
• Blob Wars : Metal Blob Solid
• Project: Starfighter
• TANX Squadron
Tutorials
• 2D shoot 'em up
• 2D top-down shooter
• 2D platform game
• Sprite atlas tutorial
• Working with TTF fonts
• 2D adventure game
• Widget tutorial
• 2D shoot 'em up sequel
• 2D run and gun
• Roguelike
• Medals (Achievements)
• 2D turn-based strategy game
• 2D isometric game
• 2D map editor
• 2D mission-based shoot 'em up
• 2D Santa game
• 2D split screen game
• 2D quest game
• SDL 1 tutorials (outdated)
Latest Updates
The Legend of Edgar 1.38
Thu, 1st January 2026
SDL2 Quest game tutorial
Wed, 7th May 2025
SDL2 Versus game tutorial
Wed, 20th March 2024
Download keys for SDL2 tutorials on itch.io
Sat, 16th March 2024
The Legend of Edgar 1.37
Mon, 1st January 2024
Tags
• battle-for-the-solar-system (10)
• blob-wars (10)
• brexit (1)
• code (6)
• edgar (10)
• games (45)
• lasagne-monsters (1)
• making-of (5)
• match3 (1)
• numberblocksonline (1)
• orb (2)
• site (1)
• tanx (4)
• three-guys (3)
• three-guys-apocalypse (3)
• tutorials (18)
• water-closet (4)
Books

The Red Road
For Joe Crosthwaite, surviving school was about to become more than just a case of passing his exams ...
— Mission-based 2D shoot 'em up —
Part 30: Title screen
Note: this tutorial assumes knowledge of C, as well as prior tutorials.


Introduction
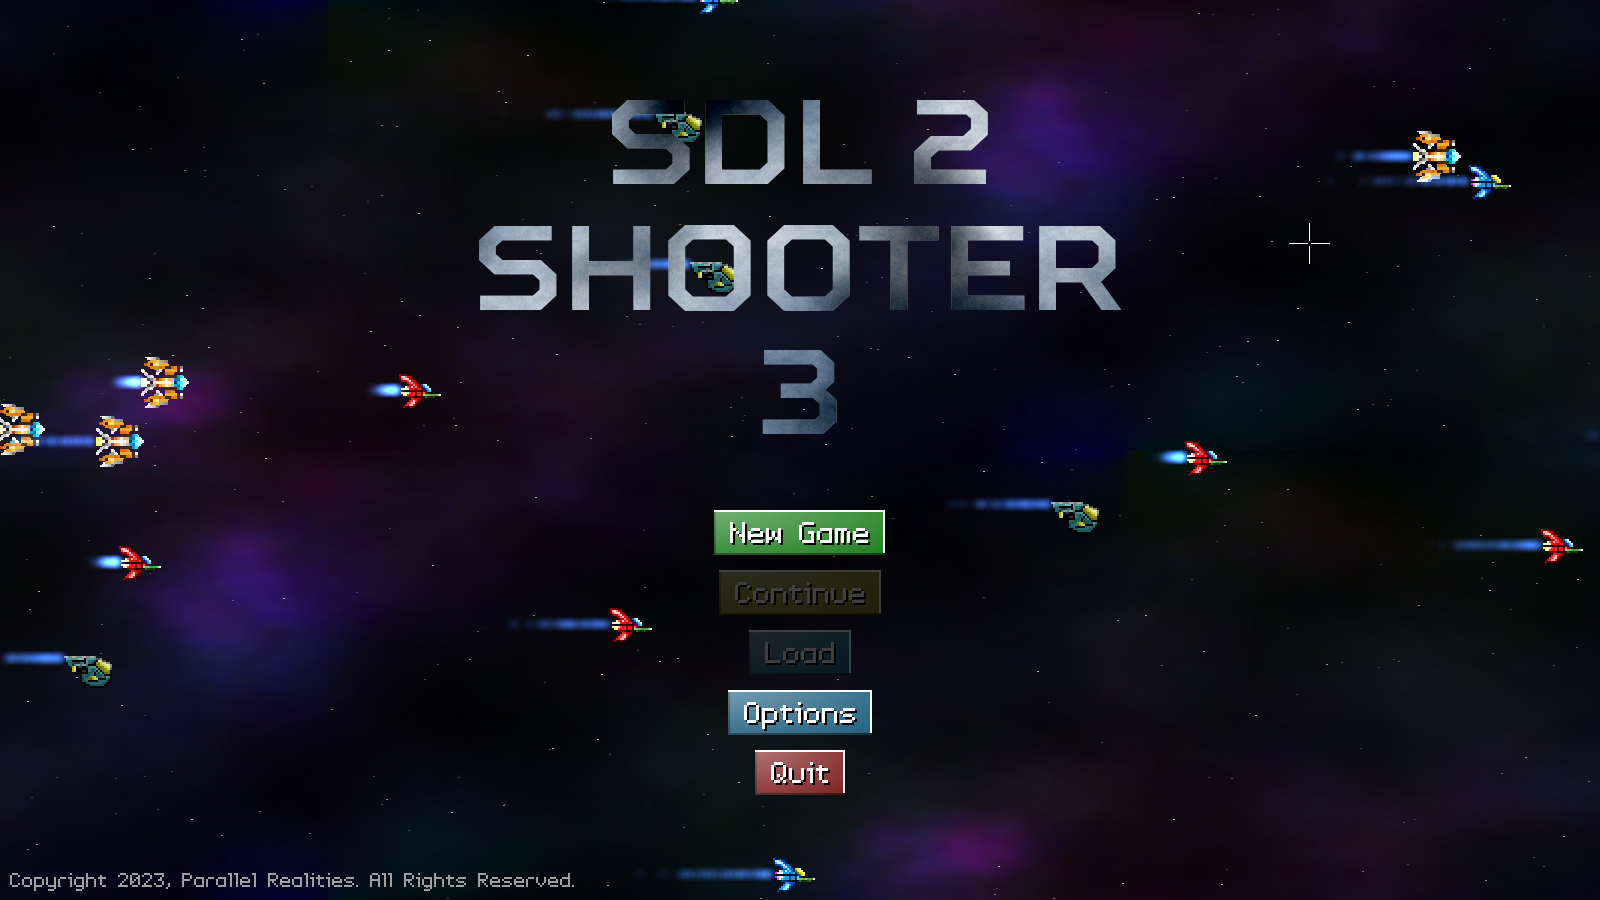
As we approach the end of making our game, it's about time we threw in the title screen. This will be the first thing the player sees when they start the game. From here, they'll be able to start a new game, continue or load an existing game, or set the various game options. It's a standard title screen..!
Extract the archive, run cmake CMakeLists.txt, followed by make, and then use ./shooter3-30 to run the code. You will see a window open like the one above. If there are no saved games available (which there won't be upon the first run) the Continue and Load buttons will be disabled. The Options button will allow you to set the various game options, which will automatically save when clicking the Back button. Click New Game to begin. Play the game as normal. You may quit back to the title screen from the Options section in the Intermission. Once you're finished, close the window to exit, or choose Quit from the title screen.
Inspecting the code
Well, not too much to say here. It's the title screen! We do get to hear the music that has been a staple of the SDL2 Shooter games, although we only hear it here. The title screen is based on the one from Project: Starfighter (in fact, most of the game is..!). So, without further ado, let's jump into the code.
Starting with structs.h:
typedef struct
{
	// snipped

	Widget       *activeWidget;
	double        fontScale;
	int           canSave;
	int           continueSaveSlot;

	// snipped
} App;
We've added in two new fields here: canSave and continueSaveSlot. canSave will determine whether we're allowed to save our game (for example, saving will be blocked on the title screen). continueSaveSlot will be used to track which save slot is the most recent, so that our Continue button can load the relevant saved game.
Now for title.c. This is the compilation unit that will house all the functions related to the title sequence. There's a number of functions here, quite a few of them to do with widgets. We'll start at the beginning, with initTitle:
void initTitle(void)
{
	startTransition();

	app.canSave = 0;

	stopMusic();

	initGame();

	clearStage();

	initEntities();

	initEffects();

	background = loadTexture("gfx/backgrounds/default.jpg");

	titleTextures[0] = getAtlasImage("gfx/title/1.png", 1);
	titleTextures[1] = getAtlasImage("gfx/title/2.png", 1);
	titleTextures[2] = getAtlasImage("gfx/title/3.png", 1);

	reveal = 0;

	show = SHOW_TITLE;

	initFighters();

	initStarfield();

	initLoadSave();

	initOptions();

	initControls();

	setupWidgets();

	loadMusic("music/Mercury.ogg");

	stage.player = &player;
	player.dead = 1;

	app.mouse.showCursor = 1;

	app.delegate.logic = logic;
	app.delegate.draw = draw;

	endTransition();

	playMusic(1);
}
Quite a lot of setup going on here. Something that our title screen is doing is leaning on Stage to drive the processing and rendering of its fighters and effects, thus we're calling functions like clearStage, initEntities, and initEffects. Some of these functions we've seen before, while others we'll come to in time. Of note is that we're setting App's canSave to 0, to block saving (we'll see more on this later). We're also loading some textures for our logo (into 3 different parts), and setting a variable called `reveal` to 0. Those familiar with SDL2 Shooter and SDL2 Shooter 2 will recongise this as the control variable for revealing our logo. We also have a `show` variable here, that we've set to SHOW_TITLE. This will, as expected, be used to control whether we display things like options, save game slots, etc. Note that, since we're relying on Stage for some of our rendering and logic, we're creating a dummy "player" entity and assigning it to Stage's `player` pointer. We're then setting the player's `dead` flag to 1, so that our behaviour is correct. Yep, this is a bit of a hack so that eveything plays nice. Many older games used to use such hacks for similar purposes (and newer ones may still do).
Now for our `logic` function:
static void logic(void)
{
	stage.engineEffectTimer -= app.deltaTime;

	reveal = MIN(reveal + app.deltaTime, 500);

	doBackground(SCROLL_SPEED * app.deltaTime, 0);

	doStarfield(SCROLL_SPEED, 0);

	doFighters();

	doEffects();

	if (stage.engineEffectTimer <= 0)
	{
		stage.engineEffectTimer = 1;
	}

	switch (show)
	{
		case SHOW_TITLE:
			doWidgets("title");
			break;

		case SHOW_LOAD_SAVE:
			doLoadSave();
			break;

		case SHOW_OPTIONS:
			doOptions();
			break;

		default:
			break;
	}
}
We're increasing the value of `reveal` here, limiting it to 500. This will be used to make our logo draw in from top to bottom during our rendering phase. We know that our logo isn't any taller than 500 pixels, which is why we've picked this number. We're also performing some relevant Stage processing here (such as updating the engineEffectTimer, calling doStarfield and doEffects, for example). The doFighters function is local to title.c, so we'll come to that in a bit. Otherwise, we're testing the value of `show`, to see whether we want to process our title widgets, our loading and saving, or our options.
So far, so good. Now for doFighters:
static void doFighters(void)
{
	Entity *e;

	for (e = stage.entityHead.next; e != NULL; e = e->next)
	{
		e->tick(e);

		if (e->x > SCREEN_WIDTH)
		{
			e->x = -e->texture->rect.w;
			e->y = rand() % SCREEN_HEIGHT - e->texture->rect.h;
		}
	}
}
The fighters that appear on the title live in Stage, and so we're processing them as though they are real game entities. We're calling their `tick` functions, to make them move and also produce their engine effects. When they reach the end of the screen (on the right), we'll reset them to the left of the screen, and randomly change their horizontal positions. This gives the impression of a large number of craft, without a repeating pattern (although the types of fighter will remain the same).
That's all there is to our logic. We're delegating to existing functions, so doFighters was all we needed here. Let's look at our rendering phase. Starting with `draw`:
static void draw(void)
{
	drawBackground(background);

	drawStarfield();

	drawFighters();

	drawEffects();

	switch (show)
	{
		case SHOW_TITLE:
			drawTitle();
			drawWidgets("title");
			break;

		case SHOW_LOAD_SAVE:
			drawLoadSave();
			break;

		case SHOW_OPTIONS:
			drawOptions();
			break;

		default:
			break;
	}

	drawText("Copyright 2023, Parallel Realities. All Rights Reserved.", 10, SCREEN_HEIGHT - 35, 160, 160, 160, TEXT_ALIGN_LEFT, 0);
}
With the exception of drawFighters, we're calling a load of familiar functions here. Once again, we're testing the value of `show`, to check if we want to draw our title and its widgets, or if we want to draw our loading and saving, or our options (as with doLoadSave and doOptions, the functions called here are the ones used by intermission.c).
Now for drawTitle:
static void drawTitle(void)
{
	int y;

	y = 100;

	drawTitlePart(titleTextures[0], (SCREEN_WIDTH - titleTextures[0]->rect.w) / 2, y);
	drawTitlePart(titleTextures[1], (SCREEN_WIDTH - titleTextures[1]->rect.w) / 2, y + 125);
	drawTitlePart(titleTextures[2], (SCREEN_WIDTH - titleTextures[2]->rect.w) / 2, y + 250);
}
We're delegating to a function called drawTitlePart here. It takes just three parameters: the texture (AtlasImage) to draw, and x and y positions. Our logo is divided into three parts, and so we're stacking them on top of one another (increasing the value of `y`, that starts at 100). Our logo is horizontally centered, hence the (SCREEN_WIDTH - width) / 2 calcuation.
Let's look at drawTitlePart now:
static void drawTitlePart(AtlasImage *atlasImage, int x, int y)
{
	SDL_Rect src, dest;

	src = atlasImage->rect;
	src.h = MIN(src.h, reveal);

	dest.x = x;
	dest.y = y;
	dest.w = atlasImage->rect.w;
	dest.h = src.h;

	SDL_RenderCopyEx(app.renderer, atlasImage->texture, &src, &dest, 0, NULL, SDL_FLIP_NONE);
}
To make our title parts reveal themselves, we're first making a copy of atlasImage's `rect`, copying it into a variable called `src`, an SDL_Rect. Next, we're limiting the value of `src`'s `h` (height), to the minimum between `reveal` and `src`'s `h`. This will give us the smaller of the two values. We then setup another SDL_Rect called `dest` (the destination on screen), assigning it the x and y positions, the atlasImage's `rect`'s `w` (width), and the height of `src` (which, again, might be smaller than the actual texture's height). Finally, we pass all this to SDL_RenderCopyEx, to draw just the portion of the image we want.
So, we're just copying a bit of the logo at a time, based on the value of `reveal`.
Next up is drawFighters:
static void drawFighters(void)
{
	Entity *e;

	for (e = stage.entityHead.next; e != NULL; e = e->next)
	{
		blitAtlasImage(e->texture, e->x, e->y, 0, SDL_FLIP_NONE);
	}
}
Not much to say here - we're looping through all the entities in Stage, and drawing them, using their texture, and position (x and y).
That's our logic and rendering functions handled. We're now going to look at the setup and widget actions. Starting with initFighters:
static void initFighters(void)
{
	int     i, n;
	Entity *e;
	char   *fighterNames[] = {"greebleDualFighter", "greebleLightFighter", "greeblePOWShip", "greebleBomber"};

	n = sizeof(fighterNames) / sizeof(char *);

	for (i = 0; i < 16; i++)
	{
		e = initEntity(fighterNames[rand() % n]);

		e->x = rand() % SCREEN_WIDTH;
		e->y = rand() % SCREEN_HEIGHT - e->texture->rect.h;

		((Fighter *)e->data)->dx = 1 + rand() % 5;
	}
}
This function is responsible for creating the fighters that fly across the screen during our title sequence. We're going to randomly setup 16 of them. We create an array called fighterNames, containing the entity names of the fighters we want to create, and then pick a random one during each iteration of our for-loop. We pass the chosen name of initEntity, and then randomly position the fighter on screen. Finally, we set the Fighter's `dx` to a random between 1 and 5. Note here that, as with the retreatEnemies function (that we saw in the previous part), we're assuming that our entities are Fighters during the cast. They should be, but one would have to be careful if they chose to tinker with adding something that isn't a Fighter to the fighterNames list.
Now for setupWidgets:
static void setupWidgets(void)
{
	Widget *w;

	w = getWidget("newGame", "title");
	w->action = newGame;
	w->x = ((SCREEN_WIDTH - w->w) / 2);
	w->y = (SCREEN_HEIGHT / 2) + 60;

	w = getWidget("continue", "title");
	w->action = continueGame;
	w->x = ((SCREEN_WIDTH - w->w) / 2);
	w->y = (SCREEN_HEIGHT / 2) + 120;
	w->disabled = app.continueSaveSlot == -1;

	w = getWidget("load", "title");
	w->action = load;
	w->x = ((SCREEN_WIDTH - w->w) / 2);
	w->y = (SCREEN_HEIGHT / 2) + 180;
	w->disabled = app.continueSaveSlot == -1;

	w = getWidget("options", "title");
	w->action = options;
	w->x = ((SCREEN_WIDTH - w->w) / 2);
	w->y = (SCREEN_HEIGHT / 2) + 240;

	w = getWidget("quit", "title");
	w->action = quit;
	w->x = ((SCREEN_WIDTH - w->w) / 2);
	w->y = (SCREEN_HEIGHT / 2) + 300;
}
Standard widget setup, but pay attention to the Continue and Load widgets. We're disabling or enabling them based on whether there is a save game available. We'll know we have at least one save game to load if App's continueSaveSlot isn't -1. We'll get to how we're determining this shortly.
Now for the widget actions. Starting with newGame:
static void newGame(void)
{
	playSound(SND_START_JINGLE, CH_GUI);

	clearStage();

	initIntermission();
}
We're playing a sound, calling clearStage (to remove all the data we set there for our fighters and effects), and calling initIntermission. Nice and easy. Next up is continueGame:
static void continueGame(void)
{
	playSound(SND_START_JINGLE, CH_GUI);

	loadGame(app.continueSaveSlot);

	clearStage();

	initIntermission();
}
Much like newGame, except that we're calling loadGame, and passing over the value of App's continueSaveSlot, to load the most recent game.
load is up next:
static void load(void)
{
	Widget *w;

	show = SHOW_LOAD_SAVE;

	w = getWidget("cancel", "loadSave");
	w->hidden = 0;
	w->action = backCancel;
}
We're updating `show` to SHOW_LOAD_SAVE, so that we can process and render the save slots. We're also grabbing hold of the Cancel widget that lives in the loadSave group, and making it visible (hidden = 0). In our intermission this widget isn't visible, as we can simply click across all the different section icons. For our title screen, we need to be able to back out of the display. We're assigning the button's `action` to a function named backCancel.
Next, we have options:
static void options(void)
{
	Widget *w;

	show = SHOW_OPTIONS;

	getWidget("quit", "options")->hidden = 1;

	w = getWidget("back", "options");
	w->hidden = 0;
	w->action = backCancel;
}
Again, we're changing `show` to the relevant value, and then manipulating the widgets we want to display. We don't want to display the Quit button, as we already have one on the main title screen. We also want to show the Back button, and again link it to backCancel.
The backCancel function is simple enough:
static void backCancel(void)
{
	saveConfig();

	setupWidgets();

	show = SHOW_TITLE;
}
We're calling saveConfig (as we might've tweaked the configuration, and this is a shared function), and then calling setupWidgets once again. The reason we're calling setupWidgets again is because we might have deleted a save game, and so we need to test whether continuing and loading is supported. Finally, we set `show` back to SHOW_TITLE.
Lastly, we have `quit`:
static void quit(void)
{
	exit(0);
}
Which just calls exit, to terminate the game.
That's all there is to title.c. We should look at the other tweaks we've made to the game now, to support some of the logic we introduced. Starting with game.c, we've updated populateSaveSlots:
void populateSaveSlots(SaveSlot *slots)
{
	int       i, latestTime;
	char      filename[MAX_FILENAME_LENGTH], *data;
	cJSON    *root, *node;
	SaveSlot *s;
	time_t    time;

	app.continueSaveSlot = -1;

	for (i = 0; i < NUM_SAVE_SLOTS; i++)
	{
		s = &slots[i];
		s->slot = i;

		sprintf(filename, SAVE_GAME_FILENAME, i);

		if (fileExists(filename))
		{
			// snipped

			s->time = cJSON_GetObjectItem(node, "date")->valueint;

			if (app.continueSaveSlot == -1 || s->time > latestTime)
			{
				app.continueSaveSlot = i;

				latestTime = s->time;
			}

			// snipped
		}
		else
		{
			// snipped
		}

		SDL_LogMessage(SDL_LOG_CATEGORY_APPLICATION, SDL_LOG_PRIORITY_INFO, "Save Slot #%d: %s", i + 1, s->dateTimeStr);
	}

	SDL_LogMessage(SDL_LOG_CATEGORY_APPLICATION, SDL_LOG_PRIORITY_INFO, "Continue Save Slot: %d", app.continueSaveSlot);
}
The populateSaveSlots function is where we're determining the save game that will act as our continue slot. We first set App's continueSaveSlot to -1, to say there is no continue slot available, and then check the times of the saves as we process them. For each available save, we test if App's continueSaveSlot is -1 or if the save slot's time is better than a variable called latestTime, and then set App's continueSaveSlot to the save slot index (`i`), and update latestTime to the value of the current slot's (`s`'s) time. This means that the save slot that was saved most recently will become our continue option.
Now over to loadSave.c, where we've made a simple update to updateButtons:
static void updateButtons(void)
{
	loadWidget->disabled = deleteWidget->disabled = selectedSaveSlot->time == SAVE_SLOT_EMPTY;
	saveWidget->disabled = !app.canSave;
}
We now only want to enable the Save button if we're allowed to save (since it will be blocked on the title screen).
Over to intermission.c, where we've also made a single update to initIntermission:
void initIntermission(void)
{
	int i, x;

	startTransition();

	app.canSave = 1;

	stopMusic();

	// snipped
}
We're setting App's canSave to 1, since we're now in the game proper, and are allowed to save.
Finally, we head to options.c, where the `quit` function has received some attention:
static void quit(void)
{
	saveConfig();

	initTitle();
}
Beforehand, this did nothing. Now, we'll be saving the configuration, and calling initTitle, to return to the title screen.
Our game is very nearly finished. We have all the pieces we need, and they all work together very nicely. We have our title screen, can load and save games, can undertake missions, upgrade the KIT-E, and configure the sound, music, and controls. Just one more part to go where we add in all the finishing touches and clean up some misc. items, and we're totally finished. It's been a long road, for sure, but the results are well worth it.
Purchase
The source code for all parts of this tutorial (including assets) is available for purchase:
From itch.io
It is also available as part of the SDL2 tutorial bundle: