PC Games
• Orb
• Lasagne Monsters
• Three Guys Apocalypse
• Water Closet
• Blob Wars : Attrition
• The Legend of Edgar
• TBFTSS: The Pandoran War
• Three Guys
• Blob Wars : Blob and Conquer
• Blob Wars : Metal Blob Solid
• Project: Starfighter
• TANX Squadron
Tutorials
• 2D shoot 'em up
• 2D top-down shooter
• 2D platform game
• Sprite atlas tutorial
• Working with TTF fonts
• 2D adventure game
• Widget tutorial
• 2D shoot 'em up sequel
• 2D run and gun
• Roguelike
• Medals (Achievements)
• 2D turn-based strategy game
• 2D isometric game
• 2D map editor
• 2D mission-based shoot 'em up
• 2D Santa game
• 2D split screen game
• 2D quest game
• SDL 1 tutorials (outdated)
Latest Updates
The Legend of Edgar 1.38
Thu, 1st January 2026
SDL2 Quest game tutorial
Wed, 7th May 2025
SDL2 Versus game tutorial
Wed, 20th March 2024
Download keys for SDL2 tutorials on itch.io
Sat, 16th March 2024
The Legend of Edgar 1.37
Mon, 1st January 2024
Tags
• battle-for-the-solar-system (10)
• blob-wars (10)
• brexit (1)
• code (6)
• edgar (10)
• games (45)
• lasagne-monsters (1)
• making-of (5)
• match3 (1)
• numberblocksonline (1)
• orb (2)
• site (1)
• tanx (4)
• three-guys (3)
• three-guys-apocalypse (3)
• tutorials (18)
• water-closet (4)
Books

Firmware
HF-Tech's chips have changed the world. Embedded into the heads of over 90% of the world's population, they have cured autism, dementia, provided intelligence boosts, and helped to ease some of the more mundane tasks in life. Daniel Blair, hacker and Workshop member, however is not convinced that everything is as rosy as it seems. But is he looking in all the wrong places..?
— Mission-based 2D shoot 'em up —
Part 18: Intermission: Shop (2 / 2)
Note: this tutorial assumes knowledge of C, as well as prior tutorials.


Introduction
We have all our icons and widgets setup for our shop, so it's now time to introduce all the buying and equipping logic. As you'll soon, there is a little more to it than simply pressing the "Buy" button.
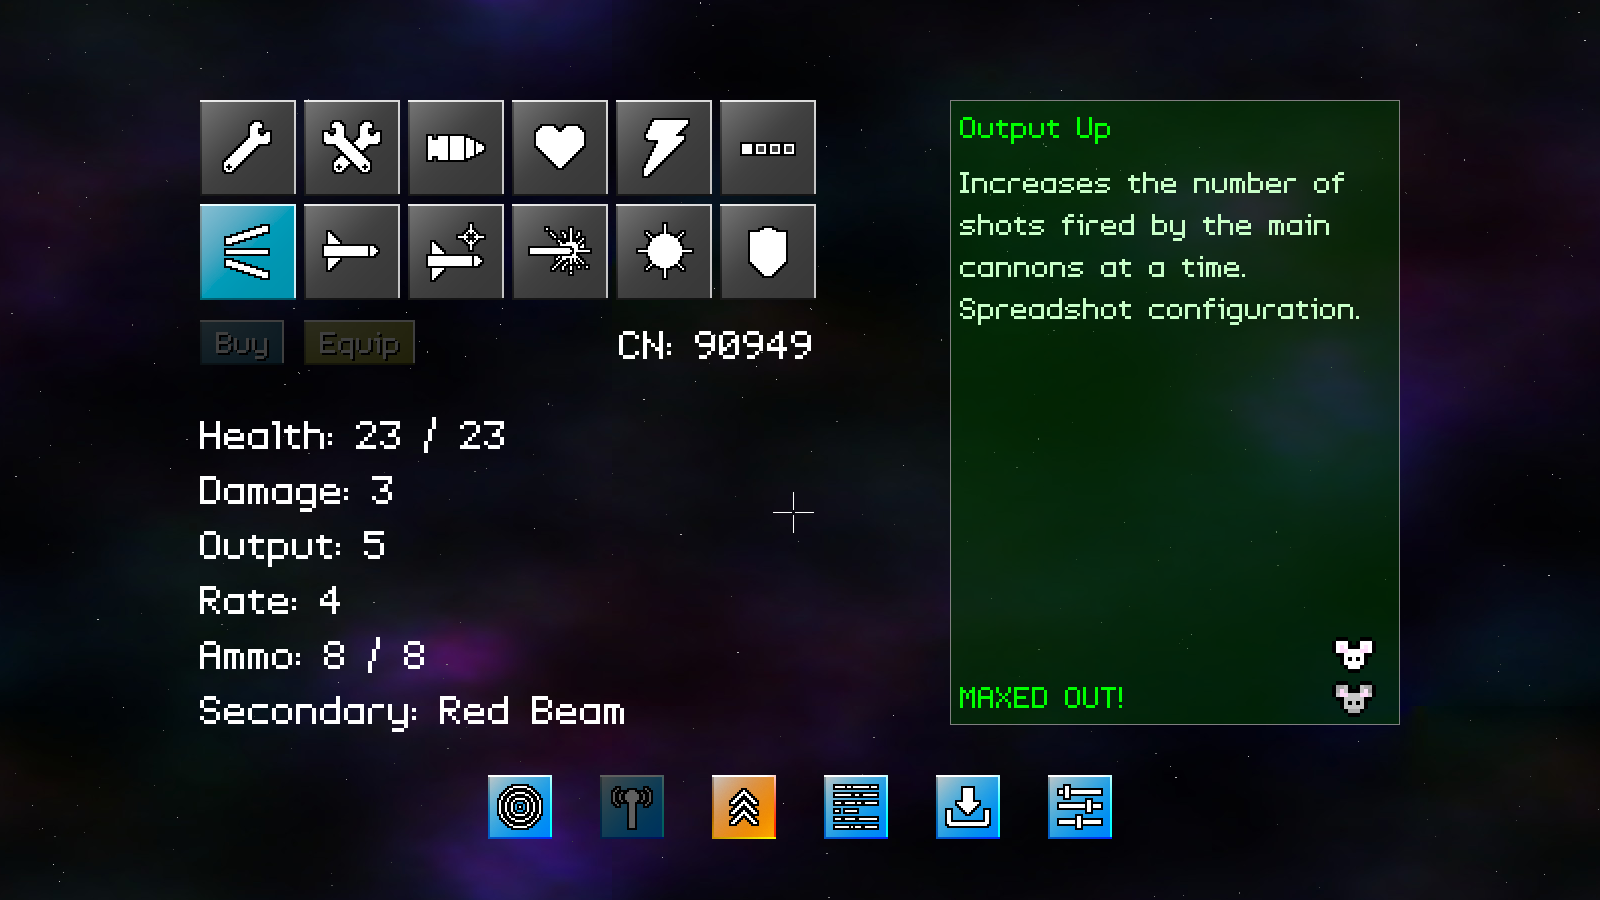
Extract the archive, run cmake CMakeLists.txt, followed by make, and then use ./shooter3-18 to run the code. You will see a window open like the one above. Use the mouse to control the cursor. Click on the various shop items (in grey) to view information about them. Click the Buy button to purchase items. For various reasons, the Buy button might be disabled. Purchased secondary weapons can be equipped by clicking the Equip button. Only one secondary weapon can be equipped at a time. Once you're finished, close the window to exit.
Inspecting the code
Let's jump right in. We've had to make a number of changes outside of shop.c to make our purchasing work. We'll start with defs.h:
#define MAX_KITE_OUTPUT     5
#define MIN_KITE_RELOAD     20
#define MAX_KITE_RELOAD     4
#define MAX_KITE_MAX_HEALTH 100
#define MAX_KITE_DAMAGE     8
#define MAX_KITE_AMMO       8
We've added in a bunch of defines to specify limits to our upgrades, including output, reload (fire rate), health, damage, and ammo.
Next, we've updated structs.h:
typedef struct
{
	int catnip;
	struct
	{
		int health, maxHealth;
		int ammo;
		int damage;
		int reload;
		int output;
		int secondaryWeapon;
		int ownedSecondaryWeapons[SW_MAX];
	} kite;
} Game;
We've added in a new field to Game's kite - ownedSecondaryWeapons is an array that will flag which secondary weapons we own. This will allow us to offer them for purchase and equipping in our shop.
Now to shop.c itself. We've both added new function and modified existing one. Starting with initShop:
void initShop(void)
{
	adjustShopPrices();

	chatTextId = rand() % numChatTexts;

	buyWidget = getWidget("buy", "shop");
	buyWidget->x = 200;
	buyWidget->y = 320;
	buyWidget->action = doBuy;

	equipWidget = getWidget("equip", "shop");
	equipWidget->x = buyWidget->x + buyWidget->w + 20;
	equipWidget->y = buyWidget->y;
	equipWidget->action = doEquip;

	// snipped
}
We're calling a new function here named adjustShopPrices. We'll see this at the end, but it basically does as its name suggests - adjusts the prices on offer in our shop, based on what we already own. Next, we're setting the actions for our buyWidget and equipWidget, to make them call doBuy and doEquip, respectively. We've also enabled them by default.
doItems is the next function to be updated:
static void doItems(void)
{
	int       i;
	SDL_Rect *r;

	hoverItem = NULL;

	for (i = 0; i < SI_MAX; i++)
	{
		r = &shopItems[i].rect;

		if (collision(app.mouse.x, app.mouse.y, 1, 1, r->x, r->y, r->w, r->h))
		{
			hoverItem = &shopItems[i];

			if (app.mouse.buttons[SDL_BUTTON_LEFT])
			{
				app.mouse.buttons[SDL_BUTTON_LEFT] = 0;

				if (selectedItem != &shopItems[i])
				{
					selectedItem = &shopItems[i];

					secondaryWeaponId = 1 + (selectedItem->id - SI_ROCKET_LAUNCHER);

					textTimer = 0;
				}
			}
		}
	}
}
We've actually added a single line here to set a variable called secondaryWeaponId to the value of the selectionItem's `id`, less the value of SI_ROCKET_LAUNCHER. What we're doing here is aligning the value of SI_ to SW_ (so, SI_ROCKET_LAUNCHER will align to SW_ROCKET, etc). We're getting away with it here, since our weapon order lines up when the maths is done. If we wanted a safer approach, we could use a switch statement or if-test to get the value we want.
Now for doShopButtons, and as you can see, the function has grown quite a lot:
static void doShopButtons(void)
{
	int canBuy, canEquip;

	canBuy = canEquip = maxedOut = 0;

	if (selectedItem != NULL)
	{
		if (selectedItem->price <= game.catnip)
		{
			switch (selectedItem->id)
			{
				case SI_REPAIR:
				case SI_REPAIR_FULL:
					canBuy = game.kite.health < game.kite.maxHealth;
					maxedOut = !canBuy;
					break;

				case SI_AMMO:
					canBuy = game.kite.ammo < MAX_KITE_AMMO;
					maxedOut = !canBuy;
					break;

				case SI_MAX_HEALTH:
					canBuy = game.kite.maxHealth < MAX_KITE_MAX_HEALTH;
					maxedOut = !canBuy;
					break;

				case SI_RATE:
					canBuy = game.kite.reload > MAX_KITE_RELOAD;
					maxedOut = !canBuy;
					break;

				case SI_DAMAGE:
					canBuy = game.kite.damage < MAX_KITE_DAMAGE;
					maxedOut = !canBuy;
					break;

				case SI_OUTPUT:
					canBuy = game.kite.output < MAX_KITE_OUTPUT;
					maxedOut = !canBuy;
					break;

				default:
					canBuy = secondaryWeaponId > SW_NONE && !game.kite.ownedSecondaryWeapons[secondaryWeaponId];
					break;
			}
		}

		canEquip = secondaryWeaponId > SW_NONE && game.kite.ownedSecondaryWeapons[secondaryWeaponId] && game.kite.secondaryWeapon != secondaryWeaponId;
	}

	buyWidget->disabled = !canBuy;

	equipWidget->disabled = !canEquip;

	doWidgets("shop");
}
What this function is doing is performing all the logic to see if the currently selected item can be purchased or equipped. We set three variables here: canBuy, canEquip, and maxedOut (the latter being static in shop.c). We first check if the player has the catnip required to buy the item, then perform individual checks on the item itself, to see if we meet the requirements. For example, we can only repair the KIT-E if our health is less than the maximum, and can only upgrade our damage if it's less than MAX_KITE_DAMAGE, etc. Our default clause will assume we're working with a secondary weapon, and check if we don't already own the weapon. The maxedOut variable is used for aesthetic purposes, and is set to the inverse of canBuy for max health, ammo, rate, damage, and output.
The canEquip variable is set based on whether we've currently selected a secondary weapon, that we own that weapon, and that we don't already have it equipped.
Lastly, the Buy and Equip widgets will be enabled or disabled based on the values of canBuy and canEquip.
So far, so good. Now let's look at the doBuy function:
static void doBuy(void)
{
	switch (selectedItem->id)
	{
		case SI_REPAIR:
			game.kite.health++;
			break;

		case SI_REPAIR_FULL:
			game.kite.health = game.kite.maxHealth;
			break;

		case SI_AMMO:
			game.kite.ammo++;
			break;

		case SI_MAX_HEALTH:
			if (game.kite.health == game.kite.maxHealth)
			{
				game.kite.health++;
			}
			game.kite.maxHealth++;
			break;

		case SI_DAMAGE:
			game.kite.damage++;
			break;

		case SI_RATE:
			game.kite.reload = MAX(game.kite.reload - KITE_RATE_STEP, MAX_KITE_RELOAD);
			break;

		case SI_OUTPUT:
			game.kite.output++;
			break;

		case SI_ROCKET_LAUNCHER:
		case SI_HOMING_MISSILE:
		case SI_BEAM:
		case SI_MINE:
		case SI_SHIELD:
			game.kite.ownedSecondaryWeapons[secondaryWeaponId] = 1;
			break;
	}

	game.catnip -= selectedItem->price;

	adjustShopPrices();
}
This function is tied to the Buy widget, so can only be invoked if that widget is enabled. This function is responsible for actually purchasing the item we have selected. We perform a switch against selectedItem's `id` to see what we're buying, and apply the appropriate logic. Most cases do as you would expect (increasing ammo, health, etc). When it comes to health, if we are already at maximum health, we'll increase that alongside it, so that we don't need to also repair the ship when we increase our health..! For our secondary weapons, we're simply setting Game's kite's ownedSecondaryWeapons flag to 1, using the value of secondaryWeaponId.
With the item purchased, we're deducting the price from our catnip, and then calling adjustShopPrices (we'll come to this function at the very end).
The doEquip function comes next, and is very simple:
static void doEquip(void)
{
	game.kite.secondaryWeapon = secondaryWeaponId;
}
Just one line. We're setting Game's kite's secondaryWeapon to the value of secondaryWeaponId.
We're almost finished. Just two function left to consider, and our shop is complete. Next up is drawItemDescription:
static void drawItemDescription(void)
{
	// snipped

	if (selectedItem != NULL)
	{
		// snipped

		if (maxedOut)
		{
			STRCPY(text, "MAXED OUT!");
		}
		else if (secondaryWeaponId <= SW_NONE || !game.kite.ownedSecondaryWeapons[secondaryWeaponId])
		{
			sprintf(text, "Price: %d CN", selectedItem->price);
		}
		else
		{
			STRCPY(text, "SOLD OUT!");
		}

		footer = text;
	}
	else
	{
		// snipped
	}

	// snipped
}
We've updated the text that is displayed for `footer`, since we won't be displaying the price at all times. If the maxedOut variable is set, we'll be printing "MAXED OUT!". If we're not using a seconday weapon or do not own the secondary weapon currently selected, we'll display the price. Finally, if none of the above apply (meaning we've selected a seconday weapon that we can't buy), we'll be printing "SOLD OUT!" Apparently, the Mouse Bros only keep one of each secondary weapon in stock..!
The last function to look at is adjustShopPrices:
static void adjustShopPrices(void)
{
	shopItems[SI_REPAIR_FULL].price = game.kite.maxHealth * 10;
	shopItems[SI_MAX_HEALTH].price = game.kite.maxHealth * 15;
	shopItems[SI_DAMAGE].price = game.kite.damage * 150;
	shopItems[SI_RATE].price = (1 + (MIN_KITE_RELOAD - game.kite.reload) / KITE_RATE_STEP) * 200;
	shopItems[SI_OUTPUT].price = game.kite.output * 250;
}
What we're doing here is setting the prices for various items and services in the shop, based on the current stats of the KIT-E. In short, the next upgrade or full repair will become more expensive with each upgrade. We're calling this function in both initShop and doBuy, to set the prices initally, and make adjustments upon each purchase.
There we go! Our shop is now complete. I'm sure you'll agree that splitting this in two was the best approach, as it would've all been too much to take in in one go. The next section that we're going to look at is our stats screen. This is going to be a very easy section compared to those that have preceeded it, giving us a bit of a breather.
Purchase
The source code for all parts of this tutorial (including assets) is available for purchase:
From itch.io
It is also available as part of the SDL2 tutorial bundle: