PC Games
• Orb
• Lasagne Monsters
• Three Guys Apocalypse
• Water Closet
• Blob Wars : Attrition
• The Legend of Edgar
• TBFTSS: The Pandoran War
• Three Guys
• Blob Wars : Blob and Conquer
• Blob Wars : Metal Blob Solid
• Project: Starfighter
• TANX Squadron
Tutorials
• 2D shoot 'em up
• 2D top-down shooter
• 2D platform game
• Sprite atlas tutorial
• Working with TTF fonts
• 2D adventure game
• Widget tutorial
• 2D shoot 'em up sequel
• 2D run and gun
• Roguelike
• Medals (Achievements)
• 2D turn-based strategy game
• 2D isometric game
• 2D map editor
• 2D mission-based shoot 'em up
• 2D Santa game
• 2D split screen game
• 2D quest game
• SDL 1 tutorials (outdated)
Latest Updates
The Legend of Edgar 1.38
Thu, 1st January 2026
SDL2 Quest game tutorial
Wed, 7th May 2025
SDL2 Versus game tutorial
Wed, 20th March 2024
Download keys for SDL2 tutorials on itch.io
Sat, 16th March 2024
The Legend of Edgar 1.37
Mon, 1st January 2024
Tags
• battle-for-the-solar-system (10)
• blob-wars (10)
• brexit (1)
• code (6)
• edgar (10)
• games (45)
• lasagne-monsters (1)
• making-of (5)
• match3 (1)
• numberblocksonline (1)
• orb (2)
• site (1)
• tanx (4)
• three-guys (3)
• three-guys-apocalypse (3)
• tutorials (18)
• water-closet (4)
Books
The Red Road
For Joe Crosthwaite, surviving school was about to become more than just a case of passing his exams ...
— Mission-based 2D shoot 'em up —
Part 16: Intermission: Comms
Note: this tutorial assumes knowledge of C, as well as prior tutorials.


Introduction
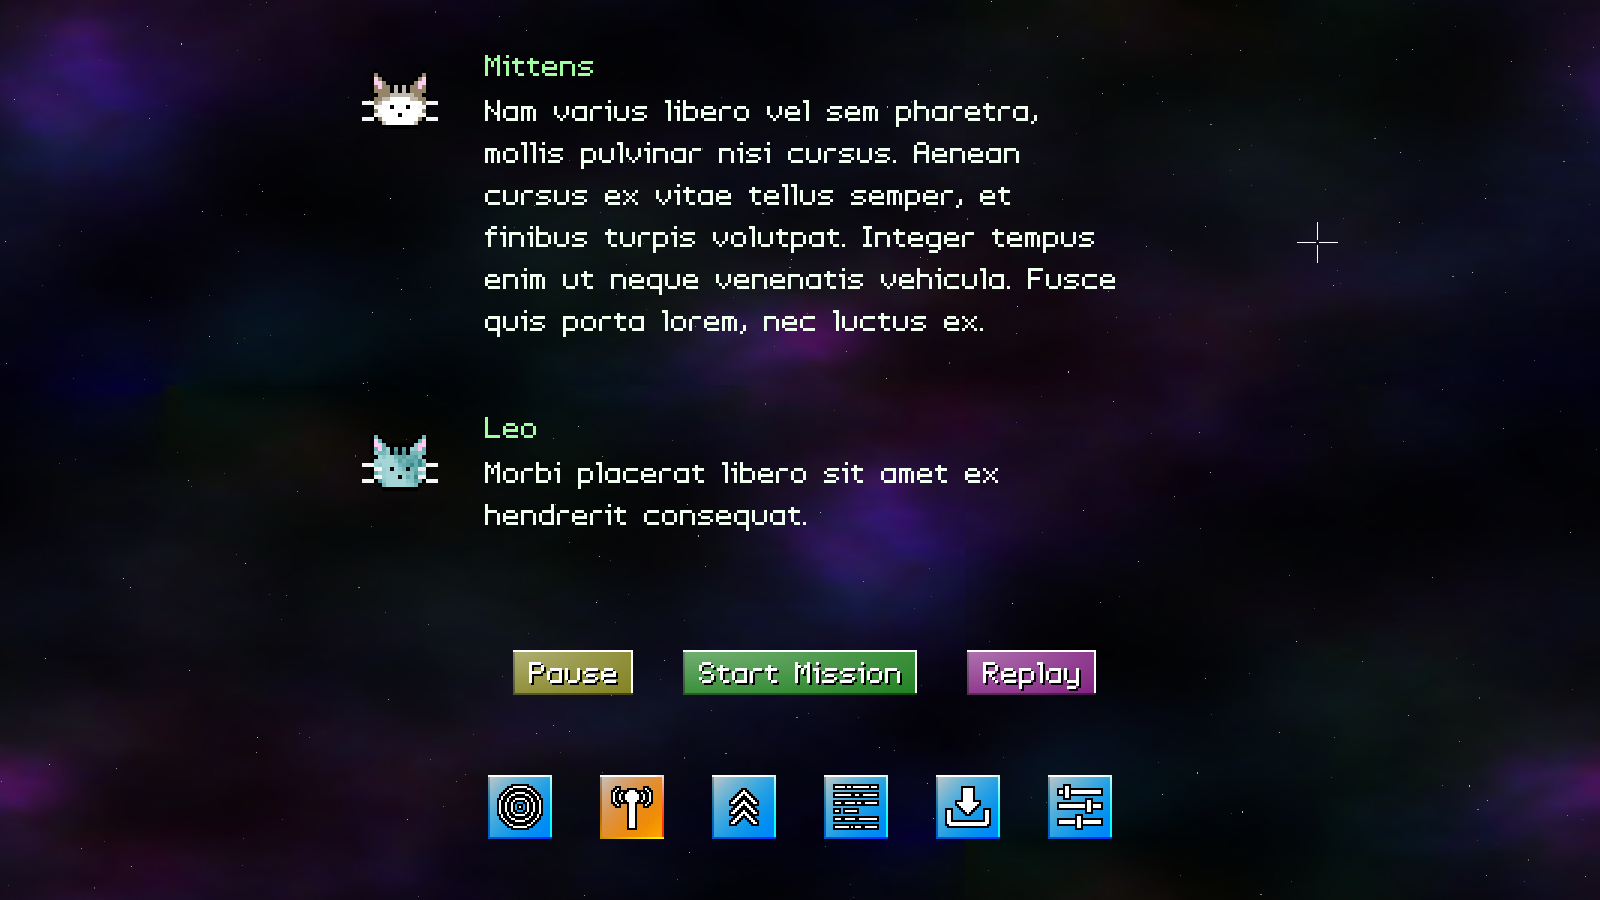
The next screen we're going to add is our comms (communications) screen. This will be where our characters (cats) have a discussion about the mission that needs to be undertaken. Rather than just show the mission objectives, I thought it would be fun to have the characters talk about what needs to be done. Again, this happened in Project Starfighter, although in that game the conversations were static, and didn't animate the way they do here.
Extract the archive, run cmake CMakeLists.txt, followed by make, and then use ./shooter3-16 to run the code. You will see a window open like the one above. Use the mouse to control the cursor. Only one communication is linked to a planet at this time. Select Radish, and then click the new active comms icon to view the conversation. The chat can be paused with the "Pause" button, and resumed with the "Resume" button. The entire conversation can be replayed with the "Replay" button. The "Start Mission" button currently does nothing. Once you're finished, close the window to exit.
Inspecting the code
Our comms system has a few more moving parts than the planets, with a number of associated compilation units needing to be updated. For example, we're blocking off the Comms button itself if a planet is select that doesn't have a mission.
Let's jump right in, starting with structs.h:
struct Comms
{
	char        speaker[MAX_NAME_LENGTH];
	AtlasImage *avatarTexture;
	char       *text;
	double      textTimer;
	Comms      *next;
};
We've added a new struct called Comms, to represent a single communication. `speaker` is the name of the speaker, avatarTexture their avatar, `text` the actual chat text, and textTimer is a control variable used to type out and message.
Next, we've added another struct called Mission:
struct Mission
{
	Comms    commsHead;
	Mission *next;
};
This struct will be expanded upon in future, to hold more data. For now, it just holds the linked list for our communications.
We've finally updated our Planet struct:
struct Planet
{
	char        name[MAX_NAME_LENGTH];
	AtlasImage *texture;
	double      x, y;
	double      orbit;
	double      speed;
	int         distance;
	Mission    *mission;
	Planet     *next;
};
We've added a pointer to a Mission struct. Not all planets will have missions, so we're only going to create one if needed.
Now, let's head over to comms.c, where all the comms logic and rendering lives. There's a good number of functions here for us to work through. Starting first with initComms:
void initComms(void)
{
	Widget *startMissionWidget, *replayWidget;

	startMissionWidget = getWidget("startMission", "comms");
	startMissionWidget->x = (SCREEN_WIDTH - startMissionWidget->w) / 2;
	startMissionWidget->y = SCREEN_HEIGHT - 250;
	startMissionWidget->action = startMission;

	pauseWidget = getWidget("pause", "comms");
	pauseWidget->x = startMissionWidget->x - (pauseWidget->w + 50);
	pauseWidget->y = SCREEN_HEIGHT - 250;
	pauseWidget->action = togglePause;

	resumeWidget = getWidget("resume", "comms");
	resumeWidget->x = pauseWidget->x;
	resumeWidget->y = pauseWidget->y;
	resumeWidget->action = togglePause;

	replayWidget = getWidget("replay", "comms");
	replayWidget->x = startMissionWidget->x + startMissionWidget->w + 50;
	replayWidget->y = SCREEN_HEIGHT - 250;
	replayWidget->action = replay;
}
This function is setting up our widgets for use. We're not going to discuss widgets in this tutorial, since we've seen them a number of times before. The main widgets tutorial can be found here. The only thing one needs to keep in mind is that we're allowing our widgets to be interacted with using the mouse (see widgets.c for the full code).
The next function is openComms:
void openComms(void)
{
	currentComms = intermission.selectedPlanet->mission->commsHead.next;

	replay();
}
This function essentially prepares our communications screen for viewing. As we'll see later, we're calling it whenever we click on the comms icon. We set a variable called currentComms to our selected planet's comms, and then call a function called `replay` to restart the comms chatting. currentComms is a control variable to let us know which comms object we're currently working with when typing out messages, etc.
The next function is doComms:
void doComms(void)
{
	doChat();

	doWidgets("comms");
}
We're just calling doChat and doWidgets, to handle our widgets. Let's jump straight to doChat:
static void doChat(void)
{
	if (!paused)
	{
		if (currentComms->textTimer >= strlen(currentComms->text))
		{
			commsTimer += 0.01 * app.deltaTime;
		}

		if (endCommsY >= SCREEN_HEIGHT - 300)
		{
			startCommsY -= 10 * app.deltaTime;
		}
		else
		{
			currentComms->textTimer = MIN(currentComms->textTimer + 0.5 * app.deltaTime, strlen(currentComms->text) + 1);
		}
	}
}
A little more going on here, but nothing complex. We're first checking if our comms system isn't paused, and if not we're going to handle the typing. We're first testing if our currentComm's textTimer is greater than or equal to the length of its text (in other words, it has finished printing out all its chat string). If so, we're going to increase the value of commsTimer. commsTimer, as we'll see later, controls which comms is currently being displayed.
With that done, we're testing a variable called endCommsY to see if it's greater than a vertical point on the screen (SCREEN_HEIGHT less 300). If so, we'll decrease the value of startCommsY. Now, this appears vague right now because it's all tied to the rendering, that we've not gotten to yet. Basically, this code is responsible for testing to see if the next block of comms text to be rendered will display below a certain vertical position on the screen (endCommsY), and raises the start position (startCommsY) until this is no longer the case. This will make more sense once we come to drawChat.
Finally, with our comms now in the correct place, we're increasing currentComms's textTimer, and limiting to the length of the string (+1, to account for the null terminator). This is what causes the text chat to type out a character at a time.
That's our logic done, so we can now look at the rendering cycle. First, we'll consider drawComms:
void drawComms(void)
{
	drawChat();

	drawWidgets("comms");
}
We're just calling drawChat and drawWidgets here. Let's move straight on to drawChat:
static void drawChat(void)
{
	Comms *c;
	int    i, x, y, h;
	char   out[MAX_LINE_LENGTH];

	x = 475;
	y = startCommsY;

	app.fontScale = 1.5;

	i = 0;

	for (c = intermission.selectedPlanet->mission->commsHead.next; c != NULL; c = c->next)
	{
		if (commsTimer >= i)
		{
			currentComms = c;

			h = getWrappedTextHeight(c->speaker, 0);

			if (y + h >= 0)
			{
				blitAtlasImage(c->avatarTexture, x - c->avatarTexture->rect.w - 25, y + 10, 0, SDL_FLIP_NONE);

				drawText(c->speaker, x + 10, y, 160, 255, 160, TEXT_ALIGN_LEFT, 0);
			}

			y += 45;

			memset(out, 0, sizeof(out));

			if (c->textTimer > 0)
			{
				STRNCPY(out, c->text, (int)c->textTimer);
			}

			if (strlen(out) < strlen(c->text))
			{
				strcat(out, "_");
			}

			h = getWrappedTextHeight(c->text, COMMS_TEXT_WIDTH) + 65;

			if (y + h >= 0)
			{
				drawText(out, x + 10, y, 240, 255, 240, TEXT_ALIGN_LEFT, COMMS_TEXT_WIDTH);
			}

			y += h;
		}

		i++;
	}

	endCommsY = y;

	app.fontScale = 1;
}
A much more interesting function. We start by setting the position of our comms text, with `y` as startCommsY. Next, we're looping through all the comms objects in our mission's linked list, and handling up to the Nth item in the list (determined by the value of commsTimer vs `i`, our loop index). commsTimer is a double, so the value will increase slowly when it can. We assign `c` to currentComms, to track which comms is the latest, and then begin rendering. We draw the Comms's avatar and speaker name (if they are on screen), and the prepare to render the main chat text. We use the Comms's textTimer value to copy that many characters into a char array called `line`, and append an underscore (_) if we are not yet at the end of the chat string. This makes it appear as though a cursor is leading the text as it appears. That text is then drawn to the screen, if visble, wrapped at COMMS_TEXT_WIDTH pixels.
With our loop complete, and having drawn all the comms chats that we are able to, we assign the final value of `y` (that has been controlling our vertical position) to endCommsY. We now know if we need to scroll our previous comms up the screen in order to make the next text block fit (this was done in doChat). Keep in mind that this logic is good for short paragraphs. Much larger blocks of text will need changes to this logic to accomodate them. We're getting away with it in this instance, since our game will only short 2-3 short sentences for each message.
So, in summary - we'll process up to the Nth comms entry, according to commsTimer, draw it to the screen, and record the resulting Y position, to work out if we need to shift our starting position up the screen. We actually could do this with the text scrolling up the screen constantly, but I think this way looks a bit nicer.
Let's now move onto the function pointers used by our widgets. We'll only cover two of them, since the Start Mission button does nothing, and has an empty function right now. Starting with togglePause:
static void togglePause(void)
{
	paused = !paused;

	pauseWidget->hidden = paused;

	resumeWidget->hidden = !paused;
}
This just toggles the value of `paused` (0 or 1), and also hides or displays the Pause and Resume buttons depending on `paused` state.
Finally, we have the `replay` function:
static void replay(void)
{
	Comms *c;

	commsTimer = 0;

	startCommsY = 80;

	endCommsY = 0;

	paused = 0;

	pauseWidget->hidden = 0;

	resumeWidget->hidden = 1;

	for (c = intermission.selectedPlanet->mission->commsHead.next; c != NULL; c = c->next)
	{
		c->textTimer = -(FPS / 4);
	}
}
This basically resets our comms section into a starting state, setting a load of control variables, and making widgets visible and invisble. Note that we're also looping through all our comms items, and setting their textTimers to negative a quarter of a second. Doing this introduces a small delay before their text starts typing (once more, this is artistic license). The `replay` function is also called by the openComms function.
That's comms.c handled, but there are still other things that we need to do to make it all work. Our comms text, for example, lives in our planets.json file, and so we now need to update the loadPlanets function in planets.c to handle this:
void loadPlanets(void)
{
	// snipped

	for (node = root->child; node != NULL; node = node->next)
	{
		// snipped

		missionNode = cJSON_GetObjectItem(node, "mission");

		if (missionNode != NULL)
		{
			p->mission = malloc(sizeof(Mission));
			memset(p->mission, 0, sizeof(Mission));

			commsTail = &p->mission->commsHead;

			for (commsNode = cJSON_GetObjectItem(missionNode, "comms")->child; commsNode != NULL; commsNode = commsNode->next)
			{
				comms = malloc(sizeof(Comms));
				memset(comms, 0, sizeof(Comms));
				commsTail->next = comms;
				commsTail = comms;

				text = cJSON_GetObjectItem(commsNode, "text")->valuestring;

				STRCPY(comms->speaker, cJSON_GetObjectItem(commsNode, "speaker")->valuestring);
				comms->avatarTexture = getAtlasImage(cJSON_GetObjectItem(commsNode, "avatar")->valuestring, 1);
				comms->text = malloc(strlen(text) + 1);
				STRNCPY(comms->text, text, strlen(text) + 1);
			}
		}

		distance += p->texture->rect.w + 8;
	}

	// snipped
}
We've added some logic to check if the planet's JSON we're currently processing has a "mission" node. If so, we'll create a Mission for the planet (`p`), and then create all our comms items for that mission. "comms" is a JSON array within "mission" that we expect to exist, so we loop through all the child nodes, create a Comms object for each, and attach them to the Mission's linked list. We're setting all the relevant fields as we do: `speaker`, avatarTexture, and `text`.
We can now turn our attention to intermission.c, where we're now putting it all togther. First up, we've modified initIntermission:
void initIntermission(void)
{
	int i, x;

	initStarfield();

	initPlanets();

	initComms();

	// snipped
}
We're calling initComms. Next up, we've updated `logic`:
static void logic(void)
{
	// snipped

	hasSelectedMission = intermission.selectedPlanet != NULL && intermission.selectedPlanet->mission != NULL;

	// snipped

	switch (section)
	{
		case IS_PLANETS:
			doPlanets();
			break;

		case IS_COMMS:
			doComms();
			break;

		default:
			break;
	}
}
We're setting a control variable called hasSelectedMission to test whether we've selected a planet and if that planet has a mission attached to it. We're going to use this to selectively enable or disable the comms button. Also, we're now handling the IS_COMMS case, to call doComms.
Next up, we've updated doSectionIcons:
static void doSectionIcons(void)
{
	int i;

	hoverSectionIcon = -1;

	for (i = 0; i < IS_MAX; i++)
	{
		if (i == IS_COMMS && !hasSelectedMission)
		{
			continue;
		}

		if (collision(app.mouse.x, app.mouse.y, 1, 1, sectionIcons[i].x, sectionIcons[i].y, sectionIconTexture->rect.w, sectionIconTexture->rect.h))
		{
			hoverSectionIcon = i;

			if (app.mouse.buttons[SDL_BUTTON_LEFT])
			{
				app.mouse.buttons[SDL_BUTTON_LEFT] = 0;

				if (i != section)
				{
					section = i;

					if (section == IS_COMMS)
					{
						openComms();
					}
				}
			}
		}
	}
}
We're doing two new things here. First, we're testing if we're processing the comms icon and if hasSelectedMission is true (1). If not, we'll call continue on our loop, so that the icon cannot be clicked on. Otherwise, we'll later test if we've clicked on the comms icon and call openComms to prepare all the chat text. Note that this means our comms chat will start from the beginning any time we enter the comms section.
Now for `draw`:
static void draw(void)
{
	// snipped

	switch (section)
	{
		case IS_PLANETS:
			drawPlanets();
			break;

		case IS_COMMS:
			drawComms();
			break;

		default:
			break;
	}

	drawSectionIcons();
}
As expected, we've added IS_COMMS and drawComms to the switch statement.
Finally, we've updated drawSectionIcons:
static void drawSectionIcons(void)
{
	int         i;
	AtlasImage *texture;

	for (i = 0; i < IS_MAX; i++)
	{
		// snipped

		blitAtlasImage(sectionIconTextures[i], sectionIcons[i].x + 7, sectionIcons[i].y + 7, 0, SDL_FLIP_NONE);

		if (i == IS_COMMS && !hasSelectedMission)
		{
			drawRect(sectionIcons[i].x, sectionIcons[i].y, sectionIconTexture->rect.w, sectionIconTexture->rect.h, 0, 0, 0, 160);
		}
	}
}
We're testing if we're drawing the comms icon, and dimming it if hasSelectedMission is false. This gives the player a visual cue that the comms section is unavailable.
Done! Our comms section is a major pillar in the intermission, as it allows the player to receive a briefing and then launch into a mission. Our chat system might look a little complicated, but it certainly gets the job done, and is well presented.
Speaking of major pillars, the other major pillar in our game is the shop. Here, the player will be able to upgrade the KIT-E with better armour, weapons, and all the rest. We'll be looking into it next.
Purchase
The source code for all parts of this tutorial (including assets) is available for purchase:
From itch.io
It is also available as part of the SDL2 tutorial bundle: