
— 2D Santa game —
Part 14: Hills and trees
Note: this tutorial assumes knowledge of C, as well as prior tutorials.


Introduction
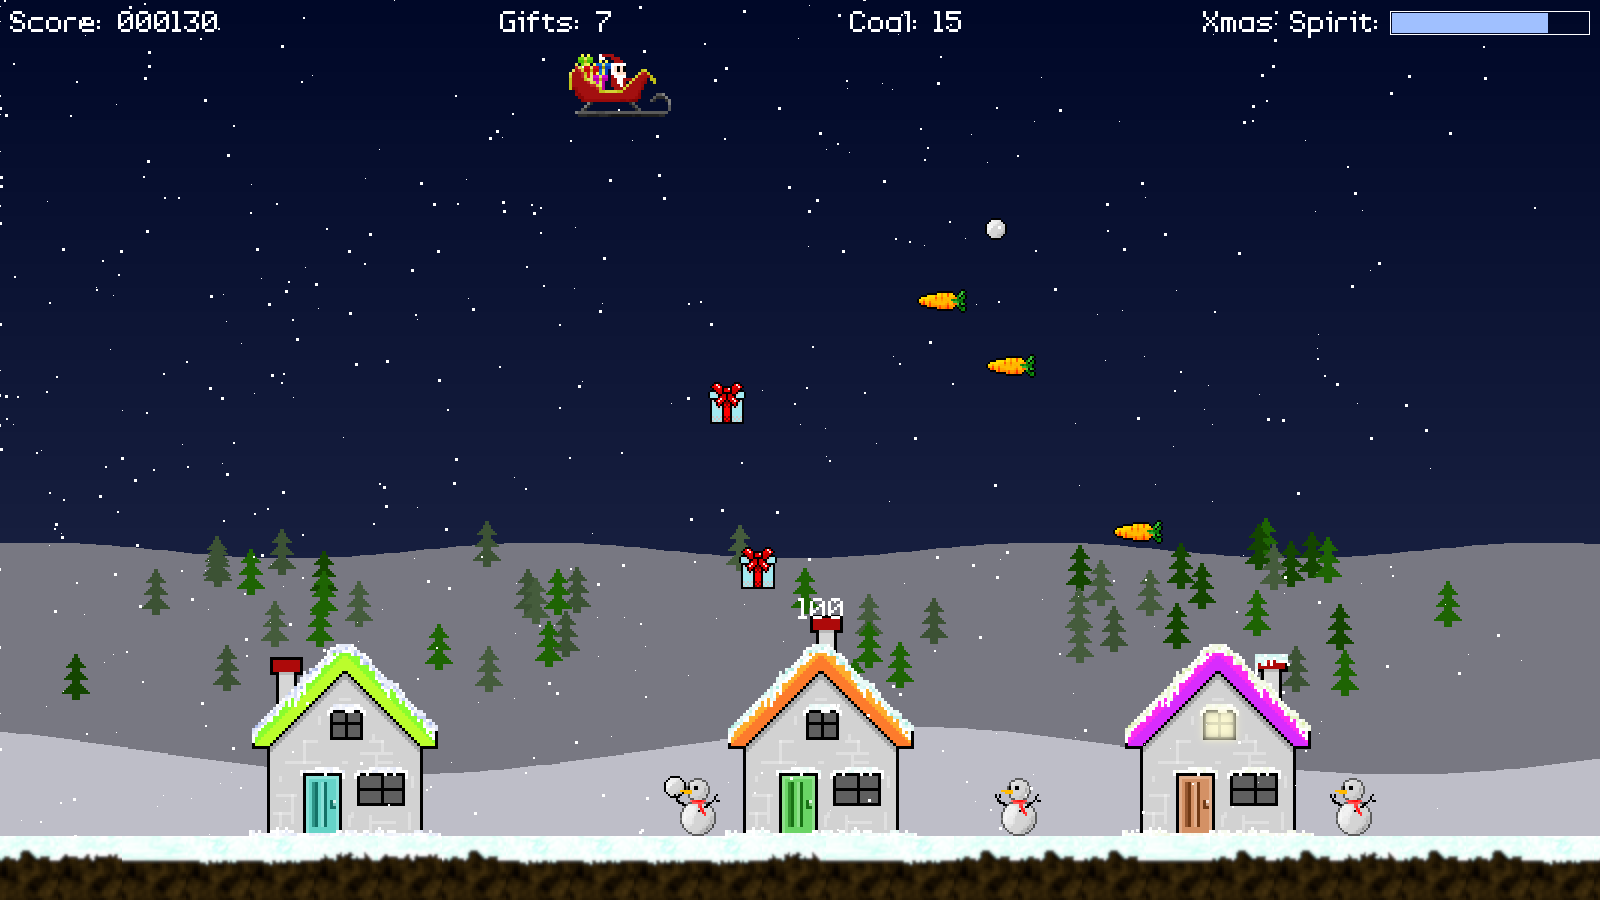
The final part of our prettification sequence involves the addition of some rolling hills in the background of our game. We'll have two layers of hills, moving at different speeds, with trees dotted throughout the most distant one.
Extract the archive, run cmake CMakeLists.txt, followed by make, and then use ./santa14 to run the code. Press Space to play. Play the game as normal, while observing the beautiful landscapes. When you're finished, close the window to exit.
Inspecting the code
There were a number of approaches that we could've taken for our hills. We could've drawn a series of filled ovals, and then drawn them as textures, overlaid on top of one another, for example. Just for fun, however, we're going to try and do something fancy, and use a height map to produce our hill effect.
Starting with defs.h:
#define HILL_WIDTH          8
#define HILLS_HEIGHT_LENGTH (SCREEN_WIDTH / HILL_WIDTH)
#define MAX_HILL_TREES      48
We've introduced a handful of new defines here, to deal with our hills and trees. HILL_WIDTH is the render width of each of our hill parts. Our hills are rendered using rectangles, and so we define the width of the rectangle here. The width of the hill will affect both the memory usage and the performance of the system the game is running on. Lower values will result in thinner rectangles, and therefore better looking hills. Larger values will result in more ragged hills, but faster processing. HILLS_HEIGHT_LENGTH is the size of the array we'll be using to hold our hill height data. MAX_HILL_TREES is the number of trees we'll be drawing on screen.
Now over to structs.h, where we've added in two new objects:
typedef struct
{
	double      x, y;
	double      speed;
	AtlasImage *texture;
} Tree;
Our Tree struct is just that - it represents one of the tress in the background. `x` and `y` are the on-screen positions of the tree, `speed` is the horizontal speed at which it moves, and `texture` is its texture.
Simple enough. Our Hills struct is a bit more complicate, though:
typedef struct
{
	double    startX;
	int       heights[HILLS_HEIGHT_LENGTH];
	int       numTrees;
	Tree      trees[MAX_HILL_TREES];
	int       y;
	int       amplitude;
	double    period;
	double    speed;
	SDL_Color color;
} Hills;
Our Hills are going to be created using a sine wave, and we will need to fields to support it. We'll make our way through all the variables. `startX` is the starting point of our sine wave. `heights` is an array of ints, that will hold the height of our hills, at their various points. numTrees is the number of trees this hill has (in this game, only one of our hills actually has tres). `trees` is an array of Trees. `y` is the vertical position of our hills on screen, above the ground (so, this value will subtract from GROUND_Y). `amplitude` and `period` are the amplitude and period of our sine wave. The amplitude will basically control the height of our sine wave, while the period will control the distance between the peaks. We can use these to adjust the steepness of our hills. `speed` is the speed that the hills will move at, and `color` is the colour of our hills.
Quite a lot, eh? Our hills are somewhat complicated, as you can no doubt tell. Hopefully, things will become clear once we get into our code.
All our updates from now on are concentrated solely in stage.c, since this part is related the the logic and rendering of the Stage itself. Let's start with initStage:
void initStage(void)
{
	// snipped

	initGround();

	initHills();

	// snipped
}
We've added one new line in initStage - a call to initHills:
static void initHills(void)
{
	int   i;
	Tree *t;
	Hills *h;

	memset(&hillLayers, 0, sizeof(Hills) * NUM_HILLS_LAYERS);

	h = &hillLayers[0];
	h->y = 350;
	h->amplitude = 8;
	h->period = 0.1;
	h->speed = 0.005;
	h->color.r = h->color.g = 120;
	h->color.b = 130;
	h->numTrees = MAX_HILL_TREES;

	h = &hillLayers[1];
	h->y = 150;
	h->amplitude = 24;
	h->period = 0.05;
	h->speed = 0.01;
	h->color.r = h->color.g = 190;
	h->color.b = 200;

	h = &hillLayers[0];

	for (i = 0; i < h->numTrees; i++)
	{
		h = &hillLayers[0];
		t = &h->trees[i];

		t->x = rand() % SCREEN_WIDTH;
		t->y = (GROUND_Y - h->y - treeTextures[0]->rect.h + h->amplitude) + rand() % 150;
		t->texture = treeTextures[rand() % NUM_TREE_TEXTURES];
		t->speed = (t->y / h->y) * 1.25;
	}

	qsort(h->trees, h->numTrees, sizeof(Tree), treeComparator);
}
This is where we setup our hills. We've got just two hills - one in the middle ground and one in the background. After memsetting our hillLayer (an array of Hills, of NUM_HILLS_LAYERS in length, static in stage.c), we start by defining the hills in the background (hillLayers index 0). We set its various attributes, giving it a dark grey colour (with a small blue tint), and assigning it the maximum number of trees. The hill moves quite slowly (its `speed` is 0.005). As for its `period` and `amplitude`, we set these as 0.1 and 8, so that it has shallow, gentle slopes. An amplitude of 80 would result in extremely steep slopes, while a period of 0.5 would result in a very bumpy landscape.
Our middle layer (hillLayers index 1) has steeper slopes, and a lighter colour. It is also positioned lower down than the background hill (remember, `y` subtracts from GROUND_Y).
We then setup the trees on our background slope. We create a for-loop from 0 to numTrees, and deal with each Tree in the array in turn (`t`). For each tree, we give it a random horizontal position along the width of the screen, and also set it somewhere about the hill itself. For this, we calculate ground level of our hill, less the height of a tree texture, and then randomly add a value between 0 and 149. We know the heights of both our hills, so we're choosing a value that will roughly allow all our trees to remain visible.
We then select a random `texture` for our tree, as well as set a random `speed`. The speed of the tree is based on its `y` position on screen (or rather, it's vertical position on the slope). With that done, we sort out trees, using qsort. We don't want tree that are higher up the slope to be drawn on top of trees that are lower down, as this will look odd. We'll see the treeComparator last.
That's our (somewhat complicated) setup done. Effectively, our hills are going to look like little waves. We'll see more when we come to draw them. For now, we'll move on to doStage:
void doStage(void)
{
	// snipped

	if (stage.pauseTimer == 0)
	{
		doGround();

		doHills();

		addHouse();

		// snipped
	}
}
A simple update - we're just calling doHills:
static void doHills(void)
{
	int    i, j;
	double x, speed;
	Hills *h;
	Tree  *t;

	speed = (stage.speed / 4);

	for (i = 0; i < NUM_HILLS_LAYERS; i++)
	{
		h = &hillLayers[i];

		x = h->startX;

		for (j = 0; j < HILLS_HEIGHT_LENGTH; j++)
		{
			h->heights[j] = h->y + sin(x) * h->amplitude;

			x -= h->period;
		}

		h->startX -= h->speed * speed * app.deltaTime;

		for (j = 0; j < h->numTrees; j++)
		{
			t = &h->trees[j];

			t->x -= t->speed * speed * app.deltaTime;

			if (t->x < -t->texture->rect.w)
			{
				t->x += SCREEN_WIDTH + t->texture->rect.w;
			}
		}
	}
}
This is where we control the logic for our hills and make them "move". They are, in fact, not actually moving, as we'll see. We start by setting a variable called `speed` to be a quarter of Stage's `speed`. This value will be used to control the speed of our hills and trees. We want them to move slower than the foreground, where our ground is, so that we get a new parallax effect. We next start looping through our hills (from hillLayers), and assign a variable called `x` the value of each Hill's startX. We then loop through all of the current hill's `heights`, updating the individual values. We do this by adding the sin value of `x` multiplied by the `amplitude` to the hill's `y`. We then decrease the value of `x` by the hill's `period`, so that the next item in the `heights` array will take on the next calculated sine wave value.
Here's where the magic comes in - if the hill's startX remained static, our hills wouldn't move. However, once we've completed our height value assignments, we decrease the value of the Hill's startX by the speed of the hill (plus our quarter speed). This means that the starting point of our sine curve will change over time, giving the impression that the hills are moving to the left.
Yes, it's literally an optical illusion. The values of the hill heights are simply moving up and down according to the sine wave curve, but to our eyes the hills appear to be sliding to the left.
We then draw the current hill's trees, using a for-loop from 0 to numTrees. For each tree, we're simply subtracting its `x` based on its `speed` and our quarter speed. If the tree moves off the left-hand side of the screen, we'll loop it around to the right-side.
That's all we need to do to handle our hills. Once again, it might look like we're scrolling our hills to the left, but in fact we're just updating a sine wave curve, to give the illusion of doing so. On next to our rendering routines, starting with drawStage:
void drawStage(void)
{
	drawHills();

	drawGround();

	drawEntities();

	drawSnow();

	if (stage.state != SS_DEMO)
	{
		drawHUD();
	}

	if (stage.state == SS_GAME_OVER && stage.speed < 1)
	{
		blit(xmasCancelledTexture, SCREEN_WIDTH / 2, (SCREEN_HEIGHT / 2) - 100, 1, SDL_FLIP_NONE);
	}
}
We're making a call to a new function named drawHills:
static void drawHills(void)
{
	int    i, j;
	Hills *h;
	Tree  *t;

	for (i = 0; i < 24; i++)
	{
		drawRect(0, i * 24, SCREEN_WIDTH, 24, i, i + 8, i + 40, 255);
	}

	for (i = 0; i < NUM_HILLS_LAYERS; i++)
	{
		h = &hillLayers[i];

		for (j = 0; j < HILLS_HEIGHT_LENGTH; j++)
		{
			drawRect(j * HILL_WIDTH, GROUND_Y - h->heights[j], HILL_WIDTH, h->heights[j], h->color.r, h->color.g, h->color.b, 255);
		}

		for (j = 0; j < h->numTrees; j++)
		{
			t = &h->trees[j];

			blitAtlasImage(t->texture, t->x, t->y, 0, SDL_FLIP_NONE);
		}
	}
}
This function is very simple to understand. We're just drawing our hills according to their heights, as well as the trees. But let's go through this function more in depth.
To start with, we're using a for-loop to render a gradient at the top of the screen. This, we're doing with a series of 24 rectangles, 24 pixels tall, and with a minor increase in the color value (initally very dark), so that it fades nicely into the rest of the scene.
With the gradiant drawn, we move on to the hills themselves. We once again use a for-loop to draw a series of rectangles, with a width of HILL_WIDTH, and a height of the value of the array index in the current height array index. The height of the hill has its base at GROUND_Y. The colour of the hill is naturally the RGB values of the Hill's color.
Next, we loop through all the trees the hill has, and draw them in place, using their `x` and `y` values.
We're nearly done! We've only got two other functions to consider, and our hill rendering is all wrapped up. First, to loadTextures:
static void loadTextures(void)
{
	int  i;
	char filename[MAX_NAME_LENGTH];

	for (i = 0; i < NUM_GROUND_TEXTURES; i++)
	{
		sprintf(filename, "gfx/ground%02d.png", i + 1);
		groundTextures[i] = getAtlasImage(filename, 1);
	}

	for (i = 0; i < NUM_TREE_TEXTURES; i++)
	{
		sprintf(filename, "gfx/tree%02d.png", i + 1);
		treeTextures[i] = getAtlasImage(filename, 1);
	}

	xmasCancelledTexture = loadTexture("gfx/xmasCancelled.png");
}
We've added in a for-loop, to load our tree textures, once again looking for images called gfx/tree01.png, gfx/tree02.png, etc.
Lastly, we have the treeComparator function:
static int treeComparator(const void *a, const void *b)
{
	Tree *t1, *t2;

	t1 = ((Tree *)a);
	t2 = ((Tree *)b);

	return t1->y - t2->y;
}
All this function does is sort our trees from top to bottom on the screen, so that we draw those with smaller `y` values first. This prevents us from drawing trees higher up on top of those lower down, which breaks our parallax effect, and looks very odd!
The hills and trees are complete. Once again, there were a number of options available to us for our hill generation. I liked the sine wave best, and found it interesting to implement. Another height map based approach might have been to fill the 2D array with random numbers, and then average them several times over, to smooth the slopes out. Done right, and this could also produce a convincing landscape. In fact, with some extra consideration, it could even be used to produce a procedural series of hills, that don't repeat.
Otherwise, our game really is now feature complete. We need only add in some finishing touches and we can stick a fork in it. Therefore, in our final part we're going to add in some sound effects, music, particle effects, and a quadtree (to optimise our collision detection).
Purchase
The source code for all parts of this tutorial (including assets) is available for purchase, as part of the SDL2 tutorials bundle:
From itch.io