PC Games
• Orb
• Lasagne Monsters
• Three Guys Apocalypse
• Water Closet
• Blob Wars : Attrition
• The Legend of Edgar
• TBFTSS: The Pandoran War
• Three Guys
• Blob Wars : Blob and Conquer
• Blob Wars : Metal Blob Solid
• Project: Starfighter
• TANX Squadron
Tutorials
• 2D shoot 'em up
• 2D top-down shooter
• 2D platform game
• Sprite atlas tutorial
• Working with TTF fonts
• 2D adventure game
• Widget tutorial
• 2D shoot 'em up sequel
• 2D run and gun
• Roguelike
• Medals (Achievements)
• 2D turn-based strategy game
• 2D isometric game
• 2D map editor
• 2D mission-based shoot 'em up
• 2D Santa game
• 2D split screen game
• 2D quest game
• SDL 1 tutorials (outdated)
Latest Updates
The Legend of Edgar 1.38
Thu, 1st January 2026
SDL2 Quest game tutorial
Wed, 7th May 2025
SDL2 Versus game tutorial
Wed, 20th March 2024
Download keys for SDL2 tutorials on itch.io
Sat, 16th March 2024
The Legend of Edgar 1.37
Mon, 1st January 2024
Tags
• battle-for-the-solar-system (10)
• blob-wars (10)
• brexit (1)
• code (6)
• edgar (10)
• games (45)
• lasagne-monsters (1)
• making-of (5)
• match3 (1)
• numberblocksonline (1)
• orb (2)
• site (1)
• tanx (4)
• three-guys (3)
• three-guys-apocalypse (3)
• tutorials (18)
• water-closet (4)
Books

The Honour of the Knights (First Edition) (The Battle for the Solar System)
When starfighter pilot Simon Dodds is enrolled in a top secret military project, he and his wingmates begin to suspect that there is a lot more to the theft of a legendary battleship and an Imperial nation's civil war than either the Confederation Stellar Navy or the government are willing to let on.
— Creating a simple roguelike —
Part 9: Equipping items
Note: this tutorial assumes knowledge of C, as well as prior tutorials.


Introduction
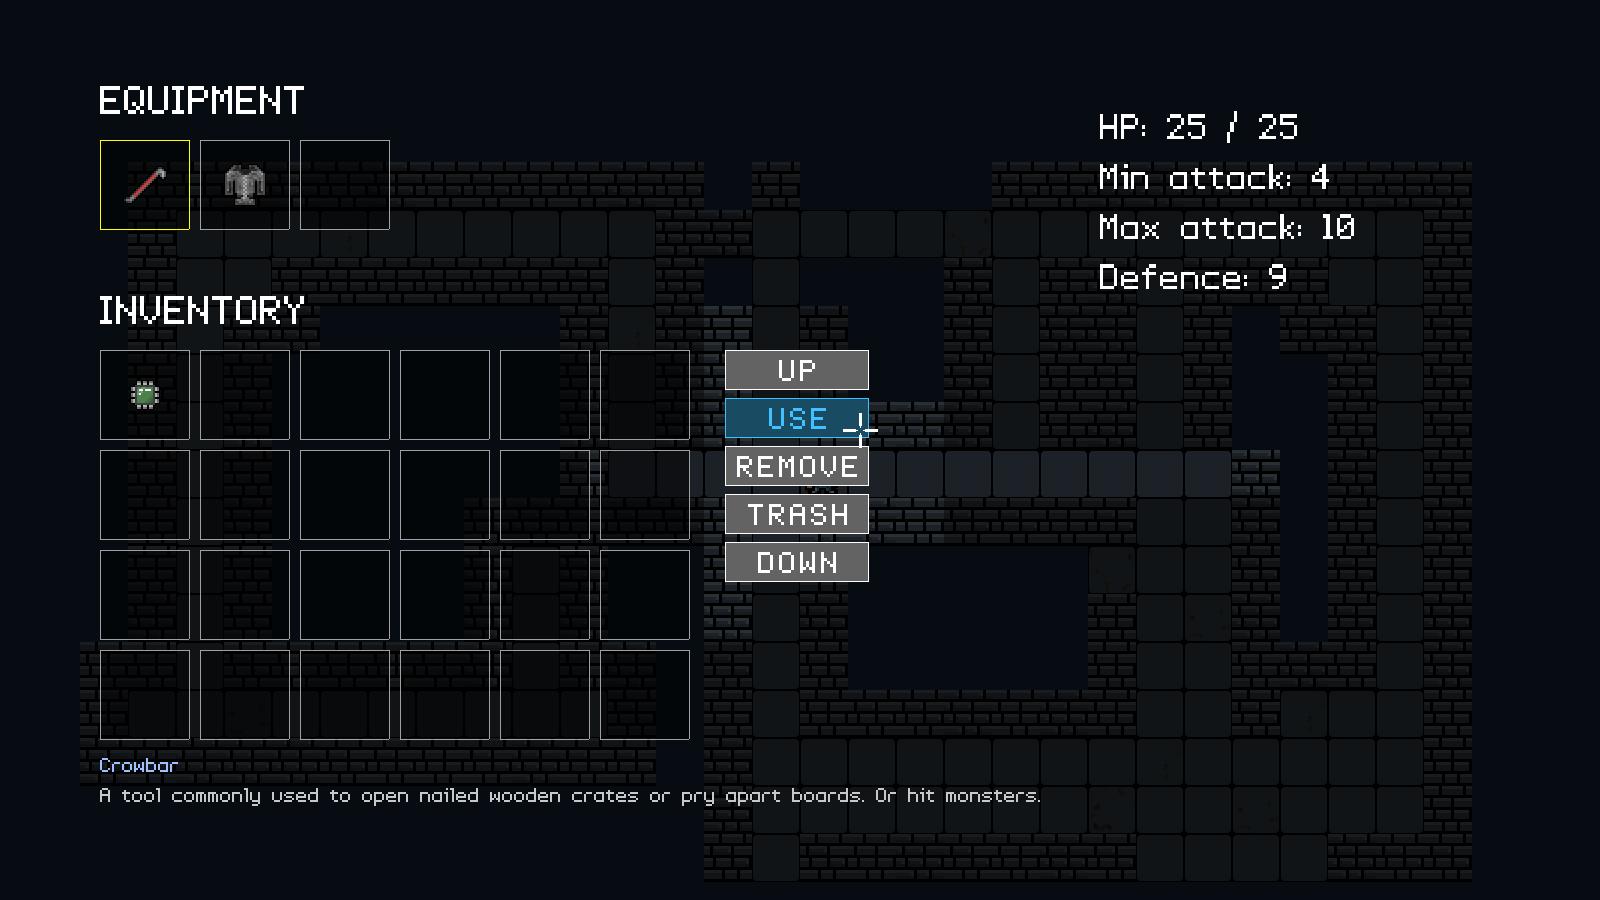
We're now able to pick up items and use them, but what about things like weapons? In this part, we'll be introducing weapons, armour, and a microchip (as a bonus piece of equipment). Again, there are no monsters to be found and we've taken the health packs and keys away, to focus on the equipment. In this dungeon, you'll find a crowbar, a biker jacket, and a microchip.
Extract the archive, run cmake CMakeLists.txt, followed by make, and then use ./rogue09 to run the code. You will see a window open like the one above, showing our main character in a dungeon environment. Use the same controls as before to move around and open the inventory. Pick up the items as you find them. To equip an item, highlight it in the inventory and click Use. To remove it, highlight it in the equipment section and click Remove. This will return the item to the inventory. Notice how your stats change as you equip and remove items. Once you're finished, close the window to exit.
Inspecting the code
Like the previous part, this part is quite long, so we'll not linger. Starting with defs.h:
enum {
	ET_UKNOWN,
	ET_PLAYER,
	ET_MONSTER,
	ET_ITEM,
	ET_WEAPON,
	ET_ARMOUR,
	ET_MICROCHIP
};
We've added in three new types to our ET enum. ET_WEAPON will define a weapon entity type, ET_ARMOUR an armour entity type, and ET_MICROCHIP a microchip entity type.
We've also added in a brand new entity type called EQUIP:
enum {
	EQUIP_WEAPON,
	EQUIP_ARMOUR,
	EQUIP_MICROCHIP,
	EQUIP_MAX
};
These will describe the type of equipment an item is. Our equipment slots are a fixed array size, allowing for three things to be set (but only one of each).
Now, let's move over to structs.h, where we've also made some updates and additions:
typedef struct {
	int hp;
	int minAttack;
	int maxAttack;
	int defence;
} Equipment;
The new Equipment struct represents a piece of equipment that the player can use. Each field represents a value by which the player's attributes would be modified. `hp` modifies the player's maxiumum hit points, minAttack their minimum attack value, maxAttack their maximum attack value, and `defence` their defence value. Note that these values can negative as well as positive.
Next, we've modified Game:
typedef struct {
	HudMessage messages[NUM_HUD_MESSAGES];
	Entity inventoryHead, *inventoryTail;
	Entity *equipment[EQUIP_MAX];
} Game;
We've added in an array of Entity pointers called `equipment`, into which our equipped items will live, of EQUIP_MAX size.
Now, let's move over to armour.c, a new file, which is where we're defining our armour. Starting with addArmour:
void addArmour(void)
{
	addEntityToDungeon(initEntity("Biker Jacket"));
}
This function is merely responsible for adding a piece of armour to the dungeon. We just calling addEntityToDungeon and passing over the entity that was created by the call to initEntity. Here, we're asking the game to add in a Biker Jacket.
Next, we have createArmour:
static Equipment *createArmour(Entity *e)
{
	Equipment *eq;

	eq = malloc(sizeof(Equipment));
	memset(eq, 0, sizeof(Equipment));

	e->type = ET_ARMOUR;
	e->data = eq;

	e->touch = touch;

	return eq;
}
This is a helper function, quite a lot like createItem and createMonster. The function takes a single argument - an Entity (`e`). We're first mallocing and memsetting a piece of Equipment (as `eq`), then setting the Entity's type to ET_ARMOUR and its `data` field as the Equipment we created. We're then assigning the entity's `touch` function and returning the Equipment.
Next is initBikerJacket:
void initBikerJacket(Entity *e)
{
	Equipment *eq;

	eq = createArmour(e);

	STRCPY(e->name, "Biker Jacket");
	STRCPY(e->description, "An ultra cool jacket that offers a decent level of protection.");
	e->texture = getAtlasImage("gfx/entities/bikerJacket.png", 1);

	eq->defence = 5;
}
This is the init function for creating a Biker Jacket. We're calling createArmour and assigning it to `eq`. We're then setting the entity's `name`, `description`, and `texture`, and finally setting the Equipment's `defence` to 5. This means that our Biker Jacket will add 5 to the player's `defence` when it is equipped.
Finally, we have the `touch` function:
static void touch(Entity *self, Entity *other)
{
	char text[MAX_DESCRIPTION_LENGTH];

	if (other == dungeon.player)
	{
		addToInventory(self);

		sprintf(text, "Picked up a %s.", self->name);

		addHudMessage(HUD_MSG_NORMAL, text);
	}
}
Like the `touch` function for our items, we're testing if the thing that has walked into the Equipment is the player, before adding it our inventory and displaying a message.
We've also added in a file for handling our weapons, called weapons.c. This is quite similar to armour.c in many aspects, so we'll keep this fairly brief. Starting with addWeapons:
void addWeapons(void)
{
	addEntityToDungeon(initEntity("Crowbar"));
}
We're just adding an entity called Crowbar to the dungeon.
Next is createWeapon:
static Equipment *createWeapon(Entity *e)
{
	Equipment *eq;

	eq = malloc(sizeof(Equipment));
	memset(eq, 0, sizeof(Equipment));

	e->type = ET_WEAPON;
	e->data = eq;

	e->touch = touch;

	return eq;
}
This is much like createArmour, except that the entity's type is ET_WEAPON.
initCrowbar follows:
void initCrowbar(Entity *e)
{
	Equipment *eq;

	eq = createWeapon(e);

	STRCPY(e->name, "Crowbar");
	STRCPY(e->description, "A tool commonly used to open nailed wooden crates or pry apart boards. Or hit monsters.");
	e->texture = getAtlasImage("gfx/entities/crowbar.png", 1);

	eq->minAttack = 3;
	eq->maxAttack = 6;
}
Again, much like initBikerJacket. However, since this is a weapon we're affecting the player's attack stats. We're setting the Equipment's minAttack to 3 and maxAttack to 6. This means that, when equipped, our Crowbar will add 3 to the player's minAttack and 6 to their maxAttack.
The `touch` function is identical to the one in armour.c:
static void touch(Entity *self, Entity *other)
{
	char text[MAX_DESCRIPTION_LENGTH];

	if (other == dungeon.player)
	{
		addToInventory(self);

		sprintf(text, "Picked up a %s.", self->name);

		addHudMessage(HUD_MSG_NORMAL, text);
	}
}
This function could be made global since it's the same for both items, weapons, and armour. For this tutorial, we'll leave it as is.
We also have microchips.c, containing several short functions. Starting with addMicrochips:
void addMicrochips(void)
{
	addEntityToDungeon(initEntity("Microchip"));
}
We're just adding a Microchip to the dungeon.
createMicrochip throws up no surprises:
static Equipment *createMicrochip(Entity *e)
{
	Equipment *eq;

	eq = malloc(sizeof(Equipment));
	memset(eq, 0, sizeof(Equipment));

	e->type = ET_MICROCHIP;
	e->data = eq;

	e->touch = touch;

	return eq;
}
We're creating a piece of Equipment and setting the Entity's type to ET_MICROCHIP.
initMicrochip, however, is more interesting:
void initMicrochip(Entity *e)
{
	Equipment *eq;
	int points;

	eq = createMicrochip(e);

	STRCPY(e->name, "Microchip");
	STRCPY(e->description, "A tiny wafer of semiconducting material. Randomly affects stats.");
	e->texture = getAtlasImage("gfx/entities/microchip.png", 1);

	do
	{
		eq->hp = rand() % 2 - rand() % 2;
		eq->minAttack = rand() % 2 - rand() % 2;
		eq->maxAttack = rand() % 2 - rand() % 2;
		eq->defence = rand() % 2 - rand() % 2;

		points = eq->hp + eq->minAttack + eq->maxAttack + eq->defence;
	}
	while (points == 0);
}
After calling createMicrochip and setting the entity's `name`, `description`, and `texture`, we're randomly setting the microchip's stats. Since a microchip can affect any of the player's stats, we're randomly setting `hp`, minAttack, maxAttack, and `defence` to values between -1 and 1. We're doing this in a do-loop, so that we can repeat the process in case all values are 0. After setting the values of the fields, we're adding them up and assigning the result to a variable called `points`. We're going to make the loop repeat while `points` is 0 (in other words, while the chip has no attributes!). So, our chip could, for example, add 1 to the player's `maxHP`, but subtract 1 from `defence`. We'll be tweaking this in a future part to make it more interesting.
The `touch` function come last:
static void touch(Entity *self, Entity *other)
{
	char text[MAX_DESCRIPTION_LENGTH];

	if (other == dungeon.player)
	{
		addToInventory(self);

		sprintf(text, "Picked up a %s.", self->name);

		addHudMessage(HUD_MSG_NORMAL, text);
	}
}
It's the same as all the others, so nothing more to add.
Now, turning to inventory.c, this is where we'll handle our equiping our items. We've made quite a few things, some minor, others major.
Starting with initInventoryView:
void initInventoryView(void)
{
	app.delegate.logic = logic;

	app.delegate.draw = draw;

	inventorySlotStart = 0;

	selectedInventoryItem = NULL;

	selectedEquipmentSlot = -1;

	app.showPointer = 1;
}
selectedEquipmentSlot is static int within inventory.c to say which equipment slot we currently have selected. It could be a number from 0 to EQUIP_MAX (exclusive).
Next, we've made an update to `logic`:
static void logic(void)
{
	doInventorySlots();

	doEquipmentSlots();

	doInventoryControls();

	if (app.keyboard[SDL_SCANCODE_TAB])
	{
		app.keyboard[SDL_SCANCODE_TAB] = 0;

		initDungeonView();
	}
}
After doInventorySlots, we're now calling doEquipmentSlots. We'll see more on this in a bit.
First up, we'll look at the changes we've made to doInventorySlots:
static void doInventorySlots(void)
{
	int i;
	SDL_Rect *r;
	Entity *e;

	// snipped

	if (selectedInventoryItem != NULL)
	{
		switch (selectedInventoryItem->type)
		{
			case ET_WEAPON:
				selectedEquipmentSlot = EQUIP_WEAPON;
				break;

			case ET_ARMOUR:
				selectedEquipmentSlot = EQUIP_ARMOUR;
				break;

			case ET_MICROCHIP:
				selectedEquipmentSlot = EQUIP_MICROCHIP;
				break;

			default:
				break;
		}
	}
}
After our for-loop, we've added in a new piece of logic, to test to see if we have an inventory item selected, by testing if selectedInventoryItem isn't NULL. If it's not, we're going to perform a switch on its `type`. Depending on the type of entity (ET_WEAPON, ET_ARMOUR, or ET_MICROCHIP), we'll be setting the value of selectedEquipmentSlot (to either EQUIP_WEAPON, EQUIP_ARMOUR, or EQUIP_MICROCHIP). The idea behind this is to enforce the equipment slot that can be used for a piece of armour, a weapon, or a microchip. We're not going to allow a player to set the microchip into the weapon slot, for example.
We now come to doEquipmentSlots:
static void doEquipmentSlots(void)
{
	int i;
	SDL_Rect *r;

	for (i = 0 ; i < EQUIP_MAX ; i++)
	{
		r = &equipmentBoxes[i];

		if (collision(r->x, r->y, r->w, r->h, app.mouse.x, app.mouse.y, 1, 1))
		{
			if (app.mouse.buttons[SDL_BUTTON_LEFT])
			{
				app.mouse.buttons[SDL_BUTTON_LEFT] = 0;

				if (i != selectedEquipmentSlot)
				{
					selectedEquipmentSlot = i;
				}
				else
				{
					selectedEquipmentSlot = -1;
				}

				selectedInventoryItem = NULL;
			}
		}
	}
}
This function is responsible for handling when the player clicks on an equipment slot. We're setting up for a for-loop from 0 to EQUIP_MAX, and then assigning the equipmentBoxes at array index `i` to an SDL_Rect pointer called `r`. Note that equipmentBoxes is a static SDL_Rect array in inventory.c. We're then testing to see if the player has placed the mouse pointer over the equipment box, by testing for a collision and feeding in `r`'s attributes, as well as the mouse's. If a collison has occurred, we're checking if the left mouse button is being pressed and clearing it if so. We're then testing whether this equipment box is not already selected by testing if `i` is not selectedEquipmentSlot, and setting selectedEquipmentSlot to `i` if so. Otherwise, we're setting selectedEquipmentSlot to -1, to deselect it. Lastly, we're setting selectedInventoryItem to NULL. Again, this is to enforce our equipment contract - we want to ensure that only armour, weapons, and microchips can be set at certain slots.
Next, we've updated `use`:
static void use(void)
{
	Item *i;

	if (selectedInventoryItem != NULL)
	{
		switch (selectedInventoryItem->type)
		{
			case ET_ITEM:
				i = (Item*) selectedInventoryItem->data;

				if (i->use != NULL && i->use())
				{
					trash();
				}
				break;

			case ET_WEAPON:
			case ET_ARMOUR:
			case ET_MICROCHIP:
				game.equipment[selectedEquipmentSlot] = selectedInventoryItem;
				removeFromInventory(selectedInventoryItem);
				selectedInventoryItem = NULL;

				updatePlayerAttributes();
				break;

			default:
				break;
		}
	}
}
We've added to our switch statement, and are now handling ET_WEAPON, ET_ARMOUR, and ET_MICROCHIP. Whenever we click Use on a piece of armour, a weapon, or a microchip, we'll enter this switch case. We'll be setting game's equipment at array index selectedEquipmentSlot to selectedInventoryItem. We're then calling removeFromInventory, passing over selectedInventoryItem, and finally setting selectedInventoryItem to NULL. In effect, this moves the selected inventory item from our inventory to an equipment slot. With that done, we then call updatePlayerAttributes, to update our stats. We'll see more on this a bit later on.
As you can see, equipping an item is quite simple. We have also updated removeItem, to now give it some funtionality:
static void removeItem(void)
{
	if (selectedEquipmentSlot != -1 && game.equipment[selectedEquipmentSlot] != NULL)
	{
		addToInventory(game.equipment[selectedEquipmentSlot]);

		game.equipment[selectedEquipmentSlot] = NULL;

		selectedEquipmentSlot = -1;

		updatePlayerAttributes();
	}
}
Removing equipped items is just as easy as equipping them. We first test that selectedEquipmentSlot is not -1 (to ensure we have something selected) and also that the equipped item at game's equipment array index at selectedEquipmentSlot is not NULL, before proceeding. If the item is valid, we'll call addToInventory, passing over the entity at the equipment index, and then set the equipment index to NULL. We'll then set selectedEquipmentSlot to -1 to deselect it, and finally call updatePlayerAttributes, to reflect the changes. In short, we're just moving the item from our equipment array back into our inventory linked list.
That's our equipment logic all handled. We're now left with the rendering. Starting with `draw`:
static void draw(void)
{
	drawMap();

	drawEntities();

	drawRect(0, 0, SCREEN_WIDTH, SCREEN_HEIGHT, 0, 0, 0, 160);

	drawEquipmentBoxes();

	drawInventoryBoxes();

	drawInventoryControls();

	drawStats();
}
We've added just one line - drawEquipmentBoxes:
static void drawEquipmentBoxes(void)
{
	int i;
	SDL_Rect *r;

	app.fontScale = 2;

	drawText("EQUIPMENT", 100, 70, 255, 255, 255, TEXT_ALIGN_LEFT, 0);

	app.fontScale = 1;

	for (i = 0 ; i < EQUIP_MAX ; i++)
	{
		r = &equipmentBoxes[i];

		drawRect(r->x, r->y, r->w, r->h, 0, 0, 0, 128);

		if (selectedEquipmentSlot == i)
		{
			drawOutlineRect(r->x, r->y, r->w, r->h, 255, 255, 0, 255);
		}
		else
		{
			drawOutlineRect(r->x, r->y, r->w, r->h, 160, 160, 160, 255);
		}

		if (game.equipment[i] != NULL)
		{
			blitAtlasImage(game.equipment[i]->texture, r->x + (r->w / 2), r->y + (r->h / 2), 1, SDL_FLIP_NONE);
		}
	}

	if (selectedEquipmentSlot != -1 && game.equipment[selectedEquipmentSlot] != NULL && selectedInventoryItem == NULL)
	{
		drawText(game.equipment[selectedEquipmentSlot]->name, 100, 750, 160, 192, 255, TEXT_ALIGN_LEFT, 0);

		drawText(game.equipment[selectedEquipmentSlot]->description, 100, 780, 200, 200, 200, TEXT_ALIGN_LEFT, 0);
	}
}
As you can see, this function is quite similar to drawInventoryBoxes. We're first drawing the "EQUIPMENT" text, scaled up by 2. Next, we're setting up a for-loop, from 0 to EQUIP_MAX, and assigning the equipmentBoxes at index `i` to `r`, an SDL_Rect pointer. We're drawing the filled rectangle in as alpha black shape, and then testing the value of selectedEquipmentSlot against `i`. If they're both the same (the box is selected), we'll draw an outline rectangle in yellow. Otherwise, the box will be drawn as a light grey. We're then testing whether the entity at game's equipment array at index `i` is not NULL before then calling drawAtlasImage to draw it.
Finally, we're testing whether selectedEquipmentSlot is not -1 and also whether an entity at selectedEquipmentSlot exists, before drawing its info. We're also testing that selectedInventoryItem is NULL, so that we don't draw both pieces of info at the same time, which would make things hard to read. The selected inventory item will always take priority.
The last change we've made is to setupUI:
static void setupUI(void)
{
	// snipped

	for (i = 0 ; i < EQUIP_MAX ; i++)
	{
		r = &equipmentBoxes[i];

		r->x = 100 + (i * 100);
		r->y = 140;
		r->w = 90;
		r->h = 90;
	}
}
Much like how we're creating our array of inventoryBoxes, we're setting up our equipmentBoxes. We're using a for-loop from 0 to EQUIP_MAX, and assigning the equipmentBoxes at index `i` to an SDL_Rect pointer called `r`, before setting `r`'s `x`, `y`, `w`, and `h` fields. `r`'s `x` is 100, plus the value of `i` multiplied by 100, to make each box lie horizontally to the right of the previous one, 100 pixels apart.
That's it for inventory.c! We're now able to equip and remove items!
We should now look at the other changes we've made. Turning to player.c, we've made a change to initPlayer:
void initPlayer(Entity *e)
{
	Monster *m;

	m = malloc(sizeof(Monster));
	memset(m, 0, sizeof(Monster));

	STRCPY(e->name, "Player");
	STRCPY(e->description, "A brave lab technician, hunting for escaped mice.");
	e->type = ET_PLAYER;
	e->texture = getAtlasImage("gfx/entities/girl.png", 1);
	e->data = m;
	e->solid = 1;

	dungeon.player = e;

	updatePlayerAttributes();

	m->hp = m->maxHP;

	moveDelay = 0;
}
Before, we were setting the player Monster's attributes (`hp`, maxHP, etc). We've now mostly replaced this with a call to updatePlayerAttributes. We're then setting the player's Monster `hp` to its maxHP. This is because updatePlayerAttributes updates the value of maxHP but not the value of `hp`. We'll see this in action now:
void updatePlayerAttributes(void)
{
	int i;
	Monster *m;
	Equipment *eq;

	m = (Monster*) dungeon.player->data;

	m->maxHP = 25;
	m->defence = 4;
	m->minAttack = 1;
	m->maxAttack = 4;

	for (i = 0 ; i < EQUIP_MAX ; i++)
	{
		if (game.equipment[i] != NULL)
		{
			eq = (Equipment*) game.equipment[i]->data;

			m->maxHP += eq->hp;
			m->minAttack += eq->minAttack;
			m->maxAttack += eq->maxAttack;
			m->defence += eq->defence;
		}
	}

	m->maxHP = MAX(m->maxHP, 1);
	m->hp = MIN(m->hp, m->maxHP);
	m->minAttack = MAX(1, m->minAttack);
	m->maxAttack = MAX(1, m->maxAttack);
	m->defence = MAX(m->defence, 0);
}
updatePlayerAttributes is a function to set the player's maxHP, `defence`, minAttack and maxAttack, taking into consideration the items that we have equipped. To start with, we're extracting the player's Monster data from the dungeon player pointer. We're then setting the maxHP, `defence`, etc. to some default values. These are our base values that will represent the player's attributes without anything equipped.
Next, we setup a for-loop, to move through all the items we have equipped. We're testing if the entity at game's equipment at array index `i` is not NULL and then extracting the Equipment object from its `data` field. The equipment's `hp`, minAttack, maxAttack and `defence` are then added to the player's maxHP, minAttack, maxAttack, and `defence`. This will continue for each item we have equipped. As you can see, if we have a Crowbar equipped, our minAttack and maxAttack will increase. We call updatePlayerAttributes whenever we equip or unequip an item.
Finally, we're limiting the player's various attribute values. We're ensuring maxHP is never less than 1, that their `hp` is never more than their maxHP, that minAttack and maxAttack are never less than one, and that `defence` is never less than 0.
A simple function to follow. Resetting the player's attributes to their defaults each time helps us to avoid complicated math when it comes to adding and removing equipment, as we simply just add everything back up again.
The last thing we need to do is ensure our Crowbar, Biker Jacket, and Microchip are all available to us, by updating entityFactory.c:
void initEntityFactory(void)
{
	memset(&head, 0, sizeof(InitFunc));
	tail = &head;

	addInitFunc("Player", initPlayer);
	addInitFunc("Micro Mouse", initMicroMouse);
	addInitFunc("Key", initKey);
	addInitFunc("Health Pack", initHealthPack);
	addInitFunc("Crowbar", initCrowbar);
	addInitFunc("Biker Jacket", initBikerJacket);
	addInitFunc("Microchip", initMicrochip);
}
We've just added in all the relevant init function calls.
And that's it! We can equip and remove armour and weapons. Not bad, not bad. But there's one thing that would be nice to know - how the thing we're equipping is going to affect our stats. What if we have several microchips and want to know which is better? In the next part, we'll look at how we can render a comparison of the current and new stats for both equpping and removing items.
Purchase
The source code for all parts of this tutorial (including assets) is available for purchase:
From itch.io
It is also available as part of the SDL2 tutorial bundle: