PC Games
• Orb
• Lasagne Monsters
• Three Guys Apocalypse
• Water Closet
• Blob Wars : Attrition
• The Legend of Edgar
• TBFTSS: The Pandoran War
• Three Guys
• Blob Wars : Blob and Conquer
• Blob Wars : Metal Blob Solid
• Project: Starfighter
• TANX Squadron
Tutorials
• 2D shoot 'em up
• 2D top-down shooter
• 2D platform game
• Sprite atlas tutorial
• Working with TTF fonts
• 2D adventure game
• Widget tutorial
• 2D shoot 'em up sequel
• 2D run and gun
• Roguelike
• Medals (Achievements)
• 2D turn-based strategy game
• 2D isometric game
• 2D map editor
• 2D mission-based shoot 'em up
• 2D Santa game
• 2D split screen game
• 2D quest game
• SDL 1 tutorials (outdated)
Latest Updates
The Legend of Edgar 1.38
Thu, 1st January 2026
SDL2 Quest game tutorial
Wed, 7th May 2025
SDL2 Versus game tutorial
Wed, 20th March 2024
Download keys for SDL2 tutorials on itch.io
Sat, 16th March 2024
The Legend of Edgar 1.37
Mon, 1st January 2024
Tags
• battle-for-the-solar-system (10)
• blob-wars (10)
• brexit (1)
• code (6)
• edgar (10)
• games (45)
• lasagne-monsters (1)
• making-of (5)
• match3 (1)
• numberblocksonline (1)
• orb (2)
• site (1)
• tanx (4)
• three-guys (3)
• three-guys-apocalypse (3)
• tutorials (18)
• water-closet (4)
Books
The Battle for the Solar System (Complete)
The Pandoran war machine ravaged the galaxy, driving the human race to the brink of destruction. Seven men and women stood in its way. This is their story.
— Creating a simple roguelike —
Part 7: Items and inventory display
Note: this tutorial assumes knowledge of C, as well as prior tutorials.


Introduction
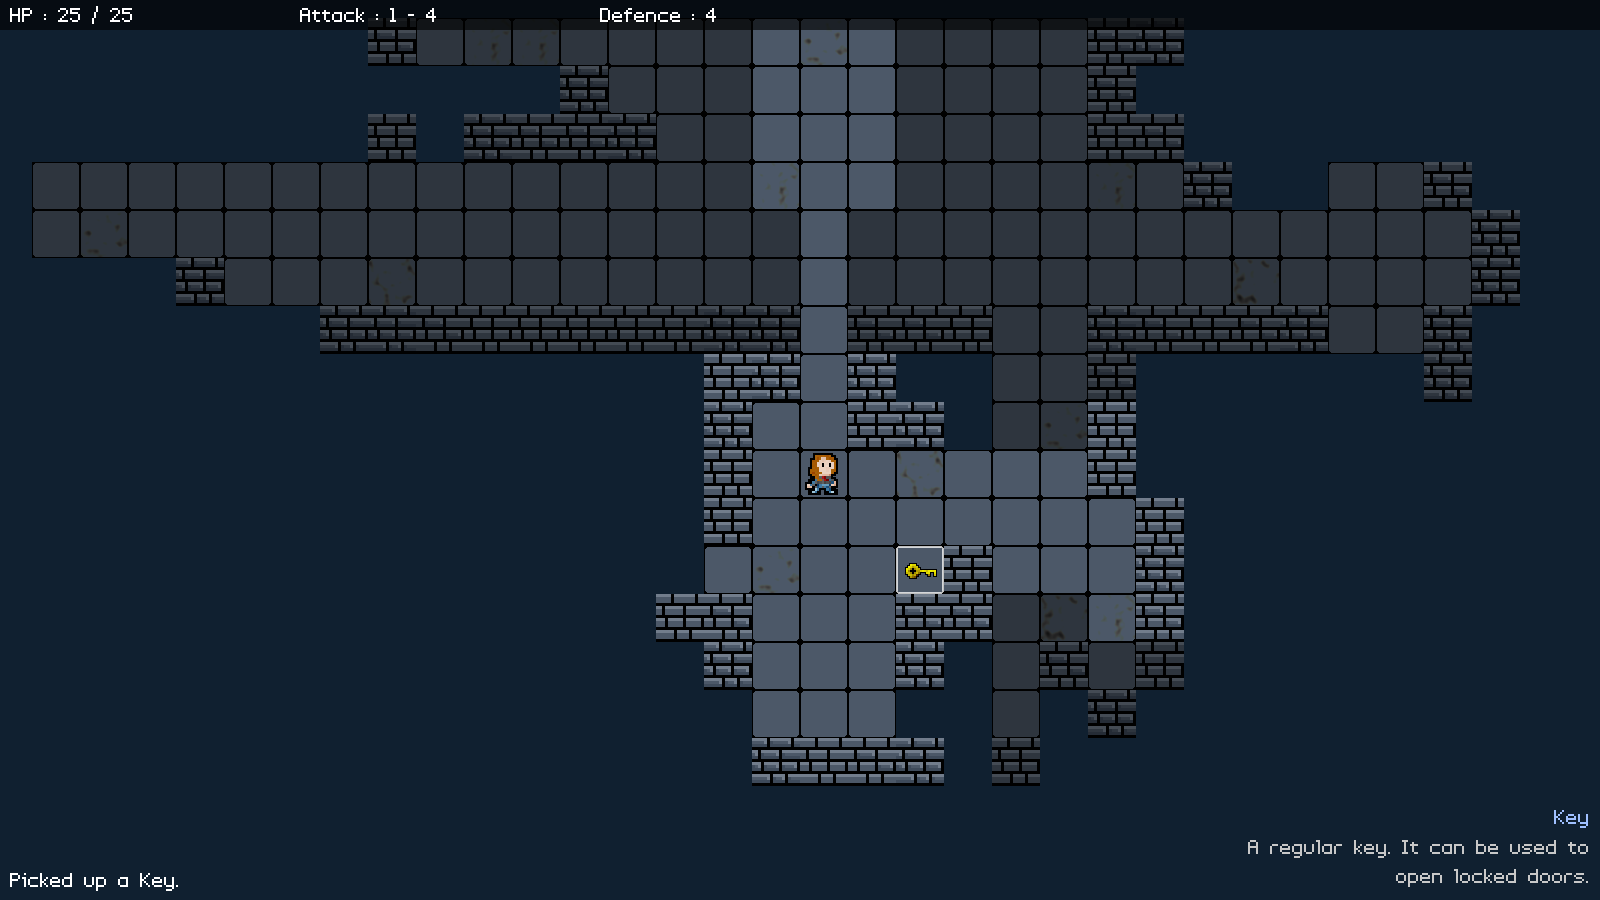
Now that we can battle monsters, the next thing we should do is add in items. Dungeons in roguelikes are typically stuffed full of all sorts of treasures to be found. In this part, we'll add some keys to the dungeon for the player to find. We'll also add in an inventory view.
Extract the archive, run cmake CMakeLists.txt, followed by make, and then use ./rogue07 to run the code. You will see a window open like the one above, showing our main character in a dungeon environment. Use the same controls as before to move around. You can now press Tab to open and close the inventory display. There are 2 keys in the dungeon. To pick them up, simply walk into them. So as to keep the focus on items, there are no monsters to be found in this part. Once you're finished, close the window to exit.
Inspecting the code
Introducing our items to our dungeon is quite simple, as it follows most of the conventions of the Monsters. Let's start with the updates to defs.h:
enum {
	ET_UKNOWN,
	ET_PLAYER,
	ET_MONSTER,
	ET_ITEM
};
We've added in a new enum type - ET_ITEM. This type will represent an item.
Now for structs.h, where we've made some updates to Entity:
struct Entity {
	int id;
	int type;
	char name[MAX_NAME_LENGTH];
	char description[MAX_DESCRIPTION_LENGTH];
	int x;
	int y;
	int dead;
	int solid;
	int facing;
	void (*data);
	void (*touch)(Entity *self, Entity *other);
	AtlasImage *texture;
	Entity *next;
};
Now, as well as `name`, our Entities now also have a `description` field. This will be displayed alongside the name of the entity when we hover the mouse over them in the dungeon (and eventually, the inventory). We've also added in a function pointer called `touch`. This will be invoked when the player walks into an item.
We've also updated our Game struct:
typedef struct {
	HudMessage messages[NUM_HUD_MESSAGES];
	Entity inventoryHead, *inventoryTail;
} Game;
Here, we've added in linked list to represent our inventory (using inventoryHead and inventoryTail). When items are added to our inventory, they will be added to this linked list.
For the items themselves, we've added in a new file called items.c. There are quite a functions here to cover, but none of them are particularly complex. Starting with addItems:
void addItems(void)
{
	int i;

	for (i = 0 ; i < 2 ; i++)
	{
		addEntityToDungeon(initEntity("Key"));
	}
}
This function merely adds some items to our dungeon. We're setting up a for-loop to call addEntityToDuungeon, passing over the result of initEntity, where we're requesting that we create a "Key".
Next, we have a function called createItem:
static void createItem(Entity *e)
{
	e->type = ET_ITEM;

	e->touch = touch;
}
It takes one argument - an Entity (`e`). This is a helper function for setting common item attributes. All we're doing here is setting `e`'s type to ET_ITEM and assigning the `touch` function pointer, something that will be common to all items.
Onto the next function, initKey:
void initKey(Entity *e)
{
	createItem(e);

	STRCPY(e->name, "Key");
	STRCPY(e->description, "A regular key. It can be used to open locked doors.");
	e->texture = getAtlasImage("gfx/entities/key.png", 1);
}
Again, very simple. The function takes an Entity (`e`) as a parameter. We're calling createItem, passing over `e`, to set all the common attributes, and then setting `e`'s `name` and `description`, as well as its `texture`.
Now for the `touch` function:
static void touch(Entity *self, Entity *other)
{
	char text[MAX_DESCRIPTION_LENGTH];

	if (other == dungeon.player)
	{
		addToInventory(self);

		sprintf(text, "Picked up a %s.", self->name);

		addHudMessage(HUD_MSG_NORMAL, text);
	}
}
There's a little more to it, but still it's not complex. We first check that the thing (`other`) that has touched the item (`self`) is the player. If so, we're calling a new function called addToInventory (more on this in a bit), passing over the item. We're then using sprintf to create a message to add to our HUD, to say that we've picked something up, using the name of the entity in question. The text is passed to addHudMessage.
So, creating and adding our items is very easy. Let's now move over to entities.c, where we've made some tweaks. Starting with isBlocked:
static int isBlocked(Entity *e, int x, int y)
{
	Entity *other, *prev;
	int hasNext;

	prev = &dungeon.entityHead;

	for (other = dungeon.entityHead.next ; other != NULL ; other = other->next)
	{
		hasNext = other->next != NULL;

		if (other->x == x && other->y == y)
		{
			switch (other->type)
			{
				case ET_PLAYER:
				case ET_MONSTER:
					doMeleeAttack(e, other);
					return 1;

				case ET_ITEM:
					other->touch(other, e);
					break;

				default:
					break;
			}

			if (hasNext && other->next == NULL)
			{
				other = prev;
			}
		}

		prev = other;
	}

	return 0;
}
To begin with, we've added a new case to our switch statement, and are now testing for ET_ITEM. We're calling `other`'s (the item's) `touch` function, passing over `other` and `e`. Remember that the item's behaviour is contained in its `touch` function and the arguments are self (the item) and other (the thing that touched it). This is why the arguments are passed in this order.
You will have noticed we've added in two new variables: `prev` and hasNext. `prev` is a pointer to the previous item in our linked list processing, like we see in doEntities. hasNext is a flag to say whether the item we're processing has a following item in our entities linked list. For each item we're processing, we're assigning hasNext based on this. After our switch statement, we're testing the value of hasNext, to see if it's 1 (true) and then also testing whether `other` no longer has a `next`. If not, we're assigning `other` to `prev`.
What this code is doing is testing whether the entity we were processing has been removed from the dungeon. If it has (such as being picked up and added to the player's inventory) it will mean that our linked list has been modified, and will therefore stop processing (due to `other`'s next now being NULL and the for-loop matching this exit condition). We therefore want to move back to the previous entity before continuing, so that our entity processing loop doesn't exit early. This helps to prevent odd behaviour, such as stepping on a tile containing two items and only collecting one of them.
The final change is that we've added in a new function called removeEntityFromDungeon:
void removeEntityFromDungeon(Entity *e)
{
	Entity *other, *prev;

	prev = &dungeon.entityHead;

	for (other = dungeon.entityHead.next ; other != NULL ; other = other->next)
	{
		if (other == e)
		{
			prev->next = other->next;

			if (other == dungeon.entityTail)
			{
				dungeon.entityTail = prev;
			}

			other->next = NULL;
		}

		prev = other;
	}
}
This function takes an entity (`e`) as a parameter. The function is simple: we loop through all the entities in our dungeon, assigning each to `other`, and then test whether `other` is the same as `e` (in other words, they are the same entity). If so, we'll remove `other` from our linked list in the standard way (however, we won't move it to another list or destroy it with free). This is the function called by an item's `touch` when the player collects it.
Another new file that we've introduced is inventory.c. This file contains all the code for handling our inventory. There's quite a few functions here already (though once again, they are quite short). We'll handle them one at a time, starting with initInventory:
void initInventory(void)
{
	game.inventoryTail = &game.inventoryHead;

	setupUI();
}
We first set our inventoryTail as our inventoryHead, to setup our inventory linked list. We're then calling a function named setupUI. We'll see this last.
Next, we have a function called initInventoryView:
void initInventoryView(void)
{
	app.delegate.logic = logic;

	app.delegate.draw = draw;
}
Nothing difficult here - we're setting App's `delegate`'s `logic` and `draw` fields to the `logic` and `draw` functions in this file.
The `logic` function is next:
static void logic(void)
{
	if (app.keyboard[SDL_SCANCODE_TAB])
	{
		app.keyboard[SDL_SCANCODE_TAB] = 0;

		initDungeonView();
	}
}
Again, nothing complicated. We're checking if the Tab key has been pressed. If so, we're zeroing the value at the keyboard index and then calling a function named initDungeonView. This function will basically allow us to press Tab to exit our inventory view and return to the dungeon. Zeroing the key will stop it from instantly returning to the inventory view when our dungeon logic tests for the same key..!
Next up is `draw`:
static void draw(void)
{
	drawMap();

	drawEntities();

	drawRect(0, 0, SCREEN_WIDTH, SCREEN_HEIGHT, 0, 0, 0, 160);

	drawInventoryBoxes();
}
Simple. We're calling drawMap and drawEntities to render what's in the dungeon, and are then calling drawRect, with parameters that cover the entire screen in a black rectangle with an alpha of 160. This will basically darken the screen after we've drawn our map and entities. With that done, we call drawInventoryBoxes. Basically, this makes our inventory appear to be overlaid on the game view. Notice how we don't call drawHud. This is because drawing the hud text could be confusing to look at, so we avoid displaying it.
Up next is drawInventoryBoxes:
static void drawInventoryBoxes(void)
{
	int i;
	Entity *e;
	SDL_Rect *r;

	app.fontScale = 2;

	drawText("INVENTORY", 100, 280, 255, 255, 255, TEXT_ALIGN_LEFT, 0);

	app.fontScale = 1;

	e = game.inventoryHead.next;

	for (i = 0 ; i < NUM_INVENTORY_BOXES ; i++)
	{
		r = &inventoryBoxes[i];

		drawRect(r->x, r->y, r->w, r->h, 0, 0, 0, 128);

		drawOutlineRect(r->x, r->y, r->w, r->h, 160, 160, 160, 255);

		if (e != NULL)
		{
			blitAtlasImage(e->texture, r->x + (r->w / 2), r->y + (r->h / 2), 1, SDL_FLIP_NONE);

			e = e->next;
		}
	}
}
This function is responsbile for drawing the 24 inventory boxes that are displayed. We start by rendering the "INVENTORY" text, scaled up by 2. Next, we grab a reference to the first entity in our inventory and assign it to a variable called `e`. We then setup a for-loop, going from 0 to NUM_INVENTORY_BOXES (24). For each loop, we're grabbing a reference to the item at the inventoryBox array index of `i`, assigning it to an SDL_Rect pointer called `r`. The reason for this is just to make the code that follows more readable. We're then drawing the rectangle (`r`), first calling drawRect, using `r` and a transparent black colour, to darkend the square. We're then drawing an outlined rectangle, again using `r` and with a light grey colour.
With the box drawn, we check to see if we can a valid entity to render in it. We test to see if `e` is not NULL and if so we'll call blitAtlasImage, to draw it. We're rendering it in the middle of the box, using `r`'s coordinates and width and height, and telling blitAtlasImage to center the entity's texture. Finally, we're assigning `e` to `e`'s next, to move onto the next item. Our inventory is a linked list, rather than a fixed array, so this is how we'll move onto the next item.
The next function is addToInventory:
void addToInventory(Entity *e)
{
	removeEntityFromDungeon(e);

	game.inventoryTail->next = e;
	game.inventoryTail = e;
}
It takes one parameter - an Entity (`e`). We start by calling removeEntityFromDungeon, passing over `e`, to remove it from the dungeon. We then add it to our inventory, by assigning it to game's inventoryTail's `next` and then make `e` the new inventoryTail.
The final function is setupUI:
static void setupUI(void)
{
	int i, x, y;
	SDL_Rect *r;

	x = y = 0;

	for (i = 0 ; i < NUM_INVENTORY_BOXES ; i++)
	{
		r = &inventoryBoxes[i];

		r->x = 100 + (x * 100);
		r->y = 350 + (y * 100);
		r->w = 90;
		r->h = 90;

		x++;

		if (x >= NUM_INVENTORY_BOXES_PER_ROW)
		{
			x = 0;
			y++;
		}
	}
}
This function is quite simple. What we're doing is setting up the positions of our 24 inventory boxes. We first assign two variables `x` and `y` values of 0. These will act as our rows and columns. Next, we setup a for-loop to move through all our inventory boxes. We're grabbing a reference to the inventoryBox at index `i`, assigning it to an SDL_Rect pointer called `r`, and then setting it's `x`, `y`, `w`, and `h` fields. `r`'s `x` and `y` will be based on the values of our `x` and `y` variables, both multiplied by 100.
With the fields for the box set, we're incrementing `x`, to space the next box out. We're then testing if we want to jump down onto the next row, by seeing if `x` is equal to or greater than NUM_INVENTORY_BOXES_PER_ROW (defined as 6). If so, we're resetting `x` to 0 and incrementing `y`.
We're almost done! So, heading over to dungeon.c, we can see some updates we've made to support our inventory. Starting with initDungeon:
void initDungeon(void)
{
	memset(&dungeon, 0, sizeof(Dungeon));

	initMap();

	initHud();

	initInventory();

	createDungeon();

	app.delegate.logic = logic;

	app.delegate.draw = draw;
}
We're calling initInventory, to get the inventory started.
We've also tweaked createDungeon:
static void createDungeon(void)
{
	initEntities();

	initEntity("Player");

	if (1)
	{
		generateMap();
	}
	else
	{
		generateEmptyMap();
	}

	//addMonsters();

	addItems();

	updateFogOfWar();

	dungeon.currentEntity = dungeon.player;
}
We're calling addItems, to put the keys into our dungeon. Note that we've commented out addMonsters for the moment, so can focus on the items and inventory in this part.
The `logic` function has also seen a tweak:
static void logic(void)
{
	// snipped

	doCamera();

	doSelectTile();

	if (app.keyboard[SDL_SCANCODE_TAB])
	{
		app.keyboard[SDL_SCANCODE_TAB] = 0;

		initInventoryView();
	}
}
Towards the end of the function, we're testing if Tab has been pressed, to bring up the inventory. If so, we're setting the Tab key's index in the array to 0 (to prevent it from being immediately processed again) and then calling initInventoryView.
Finally, we've updated player.c with a description of the player character herself:
void initPlayer(Entity *e)
{
	Monster *m;

	m = malloc(sizeof(Monster));
	memset(m, 0, sizeof(Monster));

	m->hp = m->maxHP = 25;
	m->defence = 4;
	m->minAttack = 1;
	m->maxAttack = 4;

	STRCPY(e->name, "Player");
	STRCPY(e->description, "A brave lab technician, hunting for escaped mice.");
	e->type = ET_PLAYER;
	e->texture = getAtlasImage("gfx/entities/girl.png", 1);
	e->data = m;
	e->solid = 1;

	dungeon.player = e;

	moveDelay = 0;
}
A brave girl, indeed! Lots of mice to catch and destroy.
That's it for collecting items and viewing them in our inventory. In our next part, we'll look at updating our inventory display, so we can scrolling through our inventory and also use and destroy items.
Purchase
The source code for all parts of this tutorial (including assets) is available for purchase:
From itch.io
It is also available as part of the SDL2 tutorial bundle: