
— Creating a simple roguelike —
Part 4: Adding the HUD
Note: this tutorial assumes knowledge of C, as well as prior tutorials.


Introduction
At this point, it would be good to introduce a better HUD, so we can see, for example, how many hit points we have remaining, and also display some useful information such as what is happening in battle. We'll do just that in this part.
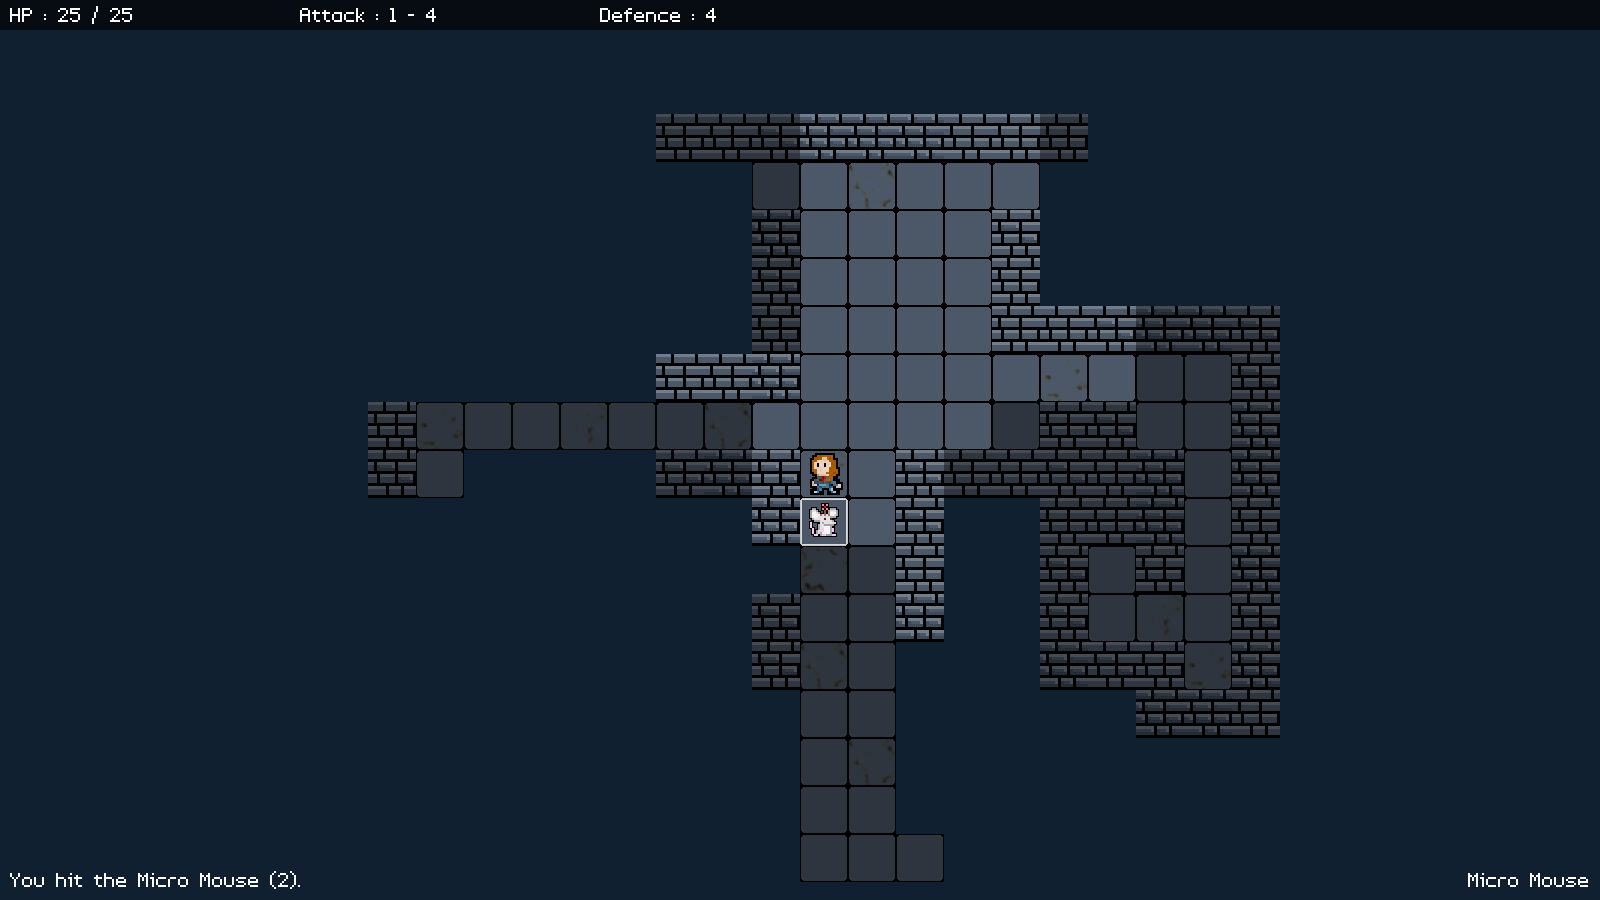
Extract the archive, run cmake CMakeLists.txt, followed by make, and then use ./rogue04 to run the code. You will see a window open like the one above, showing our main character in a dungeon environment. Use the same controls as before to move around. Battle the Micro Mouse when you find it. You'll see messages about the battle in the bottom left corner of the screen. Additionally, you can use the mouse to highlight the tiles on the map. Placing the tile select over an Entity (either the player or the mouse) will display their name in the bottom right-hand corner of the screen. Once you're finished, close the window to exit.
Inspecting the code
Introducing our HUD isn't going to be a difficult task, as we're really just rendering some text. We'll start by the updates to defs.h:
#define MAX_MOUSE_BUTTONS         8

// snipped

#define NUM_HUD_MESSAGES          5
We've added in two new defines here. MAX_MOUSE_BUTTONS is the maximum number of mouse buttons we'll be supporting. 8 ought to be enough for anybody. NUM_HUD_MESSAGE is the maximum number of messages we'll be displaying in the bottom left-hand corner; text strings such as, "You hit the Micro Mouse". We've also added in a new enum:
enum {
	HUD_MSG_NORMAL,
	HUD_MSG_GOOD,
	HUD_MSG_BAD
};
This enum will be used to determine the type of message we're displaying. Most messages will be of type HUD_MSG_NORMAL. We'll see how these are used for rendering later on.
Turning to structs.h now:
typedef struct {
	int type;
	char text[MAX_DESCRIPTION_LENGTH];
} HudMessage;
HudMessage is a struct to hold the details of a message display on the HUD. `type` is the type of HUD message (using the above enum), while `text` is the message string itself.
Next, we have a new Game struct:
typedef struct {
	HudMessage messages[NUM_HUD_MESSAGES];
} Game;
Right now, we're just storing the hud messages here (`messages`, an array of HudMessages). In a later part, we'll be saving the game data, along with the HUD messages.
The final update is to App:
typedef struct {
	struct {
		void (*logic)(void);
		void (*draw)(void);
	} delegate;

	double deltaTime;
	double fontScale;
	SDL_Renderer *renderer;
	SDL_Window *window;
	int keyboard[MAX_KEYBOARD_KEYS];

	struct {
		int x;
		int y;
		int buttons[MAX_MOUSE_BUTTONS];
	} mouse;

	struct {
		int fps;
	} dev;
} App;
We've added in a new inner struct called `mouse`. The struct has three fields: `x` and `y`, which are the location of the mouse on screen, and `buttons`, an int array of MAX_MOUSE_BUTTONS in size. This will allow up to store our mouse data.
While on the subject of mouse support, we should turn to input.c to see the updates we've made to read and handle our mouse. We've added in a couple of new functions - doMouseDown and doMouseUp. We'll start with doMouseDown:
void doMouseDown(SDL_MouseButtonEvent *event)
{
	if (event->button >= 0 && event->button < MAX_MOUSE_BUTTONS)
	{
		app.mouse.buttons[event->button] = 1;
	}
}
The function takes a single argument - an SDL_MouseButtonEvent. Within the function, we test that `event`'s `button` (the mouse button) is 0 or more and also less than MAX_MOUSE_BUTTONS before we then set the relevant index in App's mouse button's array to 1. Yep, just like when reading our keyboard.
doMouseUp is largely the same:
void doMouseUp(SDL_MouseButtonEvent *event)
{
	if (event->button >= 0 && event->button < MAX_MOUSE_BUTTONS)
	{
		app.mouse.buttons[event->button] = 0;
	}
}
The only difference is that we're now setting the mouse button's value to 0.
We've then made changes to doInput to use these new functions:
void doInput(void)
{
	SDL_Event event;

	while (SDL_PollEvent(&event))
	{
		switch (event.type)
		{
			case SDL_QUIT:
				exit(0);
				break;

			case SDL_KEYDOWN:
				doKeyDown(&event.key);
				break;

			case SDL_KEYUP:
				doKeyUp(&event.key);
				break;

			case SDL_MOUSEBUTTONDOWN:
				doMouseDown(&event.button);
				break;

			case SDL_MOUSEBUTTONUP:
				doMouseUp(&event.button);
				break;

			default:
				break;
		}
	}

	SDL_GetMouseState(&app.mouse.x, &app.mouse.y);
}
In our switch statement of our while loop, we're testing for SDL_MOUSEBUTTONDOWN and SDL_MOUSEBUTTONUP, and calling doMouseDown or doMouseUp as appropriate, and passing across the SDL_MouseButtonEvent (`event.button`) from the event. Simple. Even easier is reading the mouse position on screen. We've added in a line at the end of our function calling SDL_GetMouseState and passing across references to our app mouse's `x` and `y`. Each time doInput is called, the position of the mouse will be set to `app.mouse.x` and `app.mouse.y`, allowing us to find out where the mouse is on screen (note - this relative to our window, so it will be 0,0 at the top left of our window).
Now, let's look at what we've changed in hud.c. Starting with initHud:
void initHud(void)
{
	bloodSplatTexture = getAtlasImage("gfx/hud/bloodSplat.png", 1);

	selectedTileTexture = getAtlasImage("gfx/hud/selectedTile.png", 1);

	bloodSplatTimer = 0;

	selectedTilePulse = 0;
}
We're grabbing a new texture (gfx/hud/selectedTile.png) and assigning it to selectedTileTexture. This is the white online that is displayed when moving the mouse around in the dungeon. We're also zeroing a variable called selectedTilePulse. This is what we're using to control the subtle pulse of the selected tile image.
Next, we've made one small change to doHud:
void doHud(void)
{
	bloodSplatTimer = MAX(bloodSplatTimer - app.deltaTime, 0);

	selectedTilePulse += 0.1 * app.deltaTime;

	dungeon.animationTimer = MAX(dungeon.animationTimer, bloodSplatTimer);
}
We're just increasing the value of selectedTilePulse here, nothing more.
Now, let's look at a new function - addHudMessage:
void addHudMessage(int type, char *text)
{
	int i;

	for (i = NUM_HUD_MESSAGES - 1 ; i > 0 ; i--)
	{
		memcpy(&game.messages[i], &game.messages[i - 1], sizeof(HudMessage));
	}

	game.messages[0].type = type;
	STRCPY(game.messages[0].text, text);
}
The function takes two arguments - `type` and `text`. `type` is the type of message (such as HUD_MSG_NORMAL), while `text` is the body of the message itself. We only support 5 messages, so when a new message is added, we want to remove the oldest one and add the new one to the top of the list. To begin with, we're setting up a for-loop (indexed using `i`) starting at NUM_HUD_MESSAGE less 1 (to keep within our array size), and continuing while `i` is greater than 0. We're them using memcpy to copy the data from the hud message at index `i` - 1 to the one at index `i`. In other words, we'll be copying 3 into 4, 2 into 3, and 1 into 2, effectively shifting our messages down the list.
With all our messages shifted down, we're then setting `type` and `text` of `messages` 0 to the values we passed into the function. Our new message is now at the front of the array, with the older ones shunting down (and with the final one removed).
Moving onto the drawHud function, we've added in a few new lines:
void drawHud(void)
{
	drawTopBar();

	drawInfoMessage();

	drawBloodSplat();

	drawMessages();

	drawSelectedTile();
}
We're now calling drawTopBar, drawInfoMessage, drawMessages, and drawSelectedTile! Quite a few new additions. We'll cover these off one at a time, starting with drawTopBar:
static void drawTopBar(void)
{
	char text[16];
	Monster *m;
	double healthPercent;

	drawRect(0, 0, SCREEN_WIDTH, 30, 0, 0, 0, 160);

	m = (Monster*) dungeon.player->data;

	healthPercent = (1.0 * m->hp) / m->maxHP;

	sprintf(text, "HP : %d / %d", m->hp, m->maxHP);

	if (healthPercent <= 0.2)
	{
		drawText(text, 10, 0, 255, 64, 64, TEXT_ALIGN_LEFT, 0);
	}
	else if (healthPercent <= 0.5)
	{
		drawText(text, 10, 0, 255, 255, 0, TEXT_ALIGN_LEFT, 0);
	}
	else
	{
		drawText(text, 10, 0, 255, 255, 255, TEXT_ALIGN_LEFT, 0);
	}

	sprintf(text, "Attack : %d - %d", m->minAttack, m->maxAttack);
	drawText(text, 300, 0, 255, 255, 255, TEXT_ALIGN_LEFT, 0);

	sprintf(text, "Defence : %d", m->defence);
	drawText(text, 600, 0, 255, 255, 255, TEXT_ALIGN_LEFT, 0);
}
As you have seen, we're now displaying a few of the player's stats at the top of the screen. drawTopBar is responsible for this. To begin with, we're using drawRect to draw a transparent dark bar at the top of the screen. It's 30 pixel tall and has an RGBA of 0,0,0,160, meaning it will be entirely black but with an alpha value of 160. Next, we're extracting the Monster data from `player`. We're then working out the player's current health percentage, using the monster's hp and maxHP, and assigning the result to `healthPercent` (as a value between 0 and 1.0). We're then using sprintf to prepare the text we want to draw for the hit point display, using a variable called `text`.
Depending on the value of `healthPercent`, we'll be rendering the text in different colours. If the value is 0.2 or less (20%), we'll be rendering in red (actually, slightly lighter than pure red). If it's 0.5 or less (50%), we'll be rendering in yellow. Otherwise, we'll be rendering in white. While our player's health right now cannot be reduced, this is pre-empt for when it will be in the next part.
We're also then rendering our attack information, using sprintf to include the player Monster's minAttack and maxAttack. Finally, we're drawing the player Monster's `defence` details.
drawMessages is next:
static void drawMessages(void)
{
	int i, y;
	SDL_Color c;

	y = SCREEN_HEIGHT - 35;

	for (i = 0 ; i < NUM_HUD_MESSAGES; i++)
	{
		switch (game.messages[i].type)
		{
			case HUD_MSG_GOOD:
				c.r = 40;
				c.g = 200;
				c.b = 255;
				break;

			case HUD_MSG_BAD:
				c.r = 255;
				c.g = c.b = 64;
				break;

			default:
				c.r = c.g = c.b = 255;
				break;
		}

		drawText(game.messages[i].text, 10, y, c.r, c.g, c.b, TEXT_ALIGN_LEFT, 0);

		y -= 30;
	}
}
You will have noticed that the order of the messages displayed is that the most recent one appears at the bottom of the screen, with the older ones pushed up. We can see this happening here. We first set a variable named `y` a value of SCREEN_HEIGHT less 35 pixels. We're then setting up a for-loop to go through all our messages. For each one, we're performing a switch against its `type`. Depending on the `type` of message, we'll be drawing in a different colour, making use of an SDL_Color object (`c`). For HUD_MSG_GOOD, we'll be setting a light blue colour; for a bad message, a light-ish red; and for all others, pure white. We're then rendering the message, calling drawText, passing over the current message's `text`, and `c`, the colour data. We're also rendering the text at the current `y` position on the vertical. With this done, we're decreasing the value of `y` by 30, so that the next message appears above the current one.
Up next is drawInfoMessage:
static void drawInfoMessage(void)
{
	Entity *e;

	e = getEntityAt(dungeon.selectedTile.x, dungeon.selectedTile.y);

	if (e != NULL && dungeon.map[e->x][e->y].visible)
	{
		drawText(e->name, SCREEN_WIDTH - 10, SCREEN_HEIGHT - 35, 255, 255, 255, TEXT_ALIGN_RIGHT, 0);
	}
}
This code is responsible for drawing the message we see when we hover the mouse (our selected tile) over an entity. The code here is simple. We first call a function named getEntityAt, that returns an entity at the dungeon coordinates provided. Should the returned entity not be NULL, we're also going to test if the map tile they're standing on is visible. If so, we'll call drawText, passing over the name of the entity. We're drawing the text in the bottom right-hand corner of the screen, aligned to the right. It's important to check that the map square is visible, otherwise hidden entities will be revealed by our tile selector.
The final function is drawSelectedTile:
static void drawSelectedTile(void)
{
	double pulse;
	int x, y;

	if (dungeon.selectedTile.x != -1 && dungeon.selectedTile.y != -1)
	{
		x = dungeon.selectedTile.x - dungeon.camera.x;
		y = dungeon.selectedTile.y - dungeon.camera.y;

		pulse = (sin(selectedTilePulse) + 1) / 2;

		SDL_SetTextureAlphaMod(selectedTileTexture->texture, 127 + (pulse * 128));

		blitAtlasImage(selectedTileTexture, (x * MAP_TILE_SIZE) + MAP_RENDER_X, (y * MAP_TILE_SIZE) + MAP_RENDER_Y, 0, SDL_FLIP_NONE);
	}

	SDL_SetTextureAlphaMod(selectedTileTexture->texture, 255);
}
Drawing our selected tile is simply a case of using the selectedTile data in `dungeon`. We first check that selectedTile's `x` and `y` are not -1 (the default) and then subtract the current camera position, assigning the results to variables named `x` and `y`. We then calculate the current alpha of the selected tile image. We do this using sin, passing in our selectedTilePulse. Normally, sin will give us a result between -1 and 1. However, we want our result to be between 0 and 1. Therefore, we add 1 to the result of sin (now 0 - 2) and then divide by 2 (0 - 1). Next, we use SDL_SetTextureAlphaMod to set the alpha of selectedTileTexture. Starting with a value of 127, we add 128 multiplied by pulse, so we get a value between 127 and 255, giving us a pulsing alpha. Finally, we render the selected tile in much the same way as the entities, multiplying up the `x` and `y` values and adding the MAP_RENDER_X and MAP_RENDER_Y offsets. Before finishing, we reset selectedTileTexture's alpha (really our texture atlas's alpha) back to 255.
That's all our HUD code done. We can look quickly at the getEntities function in entities.c next:
Entity *getEntityAt(int x, int y)
{
	Entity *e, *rtn;

	rtn = NULL;

	for (e = dungeon.entityHead.next ; e != NULL ; e = e->next)
	{
		if (e->x == x && e->y == y)
		{
			if (e->solid)
			{
				return e;
			}

			rtn = e;
		}
	}

	return rtn;
}
This function looks much like isOccupied, except that it returns the entity at the requested position (`x` and `y`). One other thing it does is give priority to a solid entity at the position. Again, this is a preemptive piece of code. Items and other pickups when added won't obstruct an entity, and that means more than one entity can be in a square at once. However, since only one solid entity can be in a square, we will return it if we find it. We're considering the solid entity to be more important than the other. Our for-loop will run until it either finds a solid entity or reaches the end. An entity found at the requested `x` and `y` will be assigned to a variable called `rtn`, which will be returned at the end of the function (and is defaulted to NULL).
We can now turn to combat.c, to see where our combat messages are being created. Starting with doMeleeAttack:
void doMeleeAttack(Entity *attacker, Entity *target)
{
	// snipped

	buildAttackMessage(attacker, target, damage);

	type = HUD_MSG_NORMAL;

	if (target == dungeon.player && damage > 0)
	{
		type = HUD_MSG_BAD;
	}

	addHudMessage(type, combatMessage);
}
After all the combat has been handled, we're calling a new function named buildAttackMessage, passing in `attacker`, `target`, and `damage`. We'll see more on this in a moment. Next, we're determining the type of message we want to show (assigning it to a variable called `type`). By default, we're setting `type` to HUD_MSG_NORMAL. We're then testing if `target` (the recepient of the damage) is the player and also whether `damage` is greater than 0. In other words, whether the player has taken damage from a melee attack. If so, we're setting the type to HUD_MSG_BAD, so that it renders in red. We want to make it clear that something bad has happened here. With that determined, we're calling addHudMessage, passing in `type` and combatMessage (a static variable within combat.c).
If we look at buildAttackMessage now, we can see how the text of combatMessage is constructed:
static void buildAttackMessage(Entity *attacker, Entity *target, int damage)
{
	memset(combatMessage, 0, sizeof(combatMessage));

	if (damage > 0)
	{
		if (attacker == dungeon.player)
		{
			sprintf(combatMessage, "You hit the %s (%d).", target->name, damage);
		}
		else
		{
			sprintf(combatMessage, "The %s hits you (%d).", attacker->name, damage);
		}

		if (target->dead && target != dungeon.player)
		{
			strcat(combatMessage, " The ");
			strcat(combatMessage, target->name);
			strcat(combatMessage, " has been destroyed.");
		}
	}
	else
	{
		if (attacker == dungeon.player)
		{
			sprintf(combatMessage, "You miss the %s.", target->name);
		}
		else
		{
			sprintf(combatMessage, "The %s misses you.", attacker->name);
		}
	}
}
We start by memsetting combatMessage, to clear any existing text. Next, we testing whether `damage` is greater than 0. If so, we're going to build a text string to say that the target was hit. We test `attacker`, to see if it's the player. If so, we're going to use sprintf and combatMessage to say that the player has hit the target, printing both target's name and the damage dealt. If the attacker isn't the player, we're going to create a message to say that the attacker has struck the player.
With the initial message created, we're then testing to see if `target`'s `dead` flag is set and also if the target isn't the player. If so, we're going to use strcat with combatMessage to add that the monster was destroyed.
If, however, `damage` was 0, we're going to print a message to say that the attack missed, once again using sprintf and combatMessage.
In all cases here, we're assuming that only the player can hit monsters and only monsters can hit the player.
We're almost done. One of the last things we want to do is handle our tile selector. Turning to dungeon.c, we've made a few updates. First, to `logic`:
static void logic(void)
{
	// snipped

	doCamera();

	doSelectTile();
}
After doCamera, we're calling a new function named doSelectTile:
static void doSelectTile(void)
{
	int x, y, w, h;

	dungeon.selectedTile.x = dungeon.selectedTile.y = -1;

	x = MAP_RENDER_X;
	y = MAP_RENDER_Y;
	w = MAP_RENDER_X + ((MAP_RENDER_WIDTH - 1) * MAP_TILE_SIZE);
	h = MAP_RENDER_Y + ((MAP_RENDER_HEIGHT - 1) * MAP_TILE_SIZE);

	if (collision(app.mouse.x, app.mouse.y, 1, 1, x, y, w, h))
	{
		dungeon.selectedTile.x = ((app.mouse.x - MAP_RENDER_X) / MAP_TILE_SIZE) + dungeon.camera.x;
		dungeon.selectedTile.y = ((app.mouse.y - MAP_RENDER_Y) / MAP_TILE_SIZE) + dungeon.camera.y;
	}
}
By default, we're setting `dungeon`'s selectedTile's `x` and `y` to -1. We're then checking that our mouse's `x` and `y` coordinates lie within the rectangular area occupied by our map. We're assigning values to 4 variables: `x`, `y`, `w`, and `h`, to represent the coordinates and width and height of our map rectangle. We're then calling our good old `collision` function, passing in the mouse's `x` and `y` (with 1 for the width and height), and the `x`, `y`, `w`, and `h` values we calculated. If this test passes, we're setting the selected tile's `x` and `y`. We're doing this by subtracting the render offset from the mouse's `x` and `y` (remember that our map isn't aligned to the top left of the screen), before then dividing the results by MAP_TILE_SIZE. Finally, we're adding on the camera's `x` and `y`, so that we have the correct tile, according to our camera position.
Two final things to do is to setup our Game struct. We have a file called game.c for just this purpose. It contains just one function - initGame:
void initGame(void)
{
	memset(&game, 0, sizeof(Game));
}
Not a lot happening here. We're just memsetting Game, to ensure all the data is cleared.
initGame itself is being called in initGameSystem, in init.c:
void initGameSystem(void)
{
	srand(time(NULL));

	initAtlas();

	initFonts();

	initEntityFactory();

	initGame();
}
Doing this will ensure that our HUD messages don't show random data to begin with.
That's our HUD done! Our roguelike is starting to look a bit more like a game. What needs to happen next is for the Micro Mice to fight back. Yes, Mice. We're going to be adding 3 into the dungeon now, to make things a bit more interesting.
Purchase
The source code for all parts of this tutorial (including assets) is available for purchase:
From itch.io
It is also available as part of the SDL2 tutorial bundle: