PC Games
• Orb
• Lasagne Monsters
• Three Guys Apocalypse
• Water Closet
• Blob Wars : Attrition
• The Legend of Edgar
• TBFTSS: The Pandoran War
• Three Guys
• Blob Wars : Blob and Conquer
• Blob Wars : Metal Blob Solid
• Project: Starfighter
• TANX Squadron
Tutorials
• 2D shoot 'em up
• 2D top-down shooter
• 2D platform game
• Sprite atlas tutorial
• Working with TTF fonts
• 2D adventure game
• Widget tutorial
• 2D shoot 'em up sequel
• 2D run and gun
• Roguelike
• Medals (Achievements)
• 2D turn-based strategy game
• 2D isometric game
• 2D map editor
• 2D mission-based shoot 'em up
• 2D Santa game
• 2D split screen game
• 2D quest game
• SDL 1 tutorials (outdated)
Latest Updates
The Legend of Edgar 1.38
Thu, 1st January 2026
SDL2 Quest game tutorial
Wed, 7th May 2025
SDL2 Versus game tutorial
Wed, 20th March 2024
Download keys for SDL2 tutorials on itch.io
Sat, 16th March 2024
The Legend of Edgar 1.37
Mon, 1st January 2024
Tags
• battle-for-the-solar-system (10)
• blob-wars (10)
• brexit (1)
• code (6)
• edgar (10)
• games (45)
• lasagne-monsters (1)
• making-of (5)
• match3 (1)
• numberblocksonline (1)
• orb (2)
• site (1)
• tanx (4)
• three-guys (3)
• three-guys-apocalypse (3)
• tutorials (18)
• water-closet (4)
Books
The Honour of the Knights (Second Edition) (Battle for the Solar System, #1)
When starfighter pilot Simon Dodds is enrolled in a top secret military project, he and his wingmates begin to suspect that there is a lot more to the theft of a legendary battleship and the Mitikas Empire's civil war than the Helios Confederation is willing to let on. Somewhere out there the Pandoran army is gathering, preparing to bring ruin to all the galaxy...
— An old-school isometric game —
Part 9: Bridges and buttons
Note: this tutorial assumes knowledge of C, as well as prior tutorials.


Introduction
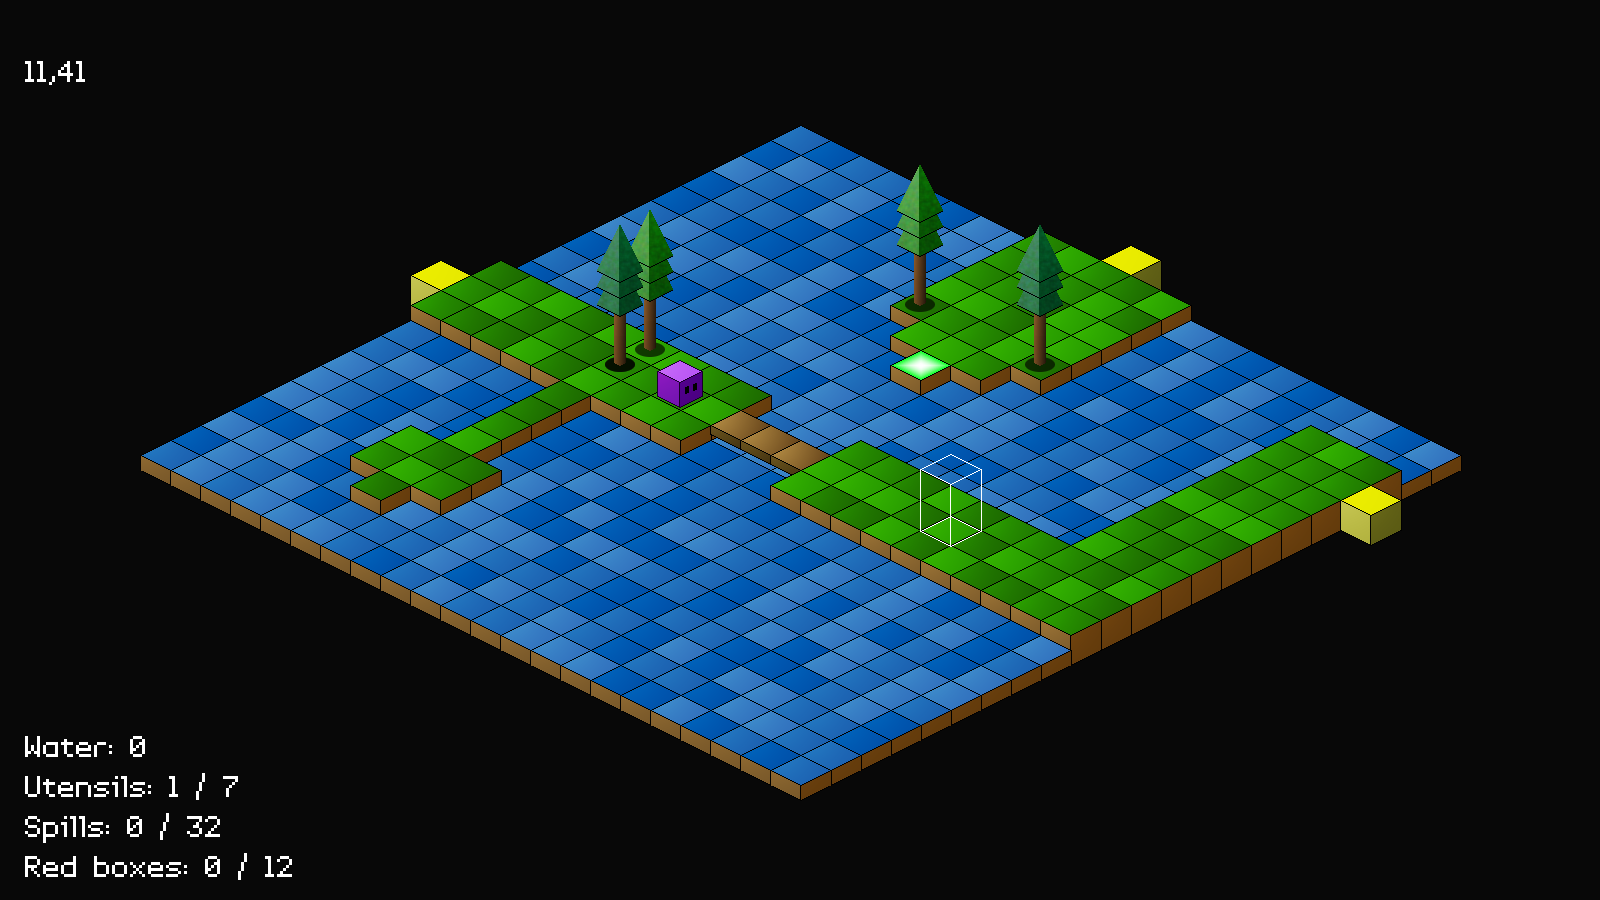
As noted in previous parts, it's impossible to explore all the map right now, as there are zones that are inaccessible, due to gaps and water that Purple Guy can't cross. In this part, we'll fix that by introducing bridges, as well as switches to raise them.
Extract the archive, run cmake CMakeLists.txt, followed by make, and then use ./isometric09 to run the code. You will see a window open like the one above. Click on ground squares to have Purple Guy move around. As you explore, you will see white outlines where bridges can be raised. Locating a purple button and walking onto it will cause the bridge to appear, permitting travel. This should now enable you to fully explore the map. Once you're finished, close the window to exit.
Inspecting the code
Wow, this is a short part! Adding in our bridges and buttons is a very simple task, so this won't take too long. We did all the major groundwork before.
Starting with defs.h:
#define EF_BRIDGE (2 << 2)
We've added in a new flag called EF_BRIDGE. This is a flag to apply to an entity and let us know it acts like a bridge. If an entity acts like a bridge, it means it will allow Purple Guy to move across it, even if the map tile beneath is water or a gap. We'll see this in action later.
Next up, we head over to structs.h, where we've updated Entity:
struct Entity {
	char name[MAX_NAME_LENGTH];
	int x;
	int z;
	int base;
	int layer;
	int dead;
	unsigned long flags;
	unsigned long isoFlags;
	AtlasImage *texture;
	void (*touch)(Entity *self, Entity *other);
	void (*activate)(Entity *self);
	Entity *next;
};
We've added a new function pointer called `activate`. This will allow our entity to take an action when it is called (e.g., a button raising a bridge).
That's all for structs.h, so let's head over to bridge.c, a new file, where we're defining our bridge. This file has two function. We'll start with initBridge:
void initBridge(Entity *e)
{
	e->texture = getAtlasImage("gfx/entities/outlineBridge.png", 1);

	e->activate = activate;
}
Not a lot here. We're setting the bridge's (`e`) texture, and also setting its `activate` function pointer to the `activate` function in the file. Notice that we're setting the bridge's `texture` to be the outline texture. All our bridges will be unusable to begin with.
Now for the `activate` function:
static void activate(Entity *self)
{
	self->texture = getAtlasImage("gfx/entities/bridge.png", 1);

	self->flags |= EF_BRIDGE;
}
As we saw, it takes the owner entity as an argument (`self`). The function will change the bridge's `texture` to be the real bridge texture (bridge.png), and also set its `flags` to include EF_BRIDGE. So, it will basically become a real bridge when the `activate` function is called.
And that's all there is to bridge..! If we now head to button.c, we can see how this is used. button.c is where we define our buttons. It defines two functions. Starting with initButton:
void initButton(Entity *e)
{
	e->layer = LAYER_MID;
	e->texture = getAtlasImage("gfx/entities/buttonOff.png", 1);

	e->touch = touch;
}
Our button is being drawn at the mid layer (LAYER_MID), so we need to set it as such. This means that Purple Guy can stand on it and everything will be rendered correctly. When setting the button's `texture`, we're using the buttonOff.png image. All our buttons are off / inactive to begin with. We're finally assigning the button's `touch` function to the one in this file.
The `touch` function itself is where things get interesting:
static void touch(Entity *self, Entity *other)
{
	Entity *e;

	if (other == world.player)
	{
		self->texture = getAtlasImage("gfx/entities/buttonOn.png", 1);

		for (e = world.entityHead.next ; e != NULL ; e = e->next)
		{
			if (e->activate != NULL && strcmp(e->name, self->name) == 0)
			{
				e->activate(e);
			}
		}

		self->touch = NULL;
	}
}
As with other things, we're testing that the player is the thing that has touched the button, and then setting the button's `texture` to be buttonOn.png. Next, we're looping through all the entities in the world (assigning them to `e`), and looking for any that have an `activate` function pointer set (in this case, it will be our bridges). We next check if the `name` of that entity matches the `name` of the button (`self`). Our buttons are all named after their targets in this case. If so, we're calling `e`'s `activate` function. Lastly, we're setting the button's `touch` function to be NULL, so that it can't be activated again.
So, in short, when our buttons are stepped on, they will cause our bridges to raise! Easy!
Over to entities.c, where we've added in a new function, hasBridge:
int hasBridge(int x, int z)
{
	Entity *e;

	for (e = world.entityHead.next ; e != NULL ; e = e->next)
	{
		if (e->x == x && e->z == z && e->flags & EF_BRIDGE)
		{
			return 1;
		}
	}

	return 0;
}
This function simply returns whether a bridge exists at a given position. It will loop through all the entities in the world, searching for an entity that matches the `x` and `z` position passed into the function, and return 1 if the entity's `flags` contains EF_BRIDGE. Otherwise, the function returns 0.
We can now look at is how our bridges support Purple Guy walking over them. Heading over to aStar.c, we've updated isBlocked:
static int isBlocked(int x, int z)
{
	Entity *e;

	if (isWithinISOScreen(x, z))
	{
		if (!isGround(x, z) && !hasBridge(x, z))
		{
			return 1;
		}

		e = getEntityAt(x, z);

		if (e != NULL && e != owner && (e->flags & EF_SOLID))
		{
			return 1;
		}

		return 0;
	}

	return 1;
}
After determining that the point we want to move to is within the current zone, we test if the current location is not a ground tile. If not, we're calling hasBridge, passing over x and z, to see if there is a bridge at this location. If not, we're returning 1, since the location is inaccessible. You may be wondering why we're not calling getEntityAt for testing if there is a bridge at the position. This because a bridge is a rare thing in our game, as it means that two entities can exist in one spot at a time. This will only be Purple Guy in our case, and so we need to be able to check for bridge support independently.
Having determined that the tile is accessible, we're grabbing the entity at the current `x` and `z` coordinates via getEntityAt, and processing the logic as before..
There is, of course, scope for optimisation here - we could change the getEntityAt function to give us a list of all the entities at a given position, so that we could iterate through them, rather than loop through everything in the world twice (which hasBridge and getEnityAt will effectively be doing). But for now, this approach is okay and not causing any performance issues.
The last thing we want to do is consider the presence of a bridge while drawing our cursor. If we hop over to world.c, we can see we've updated drawCursor:
static void drawCursor(void)
{
	int x, z;

	if (world.routeHead.next == NULL && world.cursor.x >= 0 && world.cursor.z >= 0 && world.cursor.x < MAP_RENDER_SIZE && world.cursor.z < MAP_RENDER_SIZE)
	{
		x = world.cursor.x + world.camera.x;
		z = world.cursor.z + world.camera.z;

		if (world.map[x][z].tile >= TILE_GROUND || hasBridge(x, z))
		{
			addISOObject(world.cursor.x, world.cursor.z, 0, -(TILE_HEIGHT * 2) - 1, tileSelect[0], LAYER_MID, IF_NONE);
			addISOObject(world.cursor.x, world.cursor.z, 0, -(TILE_HEIGHT * 2) - 1, tileSelect[1], LAYER_FOREGROUND, IF_NONE);
		}
	}
}
After determining that our cursor is within the bounds of our zone, we're adding the camera position (assigning to x and z), and then testing whether the map tile at the given location is a ground or wall tile, or if the location has a bridge, via a call to hasBridge. This means that our cursor will show up when we position it over a tile that has a raised bridge.
There we go! A world that can be fully explored, and all the items can be collected. Thanks to the bridges, Purple Guy's task got a whole lot easier. There is one other thing we could do with our isometric engine, and that is that we could add in some basic lighting. So, we'll look into doing so next, to add in some atmosphere.
Purchase
The source code for all parts of this tutorial (including assets) is available for purchase:
From itch.io
It is also available as part of the SDL2 tutorial bundle: