PC Games
• Orb
• Lasagne Monsters
• Three Guys Apocalypse
• Water Closet
• Blob Wars : Attrition
• The Legend of Edgar
• TBFTSS: The Pandoran War
• Three Guys
• Blob Wars : Blob and Conquer
• Blob Wars : Metal Blob Solid
• Project: Starfighter
• TANX Squadron
Tutorials
• 2D shoot 'em up
• 2D top-down shooter
• 2D platform game
• Sprite atlas tutorial
• Working with TTF fonts
• 2D adventure game
• Widget tutorial
• 2D shoot 'em up sequel
• 2D run and gun
• Roguelike
• Medals (Achievements)
• 2D turn-based strategy game
• 2D isometric game
• 2D map editor
• 2D mission-based shoot 'em up
• 2D Santa game
• 2D split screen game
• 2D quest game
• SDL 1 tutorials (outdated)
Latest Updates
The Legend of Edgar 1.38
Thu, 1st January 2026
SDL2 Quest game tutorial
Wed, 7th May 2025
SDL2 Versus game tutorial
Wed, 20th March 2024
Download keys for SDL2 tutorials on itch.io
Sat, 16th March 2024
The Legend of Edgar 1.37
Mon, 1st January 2024
Tags
• battle-for-the-solar-system (10)
• blob-wars (10)
• brexit (1)
• code (6)
• edgar (10)
• games (45)
• lasagne-monsters (1)
• making-of (5)
• match3 (1)
• numberblocksonline (1)
• orb (2)
• site (1)
• tanx (4)
• three-guys (3)
• three-guys-apocalypse (3)
• tutorials (18)
• water-closet (4)
Books

Alysha
When her village is attacked and her friends and family are taken away to be sold as slaves, Alysha Tanner sets out on a quest across the world to track them down and return them home. Along the way, she is aided by the most unlikely of allies - the world's last remaining dragon.
— An old-school isometric game —
Part 7: Loading and traversing a map
Note: this tutorial assumes knowledge of C, as well as prior tutorials.


Introduction
It's time to expand out our game past the single zone / room we've been stuck in for the past several parts. What we're going to do now is to load in a map, and allow us to fully explore it, by moving from zone to zone. This part looks a little longer, but it's mostly down to all the numerous single tweaks we've had to make to support this.
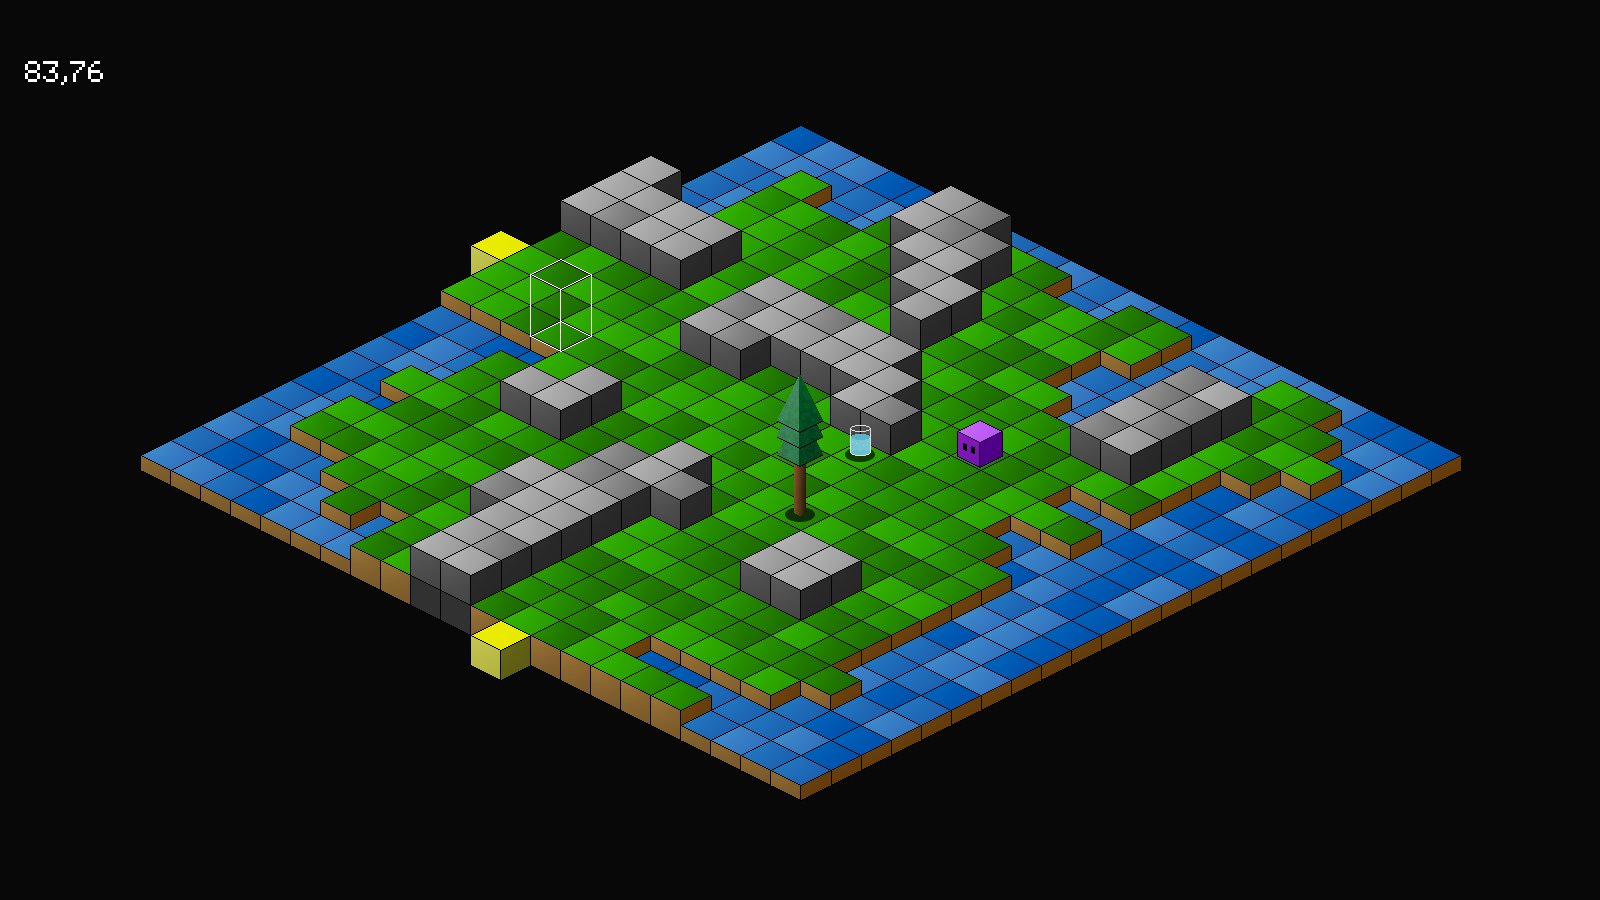
Extract the archive, run cmake CMakeLists.txt, followed by make, and then use ./isometric07 to run the code. You will see a window open like the one above. Click on ground squares to have Purple Guy move around. To move to another zone, click on the yellow squares at the edges of the map. Otherwise, the usual rules for the game apply. Notice how moving into new rooms, the isometric drawing counter resets. Also take note of how the water animates. Once you're finished, close the window to exit.
Inspecting the code
Rather than create one large isometric map to move around in, we've opted in this tutorial to make Purple Guy move from zone to zone, by entering and exiting via the yellow squares at the edges of the map. This gives the impression of the world being a little larger than it really is, and also provides an old-school feel.
Moving onto the code, we've made but one single very impactful update to structs.h:
typedef struct {
	MapTile map[MAP_SIZE][MAP_SIZE];
	Entity entityHead, *entityTail;
	Node routeHead;
	Entity *player;
	SDL_Rect playerISORect;
	struct {
		int x;
		int z;
	} cursor;
	struct {
		int x;
		int z;
	} camera;
} World;
To our World struck, we've added a `camera` struct, that will represent our game's camera. The camera will tell us which zone we're in and what entities that can be drawn. It contains two fields: x and z, the map position the camera is in.
Now onto map.c. We've made a number of updates here, so we'll go from the top. Starting with initMap:
void initMap(void)
{
	loadMap();

	loadTiles();
}
We're now calling a function named loadMap, that we'll come to last. Next up is doMap:
void doMap(void)
{
	int x, z, n;

	waterAnimTimer -= app.deltaTime;

	if (waterAnimTimer <= 0)
	{
		for (x = 0 ; x < MAP_RENDER_SIZE ; x++)
		{
			for (z = 0 ; z < MAP_RENDER_SIZE ; z++)
			{
				n = world.map[x + world.camera.x][z + world.camera.z].tile;

				if (n >= 0 && n < 10)
				{
					world.map[x + world.camera.x][z + world.camera.z].tile = rand() % 3;
				}
			}
		}

		waterAnimTimer = FPS * 0.35;
	}
}
This function is responsible for "animating" the water. It will basically randomly change the water tiles at a set interval. We start by reducing the value of waterAnimTimer. If it's 0 or less, we'll setup two for-loops, `x` and `z`, each going from 0 to MAP_RENDER_SIZE. Here we'll see the first use of World's `camera` values. We only want to animate the water in the current zone, so when testing the tile value at the map's `x` and `z`, we're also adding on World's `camera`'s `x` and `z` (we'll see how this camera value is set when we come to handling the player). With the value assigned to `n`, we test if `n`'s value is between 0 and 9, meaning it is a water tile. If so, we'll randomly set the tile to a value between 0 and 2 (we allow up to 10 water tiles, but only have 3 in this example).
With our loops complete, we'll set the value of waterAnimTimer to FPS * 0.35, meaning our water will animate every 1/3 of a second.
Onto drawMap next:
void drawMap(void)
{
	int x, z, n;

	for (x = 0 ; x < MAP_RENDER_SIZE ; x++)
	{
		for (z = 0 ; z < MAP_RENDER_SIZE ; z++)
		{
			n = world.map[x + world.camera.x][z + world.camera.z].tile;

			if (n >= 0)
			{
				if (n >= TILE_WALL)
				{
					addISOObject(x, z, 0, -TILE_HEIGHT, tiles[n], LAYER_FOREGROUND, IF_TEST_OCCLUSION);

					addISOObject(x, z, 0, 0, baseTileTexture, LAYER_BACKGROUND, IF_NONE);
				}
				else if (x == 0 || z == 0 || x == MAP_RENDER_SIZE - 1 || z == MAP_RENDER_SIZE - 1)
				{
					addISOObject(x, z, 0, 0, exitTile, LAYER_BACKGROUND, IF_NONE);
				}
				else
				{
					addISOObject(x, z, 0, 0, tiles[n], LAYER_BACKGROUND, IF_NONE);
				}
			}
		}
	}
}
Two simple updates. The only thing that's changed is that we're considering World's `camera`'s `x` and `z` values when picking out the tile to render, adding them to the `x` and `z` values. Notice that no matter where the camera is, we're looping between 0 and MAP_RENDER_SIZE, and adding on the camera adjustments. This helps to create our zone when drawing. Again, we'll come to how this is calculated a bit later on.
The other update we've made is to test whether the ground tile we're drawing lies at the edges of our map zone. We do this by checking if `x` or `z` or 0, or if they are MAP_RENDER_SIZE - 1. If so, we'll be drawing the tile differently to usual - we'll be rendering it with a texture called exitTile. This will be the yellow block you see around the edges of our map. Our maps are designed in such a way that the edges of each zone are reserved for moving between each one. So, any ground tile that exists in that space will be drawn as a yellow tile (and will also permit travel between zones!).
Now, onto loadMap:
static void loadMap(void)
{
	int x, z;
	char *data, *p;

	data = readFile("data/map.dat");

	p = data;

	for (z = 0 ; z < MAP_SIZE ; z++)
	{
		for (x = 0 ; x < MAP_SIZE ; x++)
		{
			world.map[x][z].tile = atoi(p);

			if (world.map[x][z].tile >= 0)
			{
				world.map[x][z].tile *= 10;

				world.map[x][z].tile += rand() % 3;
			}

			do {p++;} while (*p != ' ');
		}
	}

	free(data);
}
This function won't come as any real surprise to anyone who has followed these tutorials before, or has loaded such data in the past. First, we're loading all the map data into a char array, and then setting up two for-loops to read the values into World's map's multi-dimensional array. After assigning the value, notice how we're testing to see if it is greater than 0, and then multiplying the value by 10, and finally randomly adding a value between 0 and 2. The reason for this is because our map data is saved as single integers: -1 (empty space), 0 (water), 1 (land), 2 (wall). Multiplying by ten gives us 0, 10, and 20, while adding a random of 3 allows us to use a different texture.
The reason for this is because of the map editor used to create the map saved data as single values to denote empty space, water, land, and walls. With all our data loaded, we're then freeing the char array.
Finally, let's look at loadTiles:
static void loadTiles(void)
{
	int i;
	char filename[MAX_FILENAME_LENGTH];

	for (i = 0 ; i < MAX_TILES ; i++)
	{
		sprintf(filename, "gfx/tiles/%d.png", i);

		tiles[i] = getAtlasImage(filename, 0);
	}

	exitTile = getAtlasImage("gfx/tiles/exit.png", 1);

	baseTileTexture = getAtlasImage("gfx/tiles/base.png", 1);
}
We're now loading exitTile, to be used to denote the exit points around the map zone.
Moving now to entities.c, where we've once again made a number of changes to handle World's camera. First, we've updated drawEntities:
void drawEntities(void)
{
	Entity *e;
	int x, z, sx, sy;

	for (e = world.entityHead.next ; e != NULL ; e = e->next)
	{
		if (isWithinISOScreen(e->x, e->z))
		{
			x = e->x - world.camera.x;
			z = e->z - world.camera.z;

			sx = TILE_WIDTH / 2;
			sx -= e->texture->rect.w / 2;

			sy = TILE_HEIGHT / 2;
			sy -= e->texture->rect.h;
			sy -= e->base;

			addISOObject(x, z, sx, sy, e->texture, LAYER_FOREGROUND, e->isoFlags);

			if (e == world.player)
			{
				world.playerISORect.w = world.player->texture->rect.w;
				world.playerISORect.h = world.player->texture->rect.h - 8;

				toISO(x, z, &world.playerISORect.x, &world.playerISORect.y);
				world.playerISORect.x += sx;
				world.playerISORect.y += sy;
			}

			// add the shadow

			sx = TILE_WIDTH / 2;
			sx -= shadowTexture->rect.w / 2;

			sy = -shadowTexture->rect.h;
			sy += TILE_HEIGHT;

			addISOObject(x, z, sx, sy, shadowTexture, LAYER_MID, IF_NONE);
		}
	}
}
Our for-loop now incorporates a function call to a function named isWithinISOScreen, passing over the entity's `x` and `z` values. This is a helper function that will tell us whether the coordinates supplied are currently in our zone view. We'll see how it is defined later on. If our entity does live in the current camera view, we'll want to render them with the camera considered. We do this by subjecting World's `camera`'s `x` and `z` from the entity's `x` and `z`, and assigning them to variables named `x` and `z`. Now, in place of using the entity's `x` and `z` for our addISOObject and toISO calls, we use these newly calculated values instead (so, `x` and `z` instead of `e->x` and `e->z`).
That's the major change to entities.c done, but we should look at how we're handling our object distribution quickly. First, addEntities:
static void addEntities(void)
{
	Entity *e;
	int i, x, z;

	e = initEntity("purpleGuy");
	e->x = 11;
	e->z = 10;

	// snipped
}
We're hardcoding Purple Guy's position so that he always appears in the first screen. The rest of the function remains unchanged.
placeRandom has also seen a minor tweak:
static void placeRandom(int *x, int *z)
{
	int ok;

	do
	{
		*x = rand() % MAP_SIZE;
		*z = rand() % MAP_SIZE;

		ok = isGround(*x, *z) && getEntityAt(*x, *z) == NULL;
	}
	while (!ok);
}
Instead of randomly choosing a value of MAP_RENDER_SIZE, we're now picking a value of MAP_SIZE. This means that we will be randomly placing things around the entire map, rather than the first zone.
Now over to player.c, where we've made a number of updates. Starting with initPlayer:
void initPlayer(void)
{
	textures[FACING_NORTH] = textures[FACING_EAST] = getAtlasImage("gfx/entities/purpleGuyNorthEast.png", 1);
	textures[FACING_SOUTH] = getAtlasImage("gfx/entities/purpleGuySouth.png", 1);
	textures[FACING_WEST] = getAtlasImage("gfx/entities/purpleGuyWest.png", 1);

	world.player->texture = textures[FACING_SOUTH];

	walkTimer = 0;

	world.camera.x = (world.player->x / MAP_RENDER_SIZE) * MAP_RENDER_SIZE;
	world.camera.z = (world.player->z / MAP_RENDER_SIZE) * MAP_RENDER_SIZE;
}
We're setting World's `camera` position to be based around where Purple Guy starts. While we could simply set this to 0,0, given that he always appears in the first screen, these two lines of code come in handy if we wish to move him elsewhere in the world, and ensure that the camera is also always in the correct spot. Otherwise, the camera will likely be located in a zone where Purple Guy isn't. Also handy if you wish to move Purple Guy's starting location, without having to worry about how to then move the camera.
Now onto doPlayer, and this is where things get very interesting. In fact, this one of the most important updates to our game, since it is where we'll be handling our zone transitions:
void doPlayer(void)
{
	Node *n;
	int x, z, dx, dz, facing;

	walkTimer = MAX(walkTimer - app.deltaTime, 0);

	if (world.routeHead.next == NULL)
	{
		if (app.mouse.buttons[SDL_BUTTON_LEFT])
		{
			app.mouse.buttons[SDL_BUTTON_LEFT] = 0;

			createAStarRoute(world.player, world.cursor.x + world.camera.x, world.cursor.z + world.camera.z);

			walkTimer = WALK_SPEED;
		}
	}
	else if (walkTimer == 0)
	{
		// snipped

		x = world.player->x - world.camera.x;
		z = world.player->z - world.camera.z;

		if (x == 0 || z == 0 || x == MAP_RENDER_SIZE - 1 || z == MAP_RENDER_SIZE - 1)
		{
			world.camera.x += dx * MAP_RENDER_SIZE;
			world.camera.z += dz * MAP_RENDER_SIZE;

			world.player->x += (dx * 2);
			world.player->z += (dz * 2);

			initISORender();
		}
	}
}
The first change we make is to consider the camera position when creating our A* path; since we are still working with one single map, we need to add the camera position to the cursor's position, so we know where we're staring from.
The next change is the big one. After we've finished moving (the code has been snipped above), we test whether Purple Guy is now at the edge of the zone. We do this by subtracting the World's `camera`'s `x` and `z` from the player's `x` and `z`, and then testing the values. This is similar to how we're rendering the yellow exit blocks when drawing the map. If we determine that the player has moved to the edge of the zone, we're going to move the camera position.
Knowing the direction Purple Guy has just moved (`dx` and `dy`), we multiply the this by MAP_RENDER_SIZE. In effect, this moves our camera on one zone in the direction Purple Guy was going; since our camera is just x and z offsets, it could in theory be moved 1 tile at a tile, in any given direction. Here, we're moving it one entire zone at a time.
With our zone changed, we need to push Purple Guy into it a little more, or else he won't be drawn. We do this by simply adding to his `x` and `z` twice the values of `dx` and `dz`. This makes it as though Purple Guy took two extra steps after changing zone, and will appear inside the bounds of the next zone, around the point he entered. We don't push him forward just one step, or else he will appear at the reserved edge of the zone, which isn't what we want.
So, in summry, we simply check if Purple Guy has walked to the edge of the zone, move the camera position to match, and have Purple Guy take a couple of extra steps forward.
Finally, we call initISORender to reset our isometric drawing, so that the isometric objects are drawn in slowly once again. Removing this line would result in the zone changing immediately.
We're very nearly finished! Just a few odds and ends left to discuss and this part will be finished (with the basics of our game pretty much done). Let's move over to iso.c, where we've made a few changes and additions. Starting with the isWithinISOScreen function:
int isWithinISOScreen(int x, int z)
{
	x -= world.camera.x;
	z -= world.camera.z;

	return x >= 0 && z >= 0 && x < MAP_RENDER_SIZE && z < MAP_RENDER_SIZE;
}
As we saw earlier, this is a helper function to determine if a pair of x and z coordinates are within our current viewing zone. This function simply subtracts World's `camera`'s `x` and `z` from the `x` and `z` values passed into the function, and tests if the results lies within MAP_RENDER_SIZE.
Next up, we have addISOObject:
void addISOObject(int x, int z, int sx, int sy, AtlasImage *texture, int layer, unsigned long flags)
{
	ISOObject *o;

	if (numISOObjects < MAX_ISO_OBJECTS)
	{
		// snipped

		if (flags & IF_TEST_OCCLUSION &&
			(world.player->x - world.camera.x) >= x && (world.player->z - world.camera.z) <= z &&
			collision(world.playerISORect.x, world.playerISORect.y, world.playerISORect.w, world.playerISORect.h, o->sx, o->sy, texture->rect.w, texture->rect.h))
		{
			o->color.a *= 0.35;
		}
	}
}
The only change we've made here is to subtract World's `camera`'s `x` and `z` from the player's `x` and `z`, while performing the occlusion testing. So, we're just considering the camera position while making this calculation.
Over the aStar.c briefly, where we've updated isBlocked:
static int isBlocked(int x, int z)
{
	Entity *e;

	if (!isWithinISOScreen(x, z) || !isGround(x, z))
	{
		return 1;
	}

	e = getEntityAt(x, z);

	if (e != NULL && e != owner && (e->flags & EF_SOLID))
	{
		return 1;
	}

	return 0;
}
You might have noticed that you cannot command Purple Guy to move to a location in a zone that is not immediately accessible; if he has to leave the zone to do so, no route will be walked. This comes down to the isBlocked function. Here, we've added a call to isWithinISOScreen. This basically restricts our A* pathfinding to the zone we're currently in.
Finally, let's head over to world.c, where we've updated drawCursor:
static void drawCursor(void)
{
	if (world.cursor.x >= 0 && world.cursor.z >= 0 && world.cursor.x < MAP_RENDER_SIZE && world.cursor.z < MAP_RENDER_SIZE && world.map[world.cursor.x + world.camera.x][world.cursor.z + world.camera.z].tile >= 10)
	{
		addISOObject(world.cursor.x, world.cursor.z, 0, -(TILE_HEIGHT * 2) - 1, tileSelect[0], LAYER_MID, IF_NONE);
		addISOObject(world.cursor.x, world.cursor.z, 0, -(TILE_HEIGHT * 2) - 1, tileSelect[1], LAYER_FOREGROUND, IF_NONE);
	}
}
Again, nothing special going on here - we're taking World's `camera` position into account while testing the tile value at the cursor's index.
And there we have it. Adding in our camera and zone changes were actually pretty simple, we only needed to make a lot of tweaks here and there to account for it. As we can see, our game is more or less finished now. We have what we wanted - an isometric game, with (more or less) correct sorting, the ability to move our character around a map, and also the ability to change zones, a bit like Head over Heels, Knight Lore, etc. However, we could take things a little further, such as loading in some of our entities, and incorporate some other gameplay elements. We'll look into doing those things next.
Purchase
The source code for all parts of this tutorial (including assets) is available for purchase:
From itch.io
It is also available as part of the SDL2 tutorial bundle: