PC Games
• Orb
• Lasagne Monsters
• Three Guys Apocalypse
• Water Closet
• Blob Wars : Attrition
• The Legend of Edgar
• TBFTSS: The Pandoran War
• Three Guys
• Blob Wars : Blob and Conquer
• Blob Wars : Metal Blob Solid
• Project: Starfighter
• TANX Squadron
Tutorials
• 2D shoot 'em up
• 2D top-down shooter
• 2D platform game
• Sprite atlas tutorial
• Working with TTF fonts
• 2D adventure game
• Widget tutorial
• 2D shoot 'em up sequel
• 2D run and gun
• Roguelike
• Medals (Achievements)
• 2D turn-based strategy game
• 2D isometric game
• 2D map editor
• 2D mission-based shoot 'em up
• 2D Santa game
• 2D split screen game
• 2D quest game
• SDL 1 tutorials (outdated)
Latest Updates
The Legend of Edgar 1.38
Thu, 1st January 2026
SDL2 Quest game tutorial
Wed, 7th May 2025
SDL2 Versus game tutorial
Wed, 20th March 2024
Download keys for SDL2 tutorials on itch.io
Sat, 16th March 2024
The Legend of Edgar 1.37
Mon, 1st January 2024
Tags
• battle-for-the-solar-system (10)
• blob-wars (10)
• brexit (1)
• code (6)
• edgar (10)
• games (45)
• lasagne-monsters (1)
• making-of (5)
• match3 (1)
• numberblocksonline (1)
• orb (2)
• site (1)
• tanx (4)
• three-guys (3)
• three-guys-apocalypse (3)
• tutorials (18)
• water-closet (4)
Books

The Honour of the Knights (Second Edition) (Battle for the Solar System, #1)
When starfighter pilot Simon Dodds is enrolled in a top secret military project, he and his wingmates begin to suspect that there is a lot more to the theft of a legendary battleship and the Mitikas Empire's civil war than the Helios Confederation is willing to let on. Somewhere out there the Pandoran army is gathering, preparing to bring ruin to all the galaxy...
— An old-school isometric game —
Part 1: Drawing tiles
Note: this tutorial assumes knowledge of C, as well as prior tutorials.


Introduction
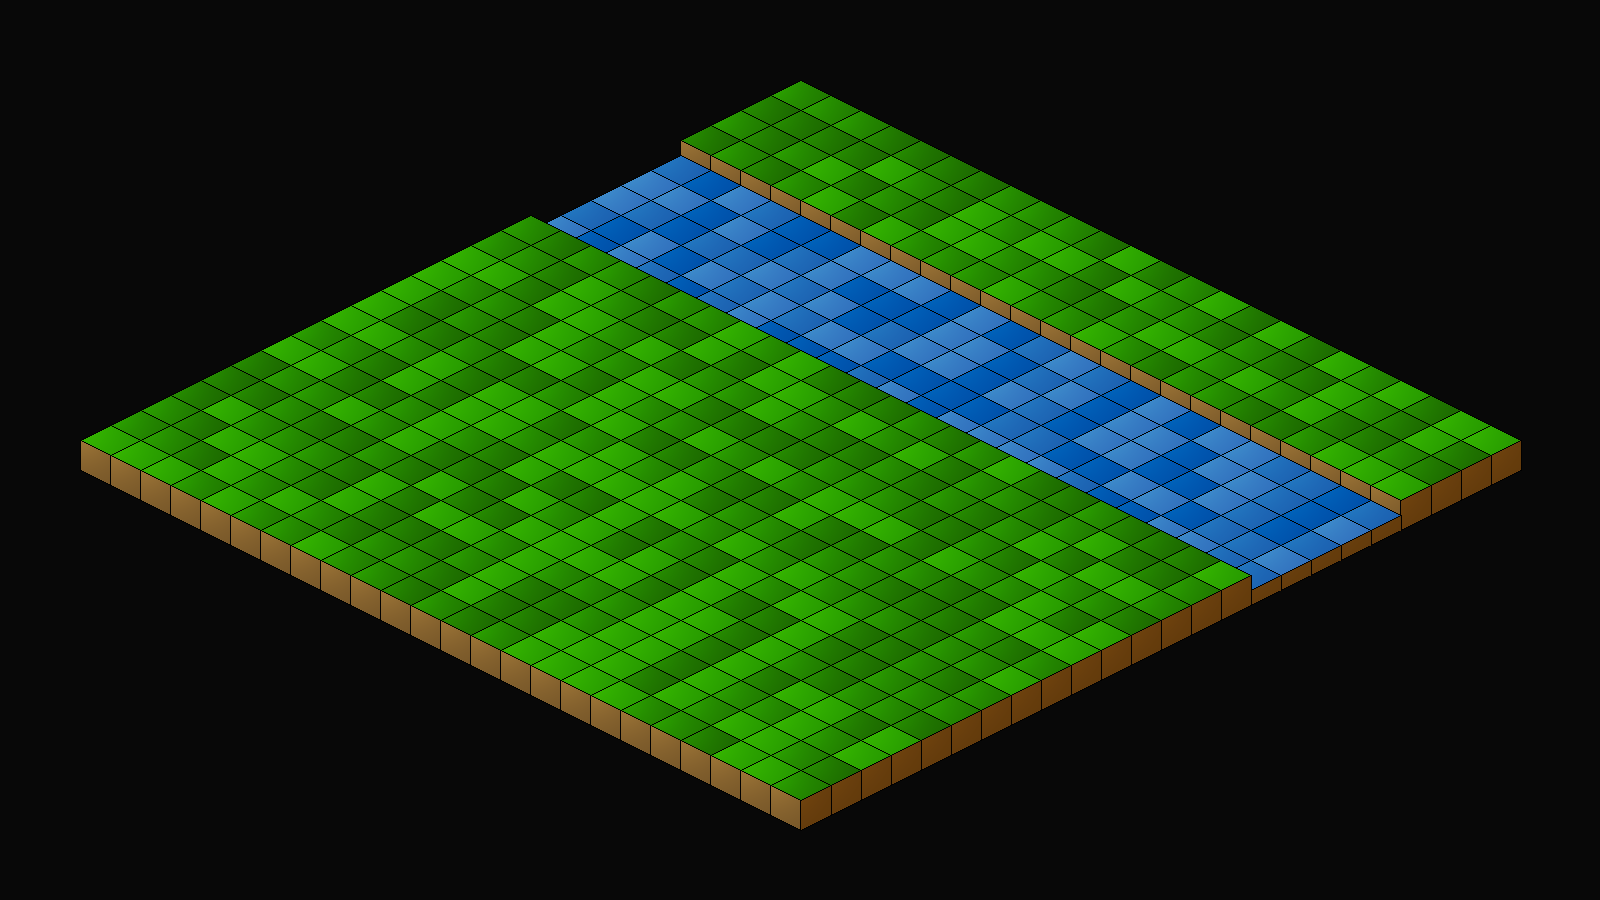
Isometric games are very popular, but developing them can throw up a number of issues, mainly due to the sorting. The secret behind successful isometric sorting is to make use of the Painter's Algorithm, and draw your objects from front to back. And, in the case of isometric perspective, draw those objects higher up the screen first (lowest y value). In this tutorial, we'll be looking at how to achieve this.
A word of caution before continuing: there is a limit to how well you can perform isometric drawing when using a 2D sprite-based system. This is simply due to the nature of attempting to sort 2D sprites, where you have no control over the ordering of the indiviual pixels. Even the best 2D isometric games will suffer from isometric sorting problems here and there, including greats such as Knight Lore, Head over Heels, Hades (yes, Hades is a 2D sprite based game - it's not 3D..!) If you need your isometric game to be more or less perfect, switching to full OpenGL and using 3D models would be a better choice.
Extract the archive, run cmake CMakeLists.txt, followed by make, and then use ./isometric01 to run the code. You will see a window open like the one above. There is a not much else to do for now, so once you're finished, close the window to exit.
Inspecting the code
As with all the more recent tutorials in this series, we're going to skip over certains aspects and focus on the parts of the code that apply to our isometric rendering. Before we start, however, let's take a look at our map tiles, so we can understand what we're drawing.
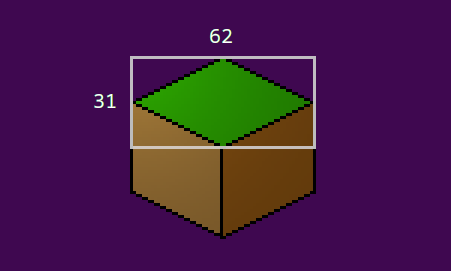
Above is one of the grass map tiles. Notice the part in the rectangular area. This our "tile", or rather the idea of the image that we're interested in. When drawing our tiles, we want to align them all to this area, not the entire texture. Our tile in this instance has an area of 62 x 31, including the black border. Compare this single part to the main image at the top of the page and you can see how we're going to line things up.
We can now move onto the code. To start with, let's look at defs.h:
#define MAP_SIZE                  96

#define TILE_HEIGHT               30
#define TILE_WIDTH                60

#define MAP_RENDER_SIZE           24

#define MAP_RENDER_OFFSET_X       ((SCREEN_WIDTH - (TILE_WIDTH * MAP_RENDER_SIZE)) / 2)
#define MAP_RENDER_OFFSET_Y       425
We're defining a number of things here. MAP_SIZE is the overall size of the map (which will come into play in a later part). TILE_HEIGHT and TILE_WIDTH are the height and width of our map tile. Notice how these values are smaller than the size of the blocks in the image above. This is because we don't want to include the black outline at both edges. Doing so will make our lines look thicker than desired; we want our map tiles to have single pixel outlines. MAP_RENDER_SIZE is the amount of the map that we want to draw. Remember that we'll ultimately be splitting our map into separate "rooms" or screens. Finally, MAP_RENDER_OFFSET_X and MAP_RENDER_OFFSET_Y are used to control the position we'll render our map on screen. These values will more or less center the view. We'll be using this variable when it comes to also rendering other world objects.
Moving over to structs.h, we've got a few to consider:
typedef struct {
	int x;
	int y;
	int sx;
	int sy;
	AtlasImage *texture;
} ISOObject;
ISOObject (isometric object) is a struct that will hold all the details about the isometric object we want to draw on the screen. This will include map tiles, objects, and the like. `x` and `y` are the object's isometric x and y values. These two variables will all come into play when we're sorting our object for drawing. `sx` and `sy` are the screen x and y coordinates for the actual drawing. `texture` is the texture that the object will use. Nothing too complex.
Next, we have a MapTile object:
typedef struct {
	int tile;
} MapTile;
Right now, this consists of one field: `tile`. This is the value of the tile image that will be drawn. We'll be expanding this struct later on.
Finally, we have our World struct:
typedef struct {
	MapTile map[MAP_SIZE][MAP_SIZE];
} World;
Again, not a lot here. We're creating a multidimensional array of MapTiles called `map`, of size MAP_SIZE x MAP_SIZE, to hold our map data.
We're now ready to dive into the actual logic, so we'll start with iso.c. This file contains everything that will be used to setup and draw our isometric objects. There are a number of functions here, so we'll go through them from top to bottom.
Starting with initISORender:
void initISORender(void)
{
	drawTimer = 0;
}
We're setting a variable called drawTimer to 0. This variable is used to control the speed at which the scene is drawn, as we'll see below in doISOObjects:
void doISOObjects(void)
{
	drawTimer = MIN(drawTimer + ISO_RENDER_SPEED * app.deltaTime, numISOObjects);

	// uncomment the line below to draw the scene instantly each time
	// drawTimer = numISOObjects;
}
This function simply increases the value of drawTimer by ISO_RENDER_SPEED (defined as 15), maxing it out at the value of numISOObjects (static within iso.c - we'll see more on this in a bit). The speed of the rendering can be increased or decreased by changing ISO_RENDER_SPEED. However, if this behaviour isn't desired, one can uncomment the final line in the function to instantly show the scene.
The drawISOObjects function comes next:
void drawISOObjects(void)
{
	int i;
	ISOObject *o;

	qsort(isoObjects, numISOObjects, sizeof(ISOObject), drawComparator);

	for (i = 0 ; i < numISOObjects ; i++)
	{
		if (drawTimer >= i)
		{
			o = &isoObjects[i];

			blitAtlasImage(o->texture, o->sx, o->sy, 0, SDL_FLIP_NONE);
		}
	}
}
A fairly simple function for now. We start by using qsort to sort our list of isometric object to draw. All our isometric objects live in an array called isoObjects, as we'll see shortly. With our objects sorted, we then setup a for-loop to draw them, going from 0 to numISOObjets (static within iso.c). Before drawing the isoObject, we're testing to see if the value of drawTimer is greater than `i`, and calling blitAtlasImage, making use of the isoObject at the array index of `i`. As you can see, as the value of drawTimer increases, we'll draw more and more isometric objects. Due to our sorting, this means items at the top of the screen will draw first. Again, uncommenting the line in doISOObjects will result in instant drawing (or even removing the drawTimer condition test here!).
The clearISOObjects function follows:
void clearISOObjects(void)
{
	memset(&isoObjects, 0, sizeof(ISOObject) * numISOObjects);

	numISOObjects = 0;
}
Again, nothing taxing. We're clearing our array of isoObjects via memset, and also resetting numISOObjects to 0, so our rendering context is completely reset.
Now for something more interesting - the toISO function:
void toISO(int x, int y, int *sx, int *sy)
{
	*sx = MAP_RENDER_OFFSET_X + ((x * TILE_WIDTH / 2) + (y * TILE_WIDTH / 2));
	*sy = MAP_RENDER_OFFSET_Y + ((y * TILE_HEIGHT / 2) - (x * TILE_HEIGHT / 2));
}
This function will convert a map square coordinate into an isometric screen space coordinate. It takes four parameters: `x` and `y` are the map x and z (as `y`) positions, while `sx` and `sy` are the screen x and y values. Notice that `sx` and `sy` are pointers into which we'll be placing the results of the calculation.
For `sx`, we're setting the value to MAP_RENDER_OFFSET_X, plus half our TILE_WIDTH multiplied by `x`, plus half our TILE_WIDTH multiplied by `y`. In effect, this will place each tile over to the right. The greater the values of `x` and `y`, the further right the tile will be placed. For `sy`, we're setting the value to MAP_RENDER_OFFSET_Y, plus half our TILE_HEIGHT multiplied by y, minus half our TILE_WIDTH multiplied by `x`. This calculation will shift the tile up or down the screen as the value of `y` and `x` increase, and their values cause those adjustments (or not at all, if `x` and `y` values are equal).
Once again, consider the image below as to how this affects our placement:
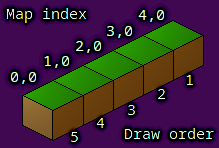
The numbers in the image above represent x and z map coordinates, respectively. One can see that the x value is increasing from left to right, as it would with a regular map. The z value remains the same, as this is the first column (0). However, as x increases, the tile is shifted further up the screen, as expected according to the calculation for `sy` performed in toISO. Notice also how the tiles are being rendered from back to front, with the tile at 4,0 being drawn first, and the tile at 0,0 being drawn last. We'll see how this is done when we come to the sorting function.
In effect, we're rotating our map 45 degrees clockwise. The "front" of our map is now the bottom left-hand part of the screen, while the "back" of the map is the top-right. In fact, altering the plus and minus operations of the toISO function will allow us to rotate the map around in different ways (but still at 45 degree angles). This, however, does bring some added complications when it comes to picking tiles, so we will leave the calculation as it is.
Moving on now to addISOObject:
void addISOObject(int x, int z, int sx, int sy, AtlasImage *texture)
{
	ISOObject *o;

	if (numISOObjects < MAX_ISO_OBJECTS)
	{
		o = &isoObjects[numISOObjects++];

		toISO(x, z, &o->x, &o->y);

		o->sx = o->x + sx;
		o->sy = o->y + sy;
		o->texture = texture;
	}
}
This function is responsible for adding isometric objects, such as the map tiles. The function takes five arguments: `x` and `z` are the map indexes, `sx` and `sy` are the screen x and y adjustment values (note: not the actual screen x and y values we want to use), and finally, `texture` is the texture to use.
We start by testing that we've not run out of isometric object to use, by testing that numISOObjects is less than MAX_ISO_OBJECTS (defined as 1024). We then grab a reference to an ISOObject at the index of numISOObjects, assigning to `o`, and increment the value at the same time. We then call the toISO function, passing over the `x` and `z` values, as well as the ISOObject's `x` and `y` to be populated. With this done, we populate the rest of the object, setting the `sx` and `sy` values to the previously calculated `x` and `y`, plus the `sx` and `sy` values passed into the function. Finally, we assign the object's `texture`.
The last function in iso.c is drawComparator. It is one of the most important functions:
static int drawComparator(const void *a, const void *b)
{
	ISOObject *o1, *o2;

	o1 = (ISOObject*) a;
	o2 = (ISOObject*) b;

	return o1->y - o2->y;
}
This comparator (used by qsort) compares ISOObjects to one another. In the current implementation, we're comparing each ISOObject's `y` value, the ones with the lowest values being pushed to the top of the array. In effect, this means that we're drawing the ISOObject from the top of the screen to the bottom. This is just what we want, according to the Painter's Algorithm, and just what we need to rendering isometric objects properly.
That's iso.c done. We'll be revisiting this file in later parts, as there is still much that needs to be added to it. For now, let's move onto the rest of the game.
Coming next to map.c, we'll find some quite familiar code, and things that are easier to understand.
Starting with initMap:
void initMap(void)
{
	int x, z;

	for (x = 0 ; x < MAP_RENDER_SIZE ; x++)
	{
		for (z = 0 ; z < MAP_RENDER_SIZE ; z++)
		{
			if (x > 14 && x < 20)
			{
				world.map[x][z].tile = rand() % 3;
			}
			else
			{
				world.map[x][z].tile = 10 + rand() % 3;
			}
		}
	}

	loadTiles();
}
We're setting up two for-loops here, to create our map. We're running through the rows (`x`) and columns (`z`) and setting the appropriate tile. We're creating our "river" by testing if `x` falls between 14 and 20, and assigning `tile` a value of 0-2, since these are our water tiles. Otherwise, values of 10-12 will be used, to represent the ground.
We're then calling loadTiles, which will load our tile graphics (we'll see this in a bit, know for now that they will fill an array called `tiles`).
Next, we have drawMap:
void drawMap(void)
{
	int x, z, n;

	for (x = 0 ; x < MAP_RENDER_SIZE ; x++)
	{
		for (z = 0 ; z < MAP_RENDER_SIZE ; z++)
		{
			n = world.map[x][z].tile;

			if (n >= 0)
			{
				addISOObject(x, z, 0, 0, tiles[n]);
			}
		}
	}
}
We're just looping through our map values here, assigning the value of MapTile's `tile` at `x` and `z` to `n`, to make things a bit easier to read, then testing the value of `n`. If it's 0 or more (later on, we'll have -1 to denote an empty tile!), we'll call addISOObject, pressing over `x` and `z`, zeros for the `sx` and `sy` (since we're not making any adjustments), and the texture at `tiles` index `n`.
Lastly, loadTiles:
static void loadTiles(void)
{
	int i;
	char filename[MAX_FILENAME_LENGTH];

	for (i = 0 ; i < MAX_TILES ; i++)
	{
		sprintf(filename, "gfx/tiles/%d.png", i);

		tiles[i] = getAtlasImage(filename, 0);
	}
}
We're just filling an array of AtlasImages called `tiles` with all the available tile graphics, from our texture atlas. MAX_TILES is defined as 50, so we can have up to 50 different tile textures.
Lastly, on now to world.c. This is where we'll be processing our game's logic and rendering.
First up, we have initWorld:
void initWorld(void)
{
	initMap();

	initISORender();

	app.delegate.logic = logic;
	app.delegate.draw = draw;
}
Okay, pretty simple and familiar. We're just calling initMap and initISORenderer, to set up both of those. We're then setting App's `logic` and `draw` function points to the ones contained in world.c. We've seen this plenty of times before.
The `logic` function follows, and is quite straightforward:
static void logic(void)
{
	doISOObjects();
}
We're just calling doISOObjects.
`draw` is equally simple:
static void draw(void)
{
	clearISOObjects();

	drawMap();

	drawISOObjects();
}
We're first calling clearISOObject to reset our isometric rendering, then calling drawMap to add all of our map's isometric objects, and finally calling drawISOObjects.
That's world.c finished. It's very easy to understand right now, as it's just delegating function calls!
That's the first part of our isometric tutorial finished. As you can see, it's not too hard to follow, but there are plenty of things that we need to think about. There will be lots more in the parts that follow, since there are a lot of gotchas that come with 2D isometric rendering (and once again, it's not something that's possible to get perfect, due to the nature of sprite-based rendering).
In the next part, we'll look at selecting tiles, using the mouse.
Purchase
The source code for all parts of this tutorial (including assets) is available for purchase:
From itch.io
It is also available as part of the SDL2 tutorial bundle: