PC Games
• Orb
• Lasagne Monsters
• Three Guys Apocalypse
• Water Closet
• Blob Wars : Attrition
• The Legend of Edgar
• TBFTSS: The Pandoran War
• Three Guys
• Blob Wars : Blob and Conquer
• Blob Wars : Metal Blob Solid
• Project: Starfighter
• TANX Squadron
Tutorials
• 2D shoot 'em up
• 2D top-down shooter
• 2D platform game
• Sprite atlas tutorial
• Working with TTF fonts
• 2D adventure game
• Widget tutorial
• 2D shoot 'em up sequel
• 2D run and gun
• Roguelike
• Medals (Achievements)
• 2D turn-based strategy game
• 2D isometric game
• 2D map editor
• 2D mission-based shoot 'em up
• 2D Santa game
• 2D split screen game
• 2D quest game
• SDL 1 tutorials (outdated)
Latest Updates
The Legend of Edgar 1.38
Thu, 1st January 2026
SDL2 Quest game tutorial
Wed, 7th May 2025
SDL2 Versus game tutorial
Wed, 20th March 2024
Download keys for SDL2 tutorials on itch.io
Sat, 16th March 2024
The Legend of Edgar 1.37
Mon, 1st January 2024
Tags
• battle-for-the-solar-system (10)
• blob-wars (10)
• brexit (1)
• code (6)
• edgar (10)
• games (45)
• lasagne-monsters (1)
• making-of (5)
• match3 (1)
• numberblocksonline (1)
• orb (2)
• site (1)
• tanx (4)
• three-guys (3)
• three-guys-apocalypse (3)
• tutorials (18)
• water-closet (4)
Books
The Third Side (Battle for the Solar System, #2)
The White Knights have had their wings clipped. Shot down and stranded on a planet in independent space, the five pilots find themselves sitting directly in the path of the Pandoran war machine as it prepares to advance The Mission. But if they can somehow survive and find a way home, they might just discover something far more worrisome than that which destroyed an empire.
— Creating a Run and Gun game —
Part 5: Basic Map
Note: this tutorial assumes knowledge of C, as well as prior tutorials.


Introduction
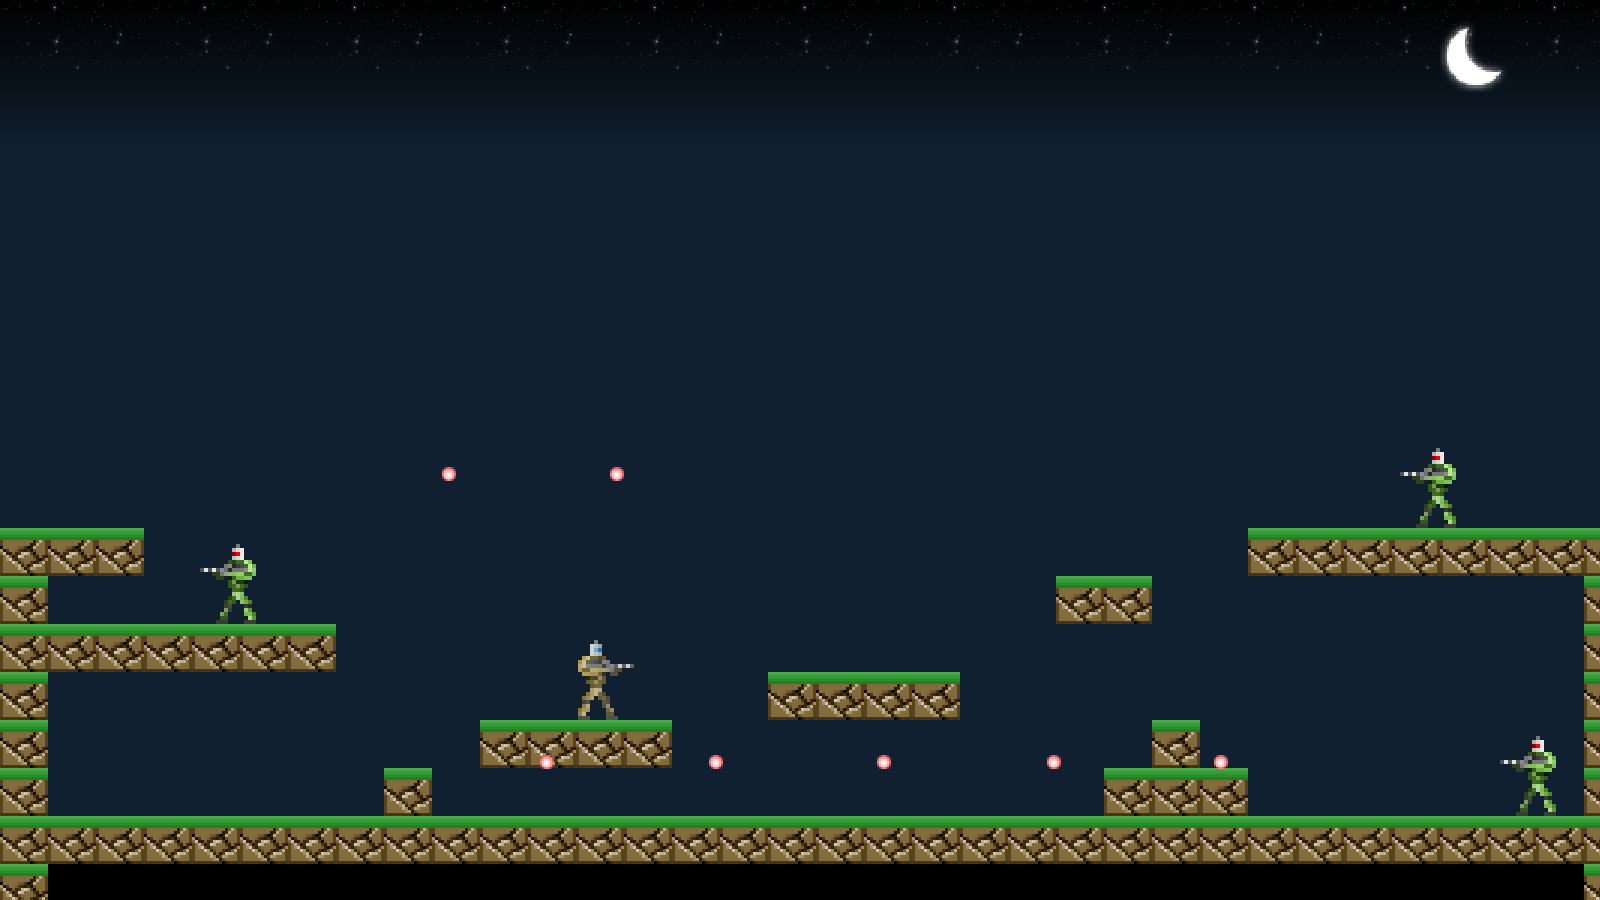
So far, we've been limited to a single screen and a flat plain. We're going to change that a little bit, by loading and making use of a pre-defined map (although one still limited to a single screen). We'll also add in a few more enemies to battle.
Extract the archive, run cmake CMakeLists.txt, followed by make, and then use ./gunner05 to run the code. You will see a window open like the one above. The main player character starts off in the bottom left-hand corner. The same controls from past tutorials apply. The player can now move around the map, jump on the various map blocks, and battle the enemies. Once you're finished, close the window to exit.
Inspecting the code
Having this map make things a little more interesting and one can see that the game is starting to take shape. We've made a good number of changes in order to support our map, both loading and displaying it, as well as the entity interactions. We'll start by looking at defs.h:
#define MAP_WIDTH              34
#define MAP_HEIGHT             19

#define MAX_TILES              100
#define MAP_TILE_SIZE          48
We've added in a few new defines to support our map. MAP_WIDTH and MAP_HEIGHT tell us how large our map is. Currently, it is 34 blocks wide by 19 blocks tall. We've also created a define called MAX_TILES, that will be used for loading and displaying map tiles. MAP_TILE_SIZE tells us how large an individual map tile is (in this case, 48x48 pixels). Our screen is 1600 x 900. 1600 / 48 gives us 33.3333, which is why our map is 34 wide. 900 / 48 is 18.75, which is why our map is 19 tall. Our map is therefore a little larger than the screen.
Moving on, we've made just one small change to structs.h:
typedef struct {
	Entity entityHead, *entityTail;
	Bullet bulletHead, *bulletTail;
	Entity *player;
	int map[MAP_WIDTH][MAP_HEIGHT];
} Stage;
We've added in a multi-dimensional array of ints called `map`, to represent our map data within Stage.
All our map code lives in map.c, which contains a number of functions. We'll start with initMap:
void initMap(void)
{
	loadMapTiles();

	loadMapData("data/stages/1.map");
}
initMap is a simple function that just calls two other functions: loadMapTiles and loadMapData. We'll look at loadMapTiles first:
static void loadMapTiles(void)
{
	char filename[MAX_FILENAME_LENGTH];
	int i;

	for (i = 1 ; i < MAX_TILES ; i++)
	{
		sprintf(filename, "gfx/tiles/%d.png", i);

		tiles[i] = getAtlasImage(filename, 0);
	}
}
loadMapTiles basically looks for and loads a series of images to represent our map. We're setting up a for-loop, going from 1 to MAX_TILES. We're then using sprintf to create a filename for our tile, using the value of i in our for-loop. So, we'll attempt to load gfx/tiles/1.png, gfx/tiles/2.png, gfx/tiles/3.png, ... gfx/tiles/99.png. When calling getAtlasImage, we're passing 0 to the second parameter, to tell the function that the image we're trying to get isn't required and therefore shouldn't error if it can't be found.
With our tile graphics loaded, we can move onto loading the actual map data. This is done in loadMapData:
static void loadMapData(char *filename)
{
	int x, y;
	char *data, *p;

	data = readFile(filename);

	p = data;

	for (y = 0 ; y < MAP_HEIGHT ; y++)
	{
		for (x = 0 ; x < MAP_WIDTH ; x++)
		{
			stage.map[x][y] = atoi(p);

			do {p++;} while (isdigit(*p));
		}
	}

	free(data);
}
We're first calling readFile, to load the data from the file specified by filename and assigning it to a variable called `data`. Next, we're assigning a char pointer called `p` to `data`. This is done to help us move through the data more easily by incrementing a pointer, as we'll see. We're then setting up two for-loops, one to read the map data rows (`y`) and the other to read the map data columns (`x`). We're calling atoi and passing in `p` as the argument. This will mean that we'll convert a series of digit characters into a int. We're then assigning the number to Stage's `map` array, using the `x` and `y` indexes we're working with. With the number read, we then want to move onto the next number. We're doing this by incrementing `p`, effectively moving it to the next character in the `data` array. We'll do this using a do-while loop. For each increment, we'll test the new character by calling isdigit. We'll continue to increment `p` until we come to a character that isn't a digit (such as a space or new line character), before we then assign the next number.
If that sounds a bit confusing, consider the map data below:
0 0 0 0 0 0 0 0 0 0 0 0 0 0 0 0 0 0 0 0 0 0 0 0 0 0 0 0 0 0 0 0 0 0
0 0 0 0 0 0 0 0 0 0 0 0 0 0 0 0 0 0 0 0 0 0 0 0 0 0 0 0 0 0 0 0 0 0
0 0 0 0 0 0 0 0 0 0 0 0 0 0 0 0 0 0 0 0 0 0 0 0 0 0 0 0 0 0 0 0 0 0
0 0 0 0 0 0 0 0 0 0 0 0 0 0 0 0 0 0 0 0 0 0 0 0 0 0 0 0 0 0 0 0 0 0
0 0 0 0 0 0 0 0 0 0 0 0 0 0 0 0 0 0 0 0 0 0 0 0 0 0 0 0 0 0 0 0 0 0
0 0 0 0 0 0 0 0 0 0 0 0 0 0 0 0 0 0 0 0 0 0 0 0 0 0 0 0 0 0 0 0 0 0
0 0 0 0 0 0 0 0 0 0 0 0 0 0 0 0 0 0 0 0 0 0 0 0 0 0 0 0 0 0 0 0 0 0
0 0 0 0 0 0 0 0 0 0 0 0 0 0 0 0 0 0 0 0 0 0 0 0 0 0 0 0 0 0 0 0 0 0
0 0 0 0 0 0 0 0 0 0 0 0 0 0 0 0 0 0 0 0 0 0 0 0 0 0 0 0 0 0 0 0 0 0
0 0 0 0 0 0 0 0 0 0 0 0 0 0 0 0 0 0 0 0 0 0 0 0 0 0 0 0 0 0 0 0 0 0
0 0 0 0 0 0 0 0 0 0 0 0 0 0 0 0 0 0 0 0 0 0 0 0 0 0 0 0 0 0 0 0 0 0
2 2 2 0 0 0 0 0 0 0 0 0 0 0 0 0 0 0 0 0 0 0 0 0 0 0 2 2 2 2 2 2 2 2
2 0 0 0 0 0 0 0 0 0 0 0 0 0 0 0 0 0 0 0 0 0 2 2 0 0 0 0 0 0 0 0 0 2
2 2 2 2 2 2 2 0 0 0 0 0 0 0 0 0 0 0 0 0 0 0 0 0 0 0 0 0 0 0 0 0 0 2
2 0 0 0 0 0 0 0 0 0 0 0 0 0 0 0 2 2 2 2 0 0 0 0 0 0 0 0 0 0 0 0 0 2
2 0 0 0 0 0 0 0 0 0 2 2 2 2 0 0 0 0 0 0 0 0 0 0 2 0 0 0 0 0 0 0 0 2
2 0 0 0 0 0 0 0 2 0 0 0 0 0 0 0 0 0 0 0 0 0 0 2 2 2 0 0 0 0 0 0 0 2
2 2 2 2 2 2 2 2 2 2 2 2 2 2 2 2 2 2 2 2 2 2 2 2 2 2 2 2 2 2 2 2 2 2
2 1 1 1 1 1 1 1 1 1 1 1 1 1 1 1 1 1 1 1 1 1 1 1 1 1 1 1 1 1 1 1 1 2
We want to read all the data above, one row and column at a time. We'll read the first character and convert that into an int. atoi don't move on automatically after reading the data, so we then need to move through the data until we find the start of the next character. We can do this by simply looking for any character that isn't a digit. We need to do this to correctly identify individual numbers.
The next function to look at is drawMap. It's quite easy to understand:
void drawMap(void)
{
	int x, y, n;

	for (x = 0 ; x < MAP_WIDTH ; x++)
	{
		for (y = 0 ; y < MAP_HEIGHT ; y++)
		{
			n = stage.map[x][y];

			if (n > 0)
			{
				blitAtlasImage(tiles[n], x * MAP_TILE_SIZE, y * MAP_TILE_SIZE, 0, SDL_FLIP_NONE);
			}
		}
	}
}
We're setting up two for-loop, to render our map array on the x and y axis. We're then grabbing the value of the tile at the `x` and `y` index in the map data (stage.map) and assigning it to `n`. We're then testing to see if `n` is greater than 0 and drawing it if so. We consider a value of 0 to be thin air, so nothing is drawn. If `n` is greater than 0, we're calling blitAtlasImage, using the tile image at index `n` (remember that tiles is an array of AtlasImages that we loaded earlier). To position the tile, we're multiplying `x` and `y` by MAP_TILE_SIZE. This will mean that tiles will be drawn at 0,0 then 0,48, then 0,96 ... 0,864, then at 48,0, 48,48, etc. Effectively our map is rendered in a grid.
One final function we should touch on is isInsideMap:
int isInsideMap(int x, int y)
{
	return x >= 0 && y >= 0 && x < MAP_WIDTH && y < MAP_HEIGHT;
}
This is a helper function to let us determine if a point lies within the map. It should be clear what's happening here. We'll see this used when we come to handle our map-entity interactions.
That's our map taken care of. As you can see, it's nice and easy. Now, we should look at how our entities interact with it. Turning to entities.c, we've made a change to doEntities:
void doEntities(void)
{
	Entity *e, *prev;

	prev = &stage.entityHead;

	for (e = stage.entityHead.next ; e != NULL ; e = e->next)
	{
		e->onGround = 0;

		if (!(e->flags & EF_WEIGHTLESS))
		{
			e->dy = MIN(e->dy + (GRAVITY * app.deltaTime), MAX_FALL_SPEED);
		}

		move(e, e->dx, 0);

		move(e, 0, e->dy);

		e->tick(e);

		if (e->dead)
		{
			prev->next = e->next;

			if (e == stage.entityTail)
			{
				stage.entityTail = prev;
			}

			deadTail->next = e;
			deadTail = e;
			deadTail->next = NULL;

			e = prev;
		}

		prev = e;
	}
}
We've added two new lines, calling the same function: `move`. In the first case, we're passing over the entity (`e`), it's `dx`, and 0. This is to first move the entity on the x axis, using the value of their `dx`. We're passing 0 to the third parameter, as we're not moving on the vertical axis. In the second call, we're calling `move` with the entity, 0, and the entity's `dy`, to tell it to move just on the vertical axis. This is done to aid our map collision detection and response, by only moving on one axis at a time.
The `move` function itself breaks the movement handling up further:
static void move(Entity *e, double dx, double dy)
{
	if (dx != 0)
	{
		e->x += (dx * app.deltaTime);

		moveToWorldX(e, dx);
	}

	if (dy != 0)
	{
		e->y += (dy * app.deltaTime);

		moveToWorldY(e, dy);
	}

	e->x = MIN(MAX(e->x, 0), SCREEN_WIDTH - e->texture->rect.w);
	e->y = MIN(MAX(e->y, 0), SCREEN_HEIGHT - e->texture->rect.h);
}
We're first testing if `dx` is a non-zero value. If so, we're adding the value of `dx` to the entity's `x`, to move them on the horizontal. After that, we're calling moveToWorldX, passing in the entity and the `dx` value. We're then testing if `dy` is a non-zero value. If so, we're adding the value of `dy` to the entity's `y`, and calling moveToWorldY, passing over the entity and the value of `dy`. The last thing we're doing in the function is clipping the entity to the bounds of the screen, to prevent them from leaving. This is a temporary measure that we'll fix later on. For now, let's look at what moveToWorldX does:
static void moveToWorldX(Entity *e, double dx)
{
	int mx, my, adj;

	mx = dx > 0 ? (e->x + e->texture->rect.w) : e->x;
	mx /= MAP_TILE_SIZE;

	for (my = (e->y / MAP_TILE_SIZE) ; my <= (e->y + e->texture->rect.h - 1) / MAP_TILE_SIZE ; my++)
	{
		if (!isInsideMap(mx, my) || stage.map[mx][my] != 0)
		{
			adj = dx > 0 ? -(e->texture->rect.w) : MAP_TILE_SIZE;

			e->x = (mx * MAP_TILE_SIZE) + adj;

			e->dx = 0;

			return;
		}
	}
}
The principle behind moveToWorldX is to test that, after moving on the x axis, if our entity has come into contact with a solid world tile. If so, we'll resolve the movement and place the entity as close to the tile as it can go. To start with, we're assigning a value to a variable called `mx`. The value depends on the direction we're moving. If `dx` is greater than 0 (we're moving right), the value of `mx` will be the entity's `x` + their texture's width. In other words, the entity's right-hand edge. Otherwise, `mx` will be the value of the entity's `x` (their left-hand edge). With `mx` assigned, we're dividing the value by MAP_TILE_SIZE. This will result in `mx`'s value becoming an index within our map data on the x axis. We now need only find the value on the y axis to find out which tile the entity has touched.
To find the y index, we're setting up a for-loop. The idea is that we'll test the y index at various points across the height of our entity. We'll start `my` at the entity's `y` / MAP_TILE_SIZE. We'll then increment `my` by 1, while it is less than entity's `y` plus the entity's height, all divided by MAP_TILE_SIZE. This means that we can check for collisions with the map at intervals along the height of the entity. Consider the image below:
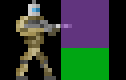
Our player sprite is 80 pixels tall. The purple block shows the first 48 pixels being covered. The green block shows the next 48 pixels (though it is truncated in this image). Assuming that `my` starts at 0, it will next move to 1 while we cover the remainder of the player sprite. Should our sprite be taller, `my` will continue to increase until we cover the entire image.
Now that we know the values of `mx` and `my`, we can test against the map data. We first call isInsideMap, passing in `mx` and `my`. We also check Stage's map data itself, checking the value at `mx` and `my`. If we're not inside the map or the Stage's map data at `mx` / `my` is not 0, we want to clip the entity and stop it from moving. We first assign a value to a variable called `adj` (short for adjustment), according to the direction the entity was moving. If moving to the right, `adj` will become the negative of the entity's texture's width. Otherwise, it will be MAP_TILE_SIZE. Next, we align the entity directly over the tile it has intersected with (on the x axis), plus the value of `adj`. What this means is that if we were moving to the right when we hit the tile, our entity will be clipped to the left-hand side of the tile, since we're aligning our entity's `x` to the map tile's `x`, less the entity texture's width. If we were moving to the left, we'll again be aligning the entity over the map tile, but then adding on MAP_TILE_SIZE, to clip the entity to the tile's right-hand side.
Again, consider the image below:
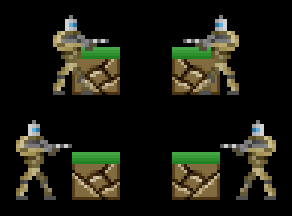
Should the character enter the block on either side, they are being shift to the left or right of the block. The final thing we do is set the entity's `dx` to 0, and return from the function (since a collision has happened and we've made the adjustment, meaning there is no point in continuing to test).
The code for moveToWorldY is largely the same:
static void moveToWorldY(Entity *e, double dy)
{
	int mx, my, adj;

	my = dy > 0 ? (e->y + e->texture->rect.h) : e->y;
	my /= MAP_TILE_SIZE;

	for (mx = e->x / MAP_TILE_SIZE ; mx <= (e->x + e->texture->rect.w - 1) / MAP_TILE_SIZE ; mx++)
	{
		if (!isInsideMap(mx, my) || stage.map[mx][my] != 0)
		{
			adj = dy > 0 ? -(e->texture->rect.h) : MAP_TILE_SIZE;

			e->y = (my * MAP_TILE_SIZE) + adj;

			e->dy = 0;

			e->onGround = dy > 0;

			return;
		}
	}
}
The main difference is we're testing the vertical movement values (i.e., `my` is used instead of `mx`, and `mx` is used instead of `my`). We're also checking across the character's width, rather than their height. The adjustments are also using the entity's height instead of width. However, there is one thing that we're doing differently: we're checking to see if the entity was moving down the screen when they hit the map. If so, we're setting the entity's onGround flag to 1. It's important to hold do this only if the entity is moving down the screen, otherwise the flag would be set to 1 if they were moving up the screen (such as when jumping) and struck a tile above them. In this case, we would be able to jump again, even though we're not on the ground. In effect, the player could hold the jump key to stick to the ceiling.
Now that our map is loaded and our entity-world interactions have been handled, we can look at the changes made to stage.c. As always, there aren't too many. Starting with initStage:
void initStage(void)
{
	memset(&stage, 0, sizeof(Stage));

	skyTexture = getAtlasImage("gfx/stage/sky.png", 1);

	moonTexture = getAtlasImage("gfx/stage/moon.png", 1);

	initMap();

	initEntities();

	initBullets();

	initEntity("player");

	addSoldiers();

	app.delegate.logic = logic;
	app.delegate.draw = draw;
}
We're loading two textures: the sky and the moon, assigned to skyTexture and moonTexture respectively. We're also calling initMap to setup and load our map, as well as a new function called addSoldiers. As with setting up our Targets in the past, we're creating our soldiers in a new function. addSoldiers is similar to what addTargets did:
static void addSoldiers(void)
{
	Entity *e;

	e = initEntity("greenSoldier");
	e->x = 1500;
	e->y = 750;

	e = initEntity("greenSoldier");
	e->x = 1400;
	e->y = 350;

	e = initEntity("greenSoldier");
	e->x = 200;
	e->y = 550;
}
We're calling initEntity three times, passing in "greenSoldier", and then positioning the returned entity on the screen. In a future part, we'll look at loading these entities from a data file (if you've already seen the Adventure tutorial, you will already have an idea of how this will happen).
Next, we've updated our `draw` function:
static void draw(void)
{
	drawSky();

	drawMap();

	drawEntities();

	drawBullets();
}
We're now making calls to two new functions: drawSky and drawMap. We've already seen drawMap, so we'll just look at drawSky:
static void drawSky(void)
{
	int x;

	x = 0;

	while (x < SCREEN_WIDTH)
	{
		blitAtlasImage(skyTexture, x, 0, 0, SDL_FLIP_NONE);

		x += skyTexture->rect.w;
	}

	blitAtlasImage(moonTexture, SCREEN_WIDTH - 160, 20, 0, SDL_FLIP_NONE);
}
Our sky sits at the top of the screen. Our sky texture is actually 150x150 pxiels, so doesn't cover the entire background. We want our sky to be drawn across the entire top of the screen, so we first set up a variable called `x` and assign it a value of 0. We then setup a while-loop, that will repeat while `x` is less than SCREEN_WIDTH. On each loop, we'll call blitAtlasImage, passing in skyTexture and `x`. We'll then increase the value of `x` by the width of skyTexture, so that we draw it at intervals across the entire width of ths screen. Finally, we're rendering our moon by calling blitAtlasImage and passing in the moonTexture, and setting it over to the right-hand side of the screen.
In case you're wondering where the dark blue sky comes from, this is done in draw.c, in prepareScene:
void prepareScene(void)
{
	SDL_SetRenderDrawColor(app.renderer, 16, 32, 48, 255);
	SDL_RenderClear(app.renderer);
}
We're now clearing the screen to a dark blue each time.
And that's this part done. Our game continues to take shape. But there are some issues that need fixing before we go any further. For one, the bullets completely ignore the world and pass straight through it. The enemies can also see us anywhere, which means we can't hide from them. We'll fix all these issues in the next part.
Purchase
The source code for all parts of this tutorial (including assets) is available for purchase:
From itch.io
It is also available as part of the SDL2 tutorial bundle: