PC Games
• Orb
• Lasagne Monsters
• Three Guys Apocalypse
• Water Closet
• Blob Wars : Attrition
• The Legend of Edgar
• TBFTSS: The Pandoran War
• Three Guys
• Blob Wars : Blob and Conquer
• Blob Wars : Metal Blob Solid
• Project: Starfighter
• TANX Squadron
Tutorials
• 2D shoot 'em up
• 2D top-down shooter
• 2D platform game
• Sprite atlas tutorial
• Working with TTF fonts
• 2D adventure game
• Widget tutorial
• 2D shoot 'em up sequel
• 2D run and gun
• Roguelike
• Medals (Achievements)
• 2D turn-based strategy game
• 2D isometric game
• 2D map editor
• 2D mission-based shoot 'em up
• 2D Santa game
• 2D split screen game
• 2D quest game
• SDL 1 tutorials (outdated)
Latest Updates
The Legend of Edgar 1.38
Thu, 1st January 2026
SDL2 Quest game tutorial
Wed, 7th May 2025
SDL2 Versus game tutorial
Wed, 20th March 2024
Download keys for SDL2 tutorials on itch.io
Sat, 16th March 2024
The Legend of Edgar 1.37
Mon, 1st January 2024
Tags
• battle-for-the-solar-system (10)
• blob-wars (10)
• brexit (1)
• code (6)
• edgar (10)
• games (45)
• lasagne-monsters (1)
• making-of (5)
• match3 (1)
• numberblocksonline (1)
• orb (2)
• site (1)
• tanx (4)
• three-guys (3)
• three-guys-apocalypse (3)
• tutorials (18)
• water-closet (4)
Books
The Battle for the Solar System (Complete)
The Pandoran war machine ravaged the galaxy, driving the human race to the brink of destruction. Seven men and women stood in its way. This is their story.
— Creating a Run and Gun game —
Part 3: Destroying targets
Note: this tutorial assumes knowledge of C, as well as prior tutorials.


Introduction
So far, we can move our Gunner, as well as shoot. It would be good to have something to actually shoot at, however. In this part, we'll introduce some non-lethal practice targets for the Gunner to take out.
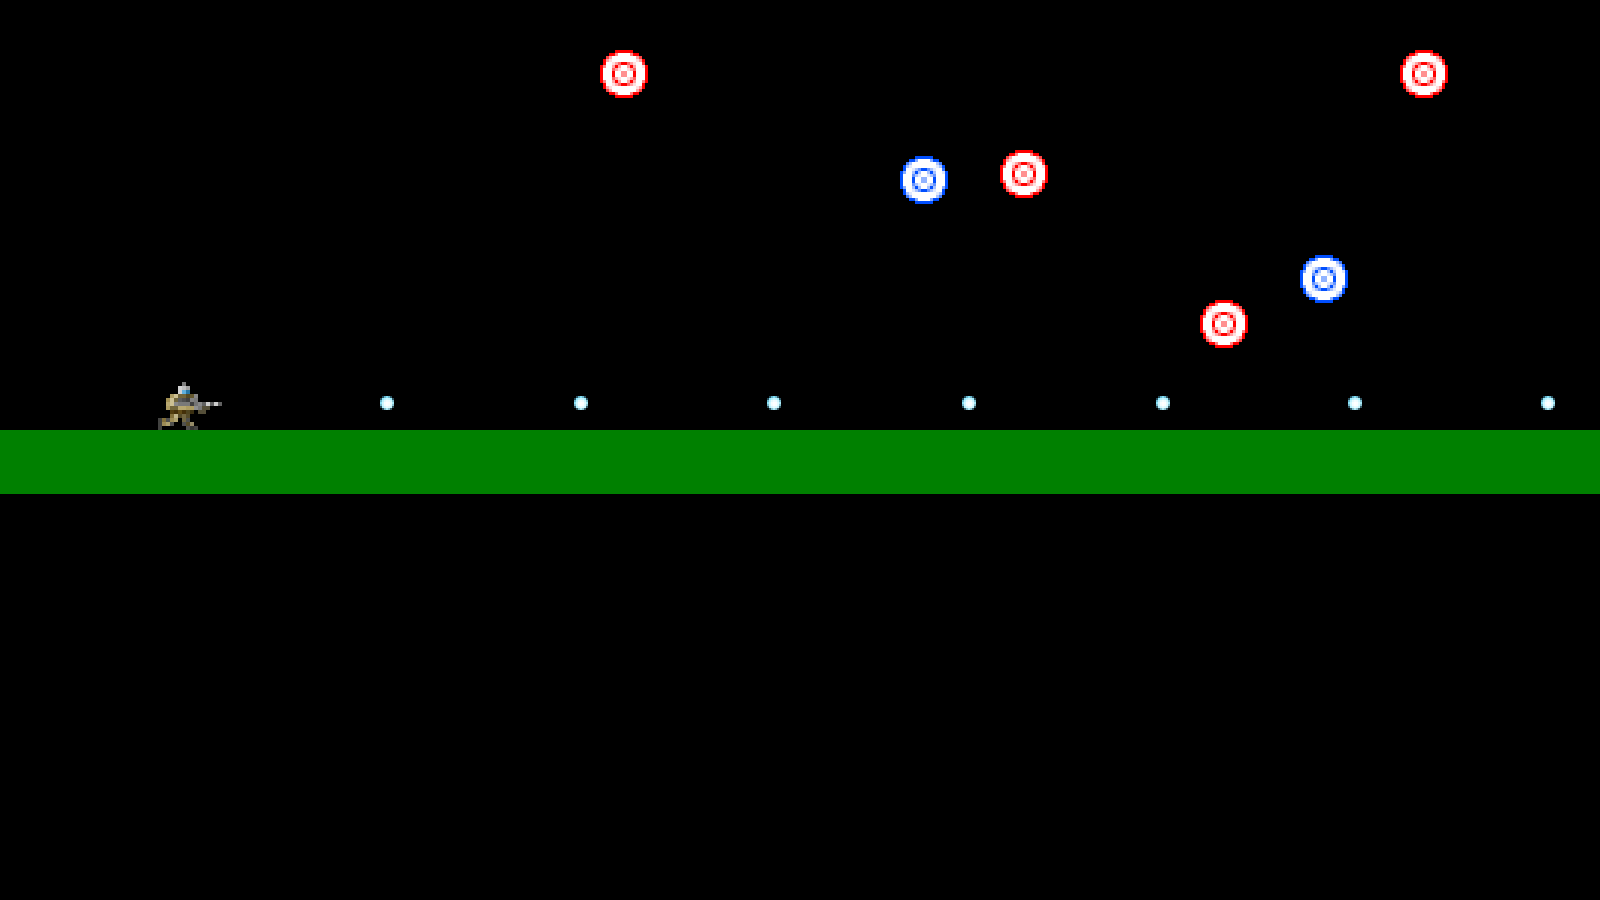
Extract the archive, run cmake CMakeLists.txt, followed by make, and then use ./gunner03 to run the code. You will see a window open like the one above, showing our main character on a black background, with a number of red and blue targets present. The controls from the previous tutorials apply. Shoot down the targets however you wish. The red targets will remain fixed in place, while the blue targets will move around, bouncing off the edges of the screen. Each one takes 3 shots to destroy and do not reappear once taken out. Once you're finished, close the window to exit.
Inspecting the code
Introducing the targets into the game has resulted in the need to make tweaks to a lot of existing code, as we'll soon see. For now, we'll start with looking at the additions and changes to defs.h and structs.h. Starting with defs.h:
#define EF_NONE                0
#define EF_WEIGHTLESS          (2 << 0)
We've added in two new defines, called EF_NONE and EF_WEIGHTLESS. EF is short for "entity flag". These are bitwise flags that can be combined together to add properties to entities. EF_NONE is a general value to say that the entity doesn't have any flags, whereas EF_WEIGHTLESS is a flag to say that the entity isn't affected by gravity. We'll see this one in action later.
Next, we come to structs.h, to see the changes made there:
struct Entity {
	double x;
	double y;
	double dx;
	double dy;
	int facing;
	int onGround;
	int dead;
	SDL_Rect hitbox;
	AtlasImage *texture;
	unsigned long flags;
	void (*data);
	void (*tick)(Entity *self);
	void (*draw)(Entity *self);
	void (*takeDamage)(Entity *self, int amount);
	Entity *next;
};
To start off with, we've added three new fields to Entity: `dead`, `hitbox`, and `flags`. `dead` is a flag used to say that an entity has been killed and should be removed from the game world. It is 0 by default. `hitbox` will be used with collision detection, whereas the `flags` field will be used to store the flags added to the entity.
We've also added in a struct to hold the details of our Target:
typedef struct {
	int life;
	double damageTimer;
} Target;
Target is a very simple struct. Like Gunner, it is used to extend the base Entity. `life` is the amount of health the target has. It will be considered dead once this value hits 0. damageTimer is a variable used to help us visually identify that the target has taken damage.
We've also made some additions to Bullet:
struct Bullet {
	double x;
	double y;
	double dx;
	double dy;
	double life;
	int damage;
	SDL_Rect hitbox;
	Entity *owner;
	AtlasImage *texture;
	Bullet *next;
};
`damage` and `hitbox` are both new fields. `damage` will control how much damage a bullet does to a target upon contact. `hitbox` is used for collision detection.
Now, let's look at how we're creating and handling the Targets. The code for the Targets is found in target.c. While we've got red and blue Targets that behave differently, they are both handled in the same file. Starting with initTarget:
void initTarget(Entity *e)
{
	Target *t;

	t = malloc(sizeof(Target));
	memset(t, 0, sizeof(Target));

	t->life = 3;

	e->data = t;

	if (redTargetTexture == NULL)
	{
		redTargetTexture = getAtlasImage("gfx/sprites/redTarget.png", 1);
		blueTargetTexture = getAtlasImage("gfx/sprites/blueTarget.png", 1);
	}

	if (rand() % 2 == 0)
	{
		e->texture = blueTargetTexture;
		e->dx = 4;
	}
	else
	{
		e->texture = redTargetTexture;
		e->flags = EF_WEIGHTLESS;
	}

	e->hitbox.w = e->texture->rect.w;
	e->hitbox.h = e->texture->rect.h;

	e->tick = tick;
	e->draw = draw;
	e->takeDamage = takeDamage;
}
We've mallocing and memsetting a Target, assigning it to a variable called `t`, then setting its `life` to 3. Higher values will mean our Targets will need more hits to destroy, while lower values will do the opposite. We're then assigning our Target to our entity's `data` field. The next thing we're doing is checking if we've loaded our required textures. We're doing this by testing if redTargetTexture is NULL. If so, we're grabbing our red and blue target textures, and assigning them to redTargetTexture and blueTargetTexture respectively.
Now we want to randomly select which type of Target this one will be. We're testing a random of 2 (0 or 1). If it's 0, this Target will be a blue type. We're setting the entity's `texture` to blueTargetTexture and also setting its `dx` to 4. Otherwise, we're setting the Target's `texture` to redTargetTexture and setting its `flags` as EF_WEIGHTLESS. This will mean that our blue Targets will immediately move to the right, while our red targets won't move at all (and won't even be affected by gravity).
We're then partly setting up the entity's `hitbox`. We're assigning the `hitbox`'s `w` and `h` (width and height) variables to be the same as the entity's texture's width and height. We'll see how the `hitbox`'s `x` and `y` fields are setup in a bit. Finally, we're assigning our entity's `tick`, `draw`, and takeDamage fields.
Now let's look at our `tick` function. It's actually quite simple (especially when compared to the player):
static void tick(Entity *self)
{
	Target *t;

	t = (Target*) self->data;

	t->damageTimer = MAX(t->damageTimer - app.deltaTime, 0);

	if (self->x > SCREEN_WIDTH - (self->texture->rect.w + 25))
	{
		self->x = SCREEN_WIDTH - (self->texture->rect.w + 25);
		self->dx = -4;
	}

	if (self->x < 25)
	{
		self->x = 25;
		self->dx = 4;
	}

	if (self->onGround)
	{
		self->dy = BOUNCE_HEIGHT;
	}

	self->hitbox.x = self->x;
	self->hitbox.y = self->y;
}
We're first extracting the Target from the entity's `data` field, then decreasing the damageTimer, capping it at 0. After that, we're testing the entity's horizonal position. If `x` is less than 25 pixels from the right-hand side of the screen (taking into account the target's texture width during the calculation), we're going to set it back to 25 pixels from the screen width, and then set its `dx` to -4. In effect, this means that when the target reaches the right-hand side of the screen (more or less), we'll reverse its direction, so that it bounces back the other way. The same is true of when the target reaches less than 25 pixels on the left-hand side. The position is reset to 25 and the `dx` is set to 4, to make it move to the right. Next, we're checking if the target is on the ground (onGround is 1). If so, we're setting the entity's `dy` to BOUNCE_HEIGHT (defined as the negative of double MAX_FALL_SPEED). This will make the Target bounce (in a somewhat unnatural fashion).
Finally, we're updating the entity's `hitbox`. We're only changing the `x` and `y` values of the `hitbox`, as the dimensions of the Target do not change. If we didn't update the hitbox like this, it would remain as the initial (0,0), meaning we'd had to shoot at the top-left of the screen to hit our targets. Again, we'll see more on hitboxes when we come to dealing with our bullets.
Our `draw` function is next. If you've worked through the SDL2 Shooter 2 tutorial, some of this will look familiar:
static void draw(Entity *self)
{
	Target *t;

	t = (Target*) self->data;

	if (t->damageTimer == 0)
	{
		blitAtlasImage(self->texture, self->x, self->y, 0, SDL_FLIP_NONE);
	}
	else
	{
		SDL_SetTextureColorMod(self->texture->texture, 255, 32, 32);
		blitAtlasImage(self->texture, self->x, self->y, 0, SDL_FLIP_NONE);
		SDL_SetTextureColorMod(self->texture->texture, 255, 255, 255);
	}
}
We're first extracting the Target from the entity `data` field and then testing the Target's damageTimer field. If it's 0, we'll draw the Target as normal, by calling blitAtlasImage and passing over its texture and position. If the damage timer is greater than zero, we'll draw the texture in red. We'll do this by calling SDL_SetTextureColorMod and passing in the main texture atlas (self->texture->texture) and RGB values (255, 32, and 32). With the red colour set, we then call blitAtlasImage as usual, before resetting the atlas color by again calling SDL_SetTextureColorMod and passing in the texture and 255 to every colour parameter.
This means that while damageTimer is greater than 0, the Target will be drawn in red, indicating that it has been hit. How is damageTimer set? That's actually done in the takeDamage function:
static void takeDamage(Entity *self, int damage)
{
	Target *t;

	t = (Target*) self->data;

	t->damageTimer = 4;

	t->life -= damage;

	if (t->life <= 0)
	{
		self->dead = 1;
	}
}
The function takes two parameter - the entity to which the damage applies and the amount of damage to apply. We're first extracting the Target from the entity's `data` field, then setting the Target's damageTimer to 4. Next, we're decreasing the Target's `life` by the amount of `damage` passed into the function. If the Target's life is 0 or less, we're setting the entity's `dead` flag to 1, to mark that it been killed and can be removed from the game. As we've seen earlier, setting the damageTimer to a number other than 0 will mean the Target will visually display it was hit.
That's it for the Targets. We can now look at the changes we've made to bullets.c. Since we now have things to shoot, we've added in collision detection to our bullet processing. Starting with the changes to doBullets:
void doBullets(void)
{
	Bullet *b, *prev;

	prev = &stage.bulletHead;

	for (b = stage.bulletHead.next ; b != NULL ; b = b->next)
	{
		b->x += (b->dx * app.deltaTime);
		b->y += (b->dy * app.deltaTime);

		b->hitbox.x = b->x;
		b->hitbox.y = b->y;

		b->life -= app.deltaTime;

		checkCollisions(b);

		if (b->life <= 0)
		{
			prev->next = b->next;

			if (b == stage.bulletTail)
			{
				stage.bulletTail = prev;
			}

			free(b);

			b = prev;
		}

		prev = b;
	}
}
As we saw when discussing the changes to the Bullet struct, we've added in a `hitbox` field (as an SDL_Rect). Now, after moving our Bullet (by adding `dx` and `dy` to the bullet's `x` and `y`), we're setting the bullet's `hitbox` `x` and `y` to the bullet's `x` and `y`. Right now, the bullet's width and height don't change, so we're good to leave those alone. We've also added in a call to a new function named checkCollisions, to which we pass in the bullet we're currently processing:
static void checkCollisions(Bullet *b)
{
	Entity *e;

	for (e = stage.entityHead.next ; e != NULL ; e = e->next)
	{
		if (e->takeDamage != NULL && collisionRects(&b->hitbox, &e->hitbox))
		{
			e->takeDamage(e, b->damage);

			b->life = 0;

			return;
		}
	}
}
Our checkCollisions function is quite simple - it uses a for-loop to move through all the entities in the stage and check to see if they have a takeDamage function set. If so, it will next check if a collision has occurred between the bullet's `hitbox` and the entity's `hitbox` (by calling collisionRects and passing both SDL_Rects over). Should both of these things be true, we'll call the entity's takeDamage function, passing over the entity itelf and the damage the bullet causes. With that done, we'll set the bullet's `life` to 0, to kill it, and then return from the function. Since the bullet has hit something and has been killed, we're not interested in processing any more entities.
In case you're wondering what the collisionRects function (found in util.c) looks like, it can be found below:
int collisionRects(SDL_Rect *r1, SDL_Rect *r2)
{
	return collision(r1->x, r1->y, r1->w, r1->h, r2->x, r2->y, r2->w, r2->h);
}
This function merely takes two SDL_Rects and then delegates to the existing collision function. In short, collisionRects is a convenience function.
With the changes to bullets.c done, we can move onto entities.c. We've only updated the doEntities function, but with some important changes:
void doEntities(void)
{
	Entity *e, *prev;

	prev = &stage.entityHead;

	for (e = stage.entityHead.next ; e != NULL ; e = e->next)
	{
		e->onGround = 0;

		if (!(e->flags & EF_WEIGHTLESS))
		{
			e->dy = MIN(e->dy + (GRAVITY * app.deltaTime), MAX_FALL_SPEED);
		}

		e->x += (e->dx * app.deltaTime);
		e->y += (e->dy * app.deltaTime);

		e->x = MIN(MAX(e->x, 10), SCREEN_WIDTH - (e->texture->rect.w + 10));

		if (e->y + e->texture->rect.h >= 430)
		{
			e->y = 430 - e->texture->rect.h;
			e->dy = 0;

			e->onGround = 1;
		}

		e->tick(e);

		if (e->dead)
		{
			prev->next = e->next;

			if (e == stage.entityTail)
			{
				stage.entityTail = prev;
			}

			deadTail->next = e;
			deadTail = e;
			deadTail->next = NULL;

			e = prev;
		}

		prev = e;
	}
}
doEntities is the function where we see the EF_WEIGHTLESS flag in action. Now, instead of applying gravity to every entity in the world, we're first testing if it doesn't have the EF_WEIGHTLESS flag set in its `flags` field. We're doing this using a bitwise operation, meaning that if the flag is set, the evaluation will return a non-zero value. If the flag isn't set, no gravity will be applied. The red Targets have this flag set.
Entities can now be killed and removed from the game world, so we need to support this. We're doing this by checking if the `dead` flag is set. If so, we're removing the entity from the linked list (by assigning the previous entity's next as the current entity's next, and also ensuring that the tail of the list is correctly reassigned), before then adding the entity to a "dead list". This dead list will hold all the entities that have been removed from the world, and will be fully deleted later on. This helps us to avoid any crashes that result from pointers attempting to deference NULL data.
The last thing we need to do in order to support the Target is to add it to our entity factory. We can do this easily in initEntityFactory:
void initEntityFactory(void)
{
	memset(&head, 0, sizeof(InitFunc));
	tail = &head;

	addInitFunc("player", initPlayer);
	addInitFunc("target", initTarget);
}
Like with the player, we need only use addInitFunc with the name of the entity and the entity's init function pointer in order for this to work.
We'll look next at how we're adding the Targets to the game world. It's rather simple. In stage.c, we've added one new function, which we've called from initStage:
void initStage(void)
{
	memset(&stage, 0, sizeof(Stage));

	initEntities();

	initBullets();

	initEntity("player");

	addTargets();

	app.delegate.logic = logic;
	app.delegate.draw = draw;
}
addTargets is a temporary function to add all the target to our game. It doesn't do a lot:
static void addTargets(void)
{
	Entity *e;

	e = initEntity("target");
	e->x = 400;
	e->y = 100;

	e = initEntity("target");
	e->x = 600;
	e->y = 50;

	e = initEntity("target");
	e->x = 800;
	e->y = 200;

	e = initEntity("target");
	e->x = 1000;
	e->y = 150;

	e = initEntity("target");
	e->x = 1200;
	e->y = 300;

	e = initEntity("target");
	e->x = 1400;
	e->y = 50;
}
We're calling initEntity 6 times, asking it to create us an entity called "target", which we assign to a variable called `e`. We're then positioning each created entity by assigning values to their `x` and `y` fields.
That's it for our Target shooting. Before we finish up, we should look a bit more at the hitboxes, as there is something we'll need to address in the next tutorial. If we return to structs.h, we've added a new variable to App:
typedef struct {
	struct {
		void (*logic)(void);
		void (*draw)(void);
	} delegate;
	SDL_Renderer *renderer;
	SDL_Window *window;
	int keyboard[MAX_KEYBOARD_KEYS];
	char inputText[MAX_INPUT_LENGTH];
	int lastKeyPressed;
	double deltaTime;
	double fontScale;
	struct {
		int fps;
		int showFPS;
		int showHitboxes;
	} dev;
} App;
In inner struct `dev`, thre is now a flag called showHitboxes. When this flag is set, the entity hitboxes will be displayed. This flag can be toggled by pressing F1, as we see in stage.c, in `logic`:
static void logic(void)
{
	doEntities();

	doBullets();

	if (app.keyboard[SDL_SCANCODE_F1])
	{
		app.dev.showHitboxes = !app.dev.showHitboxes;

		app.keyboard[SDL_SCANCODE_F1] = 0;
	}
}
Pressing F1 inverts the value of the flag, so that showHitboxes will shift between 0 and 1. For the rendering of the hitboxes themselves, we've updated drawEntities in entities.c:
void drawEntities(void)
{
	Entity *e;

	for (e = stage.entityHead.next ; e != NULL ; e = e->next)
	{
		e->draw(e);
	}

	if (app.dev.showHitboxes)
	{
		for (e = stage.entityHead.next ; e != NULL ; e = e->next)
		{
			drawOutlineRect(e->hitbox.x, e->hitbox.y, e->hitbox.w, e->hitbox.h, 255, 255, 0, 255);
		}
	}
}
We're now checking if the showHitboxes flag is set. If so, we're looping through all our entities and drawing an outlined yellow rectangle using their `hitbox` data. The player, of course, has their own hitbox, which is updated during their `tick` phase:
void tick(Entity *self)
{
	handleMovement(self);

	handleShoot(self);

	self->hitbox.x = self->x;
	self->hitbox.y = self->y;
	self->hitbox.w = self->texture->rect.w;
	self->hitbox.h = self->texture->rect.h;
}
We're simply assigning the `hitbox`'s `x`, `y`, `w`, and `h` values as the player's `x` and `y`, and their current texture's width and height. And this leads to a problem, since all our player sprites are the same size. As you can see from the image below, when we duck, our hitbox doesn't change:
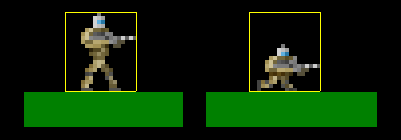
So, in effect, ducking will do nothing but change the image. If we wanted to duck to avoid enemy fire, we'll be completely out of luck. In the next part, we'll look at how we're going to more effectively handle hitboxes to overcome issues such as this.
Purchase
The source code for all parts of this tutorial (including assets) is available for purchase:
From itch.io
It is also available as part of the SDL2 tutorial bundle: