PC Games
• Orb
• Lasagne Monsters
• Three Guys Apocalypse
• Water Closet
• Blob Wars : Attrition
• The Legend of Edgar
• TBFTSS: The Pandoran War
• Three Guys
• Blob Wars : Blob and Conquer
• Blob Wars : Metal Blob Solid
• Project: Starfighter
• TANX Squadron
Tutorials
• 2D shoot 'em up
• 2D top-down shooter
• 2D platform game
• Sprite atlas tutorial
• Working with TTF fonts
• 2D adventure game
• Widget tutorial
• 2D shoot 'em up sequel
• 2D run and gun
• Roguelike
• Medals (Achievements)
• 2D turn-based strategy game
• 2D isometric game
• 2D map editor
• 2D mission-based shoot 'em up
• 2D Santa game
• 2D split screen game
• 2D quest game
• SDL 1 tutorials (outdated)
Latest Updates
The Legend of Edgar 1.38
Thu, 1st January 2026
SDL2 Quest game tutorial
Wed, 7th May 2025
SDL2 Versus game tutorial
Wed, 20th March 2024
Download keys for SDL2 tutorials on itch.io
Sat, 16th March 2024
The Legend of Edgar 1.37
Mon, 1st January 2024
Tags
• battle-for-the-solar-system (10)
• blob-wars (10)
• brexit (1)
• code (6)
• edgar (10)
• games (45)
• lasagne-monsters (1)
• making-of (5)
• match3 (1)
• numberblocksonline (1)
• orb (2)
• site (1)
• tanx (4)
• three-guys (3)
• three-guys-apocalypse (3)
• tutorials (18)
• water-closet (4)
Books

A North-South Divide
For over a hundred years, messenger Duncan has wandered the world, searching for the missing pieces of an amulet that will rid him of his curse; a curse that has burdened him with an extreme intolerance of the cold, an unnaturally long life, and the despair of watching all he knew and loved become lost to the ravages of time. But now, Duncan is close to the end of his long quest.
— Simple 2D map editor —
Part 5: Expanded UI and mini map
Note: this tutorial assumes knowledge of C, as well as prior tutorials.


Introduction
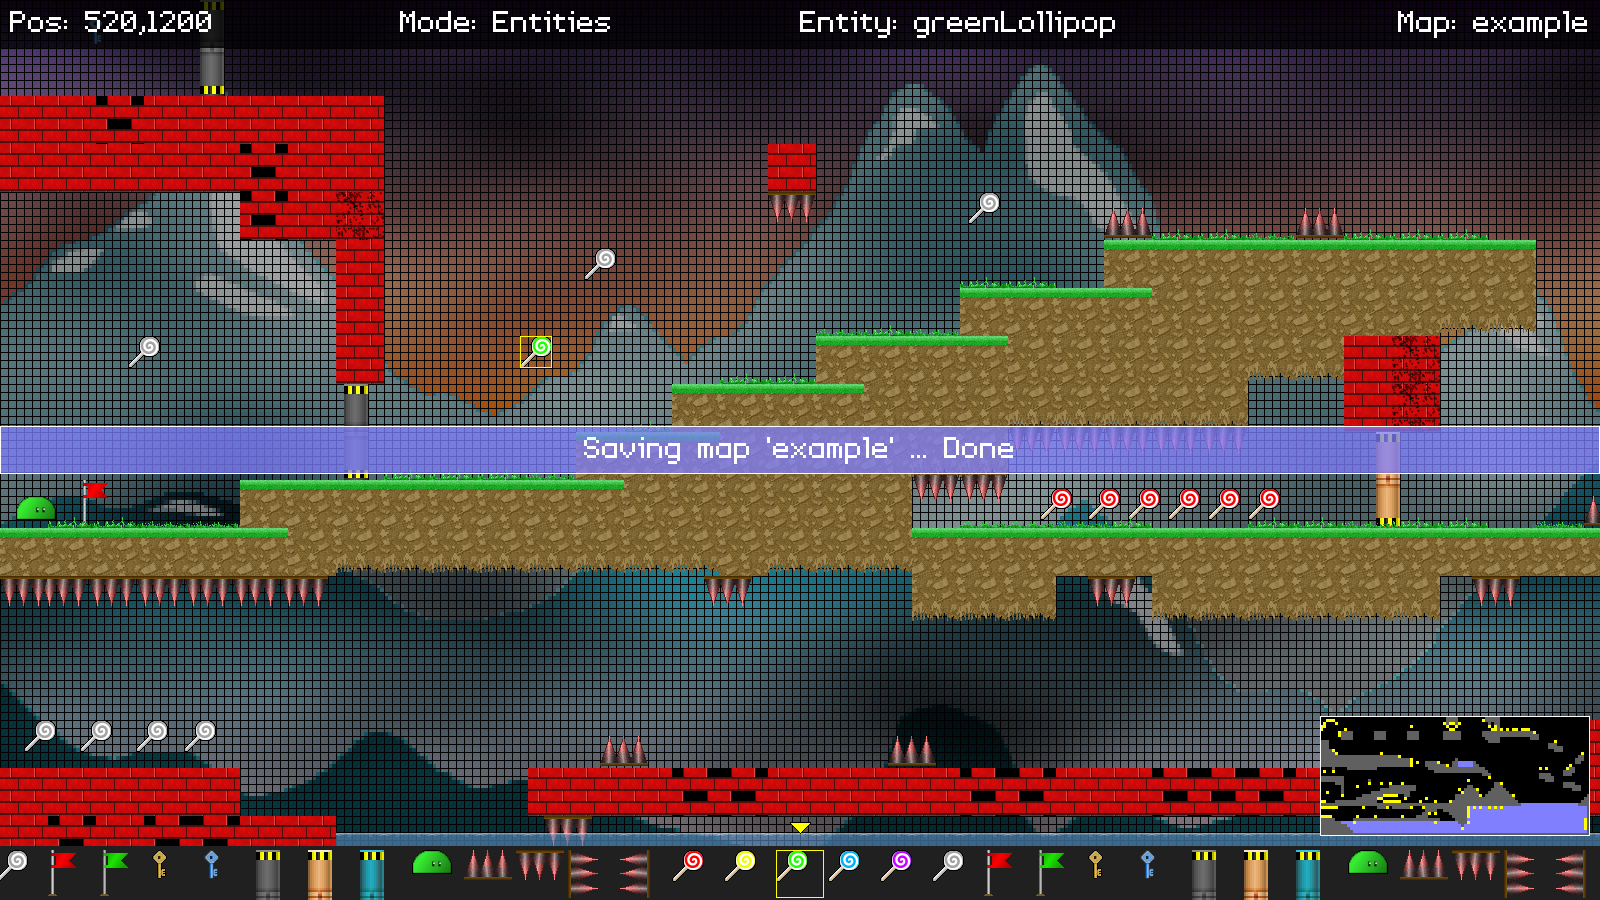
Now what we've covered off all the major pieces of our editor, it's time to add in a few nice to haves. So, in this final part, we've added in a mini map that is shown in the bottom right-hand corner, as well as a status message that appears on screen whenever we save our map.
Extract the archive, run cmake CMakeLists.txt, followed by make, and then use ./editor05 -edit example to run the editor. You will see a window open, displaying a scene like the one above. The controls from the previous tutorial apply. A mini map of the stage is now displayed in the bottom right of the screen. This shows a view of the entire stage, as well as the entities that have been placed. Pressing 0 on the keyboard will also toggle the mini map off and on. Once you're finished editing, press Space to save the map. The saving message (including errors) are now displayed on screen, as a light blue banner. With your map saved, close the window to exit. As before, you can play the map by using ./editor05 -map example.
Inspecting the code
Adding in the final features of our editor is easy, and once again only affects editor.c.
We'll start with initEditor:
void initEditor(void)
{
	app.dev.isEditor = 1;

	// snipped

	miniMapRect.w = MAP_WIDTH * MINI_MAP_CELL_SIZE;
	miniMapRect.h = MAP_HEIGHT * MINI_MAP_CELL_SIZE;
	miniMapRect.x = SCREEN_WIDTH - (miniMapRect.w + 10);
	miniMapRect.y = SCREEN_HEIGHT - (miniMapRect.h + 64);

	showMiniMap = 1;

	// snipped
}
We've added an SDL_Rect called miniMapRect in editor.c. This will handle the position and dimensions of our mini map. We start by setting the width (`w`) of the mini map to MAP_WIDTH * MINI_MAP_CELL_SIZE, and the height (`h`) to MAP_HEIGHT * MINI_MAP_CELL_SIZE. MINI_MAP_CELL_SIZE is defined as 3. This means that each cell of our mini map will be 3 pixels in size when rendered. We next set miniMapRect's `x` and `y` to the screen width and height, less the mini map's own width and height (with some padding thrown in, so it's not exactly in the bottom right-hand corner, and obscuring the bottom bar).
Finally, we set showMiniMap to 1. showMiniMap is a flag to say whether to display the mini map, that can be toggled by the user by pressing 0, as we'll see in a bit.
Now for the updates to `logic`:
static void logic(void)
{
	// snipped

	statusMessageTimer = MAX(statusMessageTimer - app.deltaTime, 0);

	doMouse();

	doKeyboard();

	activeObjectArrowBob += 0.1 * app.deltaTime;
}
We've only made one addition here: our status message display runs on a timer, controlled by a variable called statusMessageTimer. Like other timers, we're reducing the value here and limiting it 0.
Now onto doKeyboard:
static void doKeyboard(void)
{
	// snipped

	if (app.keyboard[SDL_SCANCODE_SPACE])
	{
		setStatusMessage("Saving map '%s' ...", stage.name);

		if (!saveMap() || !saveEntities())
		{
			setStatusMessage("Failed to save map!");
		}
		else
		{
			setStatusMessage("Saving map '%s' ... Done", stage.name);
		}

		app.keyboard[SDL_SCANCODE_SPACE] = 0;
	}

	// snipped

	if (app.keyboard[SDL_SCANCODE_0])
	{
		app.keyboard[SDL_SCANCODE_0] = 0;

		showMiniMap = !showMiniMap;
	}
}
Beforehand, when saving a map via pressing Space, we were logging the messages using SDL_LogMessage. Now, we're calling a new function named setStatusMessage, and passing over the same values as before (as setStatusMessage allows for variable length arguments). We'll see this function in a bit. We've also added in a key check for pressing 0. If it is pressed, we'll clear the key's state, and then toggle the value of showMiniMap. Assigning the value of showMiniMap to its inverse will mean it switches between 1 and 0 (or true or false).
That's all there is to `logic`. As you can see, these are all nice, simple updates. We can now look at setStatusMessage:
static void setStatusMessage(char *format, ...)
{
	va_list args;

	memset(&statusMessage, '\0', sizeof(statusMessage));

	va_start(args, format);
	vsprintf(statusMessage, format, args);
	va_end(args);

	statusMessageTimer = FPS * 1.5;

	SDL_LogMessage(SDL_LOG_CATEGORY_APPLICATION, SDL_LOG_PRIORITY_INFO, "%s", statusMessage);
}
This function is responsible for setting the status message that is displayed when we save our map. This function allows for a variable number of arguments, and supports formatting (so it behaves it printf). We start by memsetting a char array called statusMessage, that will hold our formatted message. We then use the va_start, vsprintf, and va_end macros to generate the formatted message, and place the result into statusMessage. We then set statusMessageTimer to one-and-a-half seconds, so that the text can be displayed. Finally, we call SDL_LogMessage as before, to log the output to the console.
So, simply put, we're copying our formatted message into statusMessage and resetting the message timer. Again, nothing taxing.
That's all our logic handled, so now we can look at the rendering changes. First up, the changes to drawUI:
static void drawUI(void)
{
	drawTopBar();

	drawBottomBar();

	if (showMiniMap)
	{
		drawMiniMap();
	}

	drawStatusMessage();
}
We've added in a check to see if the showMiniMap flag is set. If so, we're going to call drawMiniMap. As expected, this means we can choose to show or hide the mini map. Next, we're calling another new function named drawStatusMessage.
We'll look at both these new functions now, starting with drawMiniMap:
static void drawMiniMap(void)
{
	int     x, y;
	Entity *e;

	drawRect(miniMapRect.x, miniMapRect.y, miniMapRect.w, miniMapRect.h, 0, 0, 0, 255);

	for (x = 0; x < MAP_WIDTH; x++)
	{
		for (y = 0; y < MAP_HEIGHT; y++)
		{
			if (isSolidMap(x, y))
			{
				drawRect(miniMapRect.x + x * MINI_MAP_CELL_SIZE, miniMapRect.y + y * MINI_MAP_CELL_SIZE, MINI_MAP_CELL_SIZE, MINI_MAP_CELL_SIZE, 96, 96, 96, 255);
			}
			else if (isWater(x, y))
			{
				drawRect(miniMapRect.x + x * MINI_MAP_CELL_SIZE, miniMapRect.y + y * MINI_MAP_CELL_SIZE, MINI_MAP_CELL_SIZE, MINI_MAP_CELL_SIZE, 128, 128, 255, 255);
			}
		}
	}

	for (e = stage.entityHead.next; e != NULL; e = e->next)
	{
		x = e->x / MAP_TILE_SIZE;
		y = e->y / MAP_TILE_SIZE;

		drawRect(miniMapRect.x + x * MINI_MAP_CELL_SIZE, miniMapRect.y + y * MINI_MAP_CELL_SIZE, MINI_MAP_CELL_SIZE, MINI_MAP_CELL_SIZE, 255, 255, 0, 255);
	}

	drawOutlineRect(miniMapRect.x, miniMapRect.y, miniMapRect.w, miniMapRect.h, 255, 255, 255, 255);
}
This is the function where we draw our mini map. It's quite straightforward, really. We first draw a black rectangle at the location of our mini map (using miniMapRect's values). Next, we setup two for-loops, `x` and `y`, to loop through our map data. We then test if the map tile at the given `x` and `y` position is solid (isSolidMap) or if it's a water tile (isWater), and draw a coloured rectangle at the appropriate position: dark grey if it's solid, and light blue if its water. The rectangles will be drawn at a size of MINI_MAP_CELL_SIZE, so that they fit into our defined miniMapRect's width and height. In short, this will draw the entire map in a miniature view, using 3x3 pixel squares.
Next, we loop through all the entities in the stage, dividing their `x` and `y` values by MAP_TILE_SIZE, to align them with the area of the map they occupy, and assign the results to `x` and `y` variables. Once again, we then call drawRect, in the same way as with the map tiles, this time using a bright yellow colour. So, all the entities we've scattered around the map will be quite visible.
Lastly, we have the drawStatusMessage function:
static void drawStatusMessage(void)
{
	SDL_Rect r;

	if (statusMessageTimer > 0)
	{
		r.w = SCREEN_WIDTH;
		r.h = 48;
		r.x = 0;
		r.y = (SCREEN_HEIGHT - r.h) / 2;

		drawRect(r.x, r.y, r.w, r.h, 128, 128, 255, 192);
		drawOutlineRect(r.x, r.y, r.w, r.h, 255, 255, 255, 255);

		drawText(statusMessage, SCREEN_WIDTH / 2, r.y, 255, 255, 255, TEXT_ALIGN_CENTER, 0);
	}
}
This function will render our status message on screen. We first test if statusMessageTimer is greater than 0, then then setup a rectangle (`r`), with a width of the entire screen, a height of 48, and a position of around the middle of the screen. Using `r`'s values, we first call drawRect, to create a light blue rectangle. Next, we call drawOutlineRect, again using `r`'s values, to create a white outline around our blue rectangle. Finally, we call drawRect, using statusMessage that we created in setStatusMessage. The text is drawn in the middle of the screen, at `r`'s `y` value.
Done. There you have it - a very basic map editor. There are many other features that could be added to this editor, such as displaying the real names of the entities, or changing the size of the grid while working with entities. Advanced features could involve showing the destination of a teleporter, or direction a door would move when opened. Such things could allow for their "target destinations" to be moved around in Pick mode, for example. This was done for editing the maps for Blob Wars : Attrition (although the code for that editor has sadly been lost). Games such as Water Closet made use of an editor quite a lot like this one. If one was feeling brave, they could also allow for the in-line editing for names and other properties, although to be honest, this is something I used to do by hand, by changing the JSON; more time would've been lost on creating a UI with such features than simply loading up the JSON in a text editor and typing in the values..!
An editor such as this can be used for basic projects, or just as something to learn from, where more advanced editors aren't needed (or have to be learned).
Purchase
The source code for all parts of this tutorial (including assets) is available for purchase:
From itch.io
It is also available as part of the SDL2 tutorial bundle: