PC Games
• Orb
• Lasagne Monsters
• Three Guys Apocalypse
• Water Closet
• Blob Wars : Attrition
• The Legend of Edgar
• TBFTSS: The Pandoran War
• Three Guys
• Blob Wars : Blob and Conquer
• Blob Wars : Metal Blob Solid
• Project: Starfighter
• TANX Squadron
Tutorials
• 2D shoot 'em up
• 2D top-down shooter
• 2D platform game
• Sprite atlas tutorial
• Working with TTF fonts
• 2D adventure game
• Widget tutorial
• 2D shoot 'em up sequel
• 2D run and gun
• Roguelike
• Medals (Achievements)
• 2D turn-based strategy game
• 2D isometric game
• 2D map editor
• 2D mission-based shoot 'em up
• 2D Santa game
• 2D split screen game
• 2D quest game
• SDL 1 tutorials (outdated)
Latest Updates
The Legend of Edgar 1.38
Thu, 1st January 2026
SDL2 Quest game tutorial
Wed, 7th May 2025
SDL2 Versus game tutorial
Wed, 20th March 2024
Download keys for SDL2 tutorials on itch.io
Sat, 16th March 2024
The Legend of Edgar 1.37
Mon, 1st January 2024
Tags
• battle-for-the-solar-system (10)
• blob-wars (10)
• brexit (1)
• code (6)
• edgar (10)
• games (45)
• lasagne-monsters (1)
• making-of (5)
• match3 (1)
• numberblocksonline (1)
• orb (2)
• site (1)
• tanx (4)
• three-guys (3)
• three-guys-apocalypse (3)
• tutorials (18)
• water-closet (4)
Books

Alysha
When her village is attacked and her friends and family are taken away to be sold as slaves, Alysha Tanner sets out on a quest across the world to track them down and return them home. Along the way, she is aided by the most unlikely of allies - the world's last remaining dragon.
— 2D Top-down shooter tutorial —
Part 5: Scrolling the arena


Introduction
Note: this tutorial series builds upon the ones that came before it. If you aren't familiar with the previous tutorials, or the prior ones of this series, you should read those first.
This first tutorial will explain how to read the mouse in SDL2. Extract the archive, run cmake CMakeLists.txt, followed by make to build. Once compiling is finished type ./bad05 to run the code.
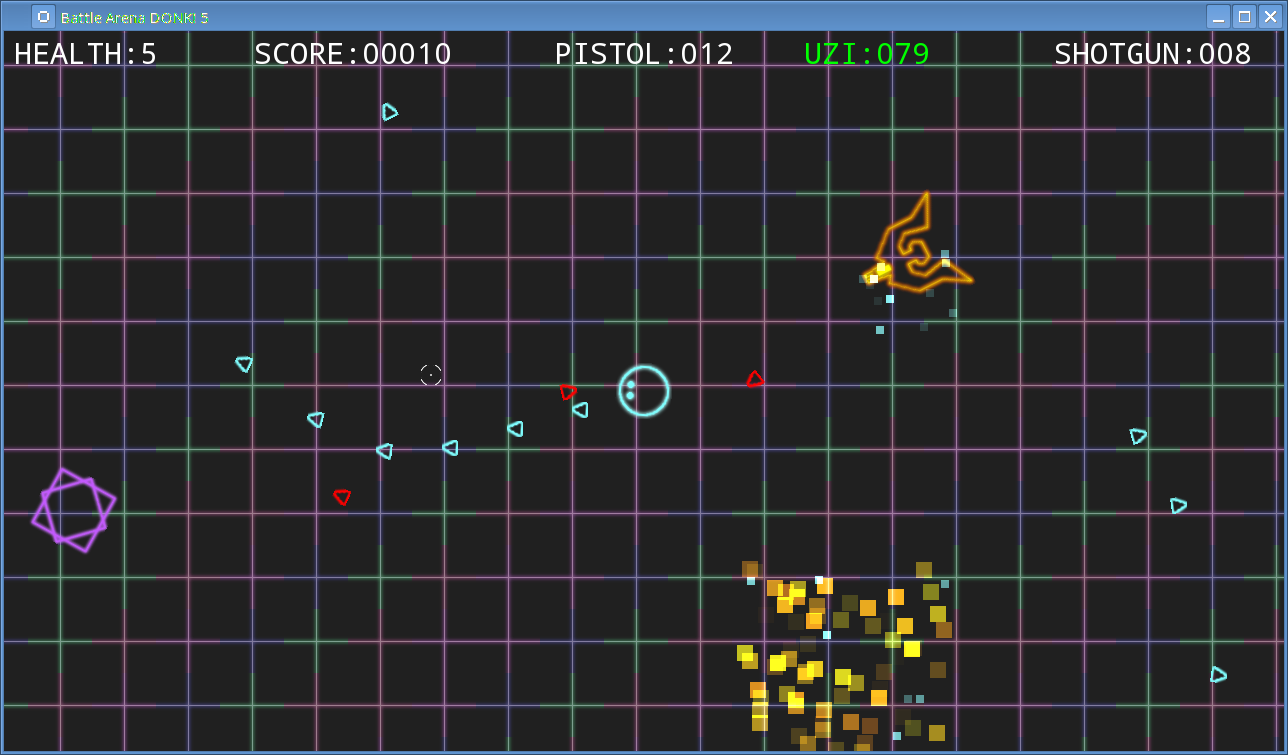
A 1280 x 720 window will open, with a dark grey background over which a multicolored grid is shown. A targetter will be displayed that will track the mouse movements. The main character, Donk, will also display. Donk can be moved with the WSAD control scheme and will always face the targetter. Use the left mouse button to fire. The mouse wheel will cycle through the available weapons. The right mouse button will reload the pistol when it is out of ammo. Enemies will appear in the arena and may drop powerups when defeated. Keep moving and try and stay alive as long as possible. Close the window by clicking on the window's close button.
Inspecting the code
There have been a number of additions to this part of the tutorial. The focus, however, is on scrolling the arena. Let's take a look at the additions made to enable this, starting, as always, with structs.h and defs.h:
#define ARENA_WIDTH  (SCREEN_WIDTH * 5)
#define ARENA_HEIGHT (SCREEN_HEIGHT * 5)

...

#define GRID_RENDER_WIDTH  (SCREEN_WIDTH / GRID_SIZE)
#define GRID_RENDER_HEIGHT ((SCREEN_HEIGHT / GRID_SIZE) + 1)
In defs.h we've created defines for the size of the arena, and another two to help us with drawing the grid now that it is scrollable. In structs.h, we've also made an important addition:
typedef struct {
	...
	SDL_Point camera;
} Stage;
The camera we'll be observing the game with will be stored as an SDL_Point (so, just x and y coordinates). So far so good. Now we've added a new compilation unit called camera.c. This is a very simple file with just one function:
void doCamera(void)
{
	if (player != NULL)
	{
		stage.camera.x = player->x - (SCREEN_WIDTH / 2);
		stage.camera.y = player->y - (SCREEN_HEIGHT / 2);
	}
}
doCamera is used to center the camera over the player. We do this by simply subtracting half the screen resolution from the player's position. This in itself isn't quite enough, but further calculations later on will help to remedy this. Note also that we're testing to see if player is null. We're doing this since, in this update, the player can now be killed by enemy fire.
Moving onto stage.c, we've made but one change to help with the camera display:
static void logic(void)
{
	...
	doCamera();
}
We call doCamera in our logic function so that the position is updated every frame. Now onto some more interesting things. In player.c we've had to make a tweak to the angle calculation:
void doPlayer(void)
{
	...
	player->angle = getAngle(player->x - stage.camera.x, player->y - stage.camera.y, app.mouse.x, app.mouse.y);
Since the player can now walk around in the arena, we need to subtract the camera x and y from the player's x and y when calling getAngle. This is so that we can correctly resolve the player's position back to the screen location and not the arena location. If we don't do this, Donk will face completely the wrong way as we move around.
We'll see the need to carry out this same calculation when it comes to drawing the entities:
void drawEntities(void)
{
	...
	blitRotated(e->texture, e->x - stage.camera.x, e->y - stage.camera.y, e->angle);
We subtract the camera's x and y from all the entities' x and y as we draw them, offsetting them correctly. Note that when Donk himself is drawn, he will be dead center in the screen, due to the calculation we did in doCamera. The same calculation is done with the bullets:
void drawBullets(void)
{
	...
	blitRotated(b->texture, b->x - stage.camera.x, b->y - stage.camera.y, b->angle);
As well as subtracting the camera's x and y from the various entities while drawing them, we also need to make changes to the bullet function for when Donk fires:
static void fireDonkUzi(void)
{
	Entity *b;

	b = createDonkBullet();

	calcSlope(app.mouse.x, app.mouse.y, b->x - stage.camera.x, b->y - stage.camera.y, &b->dx, &b->dy);
Again, we need to subtract the camera's x and y from the bullet's when calculating the direction the bullet will go. If we fail to do this, Donk will not shoot in the correct direction, as he will attempt to shoot from the arena coordinates to the mouse's, which will be way off. The shotgun firing area projection needs to also be resolved:
static void fireDonkShotgun(void)
{
	...
	calcSlope(app.mouse.x, app.mouse.y, player->x - stage.camera.x, player->y - stage.camera.y, &dx, &dy);

	dx = player->x + (dx * 128);
	dy = player->y + (dy * 128);

	for (i = 0 ; i < 8 ; i++)
	{
		b = createDonkBullet();

		destX = dx + (rand() % 24 - rand() % 24);
		destY = dy + (rand() % 24 - rand() % 24);

		calcSlope(destX, destY, b->x, b->y, &b->dx, &b->dy);

		b->dx *= 16;
		b->dy *= 16;
	}
}
Note that unlike firing the pistol and uzi, we need to only perform the camera calculation once (before the for loop). After that, we can happily tweak the pellets velocity and destination zone without impacting the aiming.
Finally, we want to scroll the background grid; it wouldn't look too good if the grid remained static as Donk and the enemies moved about. In order to do this, we make quite a number of changes to drawGrid in stage.c:
static void drawGrid(void)
{
	int x1, x2, y1, y2, x, y, mx, my, n;

	x1 = (stage.camera.x % GRID_SIZE) * -1;
	x2 = x1 + GRID_RENDER_WIDTH * GRID_SIZE + (x1 == 0 ? 0 : GRID_SIZE);

	y1 = (stage.camera.y % GRID_SIZE) * -1;
	y2 = y1 + GRID_RENDER_HEIGHT * GRID_SIZE + (y1 == 0 ? 0 : GRID_SIZE);

	mx = stage.camera.x / GRID_SIZE;
	my = stage.camera.y / GRID_SIZE;

	n = 0;

	for (x = x1; x < x2; x += GRID_SIZE)
	{
		for (y = y1; y < y2; y += GRID_SIZE)
		{
			if (mx >= 0 && my >= 0 && mx <= (ARENA_WIDTH / GRID_SIZE) - 1 && my <= (ARENA_HEIGHT / GRID_SIZE) - 1)
			{
				n = ((mx * my) / 40) % 4;

				blit(gridTexture[n], x, y, 0);
			}

			my++;
		}

		my = stage.camera.y / GRID_SIZE;
		mx++;
	}
}
To start with, we need to decide where to render the grid from and to on both the x and y axis. We find the starting x and y (x1 and y1) by performing a modulo on the camera's x and y using the grid size, and then multiplying the result by -1. The means that the starting axis will be 0 or less, in effect meaning that the starting location could be offscreen. If we didn't multiply by -1, the x1 and y1 would always be positive and the starting tiles would keep popping in. Working out the ending x and y (x2 and y2) is a simple case of multiplying our grid render sizes by the grid size, and adding a final tile if we start at exactly 0 (again, to prevent the pop in effect).
Next, we want to work out our starting tiles. We do this by dividing the camera's x and y by our grid size and storing them in variables named mx and my. We then draw the grid by using for loops composed of x1, y1, x2, and y2. We increment mx and my as we step through their respective loops, resetting my at the end of its own. When it comes to drawing the grid tile itself, we check that mx and my are >= 0 than the size of the grid, and then draw it. To create a pattern we're simply multiplying mx and my together, dividing by 40 and then getting the modulo of 4, and using that as the tile image to draw. It's not a great, but it serves its purpose. Correctly handling a tile map will be discussed in another tutorial.
We've also added the ability for the enemies to attack Donk, new enemy types, and effects. We'll look at these briefly:
void addEnemy(int x, int y)
{
	Entity *e;

	e = malloc(sizeof(Entity));
	memset(e, 0, sizeof(Entity));
	stage.entityTail->next = e;
	stage.entityTail = e;

	e->side = SIDE_ENEMY;
	e->x = x;
	e->y = y;

	e->color.r = e->color.g = e->color.b = e->color.a = 255;

	switch (rand() % 12)
	{
		case 0:
			e->texture = enemyTexture[1];
			e->tick = tick2;
			e->radius = 35;
			e->health = 25;
			break;

		case 1:
		case 2:
			e->texture = enemyTexture[2];
			e->tick = tick3;
			e->radius = 26;
			e->health = 1;
			break;

		default:
			e->texture = enemyTexture[0];
			e->tick = tick1;
			e->radius = 32;
			e->health = 5;
			break;
	}

	SDL_QueryTexture(e->texture, NULL, NULL, &e->w, &e->h);

	e->die = die;
}
addEnemy now choosing between 3 different enemy types, with some enemies having a smaller chance of appearing than others. Each has their own texture, tick function, and health stats. They all share the same die function, however. Taking a look at one of the tick functions, we can see how the enemies are told to attack the player:
static void tick1(void)
{
	if (player != NULL)
	{
		self->angle = getAngle(self->x, self->y, player->x, player->y);

		calcSlope(player->x, player->y, self->x, self->y, &self->dx, &self->dy);

		self->reload = MAX(self->reload - 1, 0);

		if (self->reload <= 0 && getDistance(self->x, self->y, player->x, player->y) < SCREEN_HEIGHT / 2)
		{
			fireEnemyBullet();

			self->reload = FPS * 3;
		}
	}
}
We check to see if the player is not null, and tell the enemy to chase Donk as usual. We then decrement the reload variable. Once this hits 0 or less, we test the distance between the player and the enemy. If it's less than half the screen height, we call the new fireEnemyBullet function and reset our reload counter, so that the enemy doesn't fire again right away. The fireEnemyBullet function is very simple:
void fireEnemyBullet(void)
{
	Entity *b;

	b = malloc(sizeof(Entity));
	memset(b, 0, sizeof(Entity));
	stage.bulletTail->next = b;
	stage.bulletTail = b;

	b->x = self->x;
	b->y = self->y;
	b->texture = bulletTexture;
	b->health = FPS * 2;
	b->angle = getAngle(self->x, self->y, player->x, player->y);
	b->radius = 16;
	b->side = SIDE_ENEMY;
	SDL_QueryTexture(b->texture, NULL, NULL, &b->w, &b->h);
	b->color.r = 255;
	b->color.g = b->color.b = 0;
	b->color.a = 255;

	calcSlope(player->x, player->y, b->x, b->y, &b->dx, &b->dy);

	b->dx *= 12;
	b->dy *= 12;
}
It should be clear what is going on by now, as this is largely the same as when Donk fires his weapons. An Entity is created and all its essential details are filled in. The side set to SIDE_ENEMY, to prevent friendly fire from occurring, and the angle between the enemy and the player is calculated, as well as the direction of movement. Nothing unusual. One thing that is new is that the color of the bullet is being set. This is done using a new variable in the Entity struct:
struct Entity {
	...
	SDL_Color color;
SDL_Color is a simple struct that holds four values: r, g, b, and a, that should be set between 0 and 255 to set the intensity of the color, from dark to light.
We've also added effects for when bullets hit, and when enemies (and Donk) are killed. Another new struct is used for this:
struct Effect {
	float x;
	float y;
	float dx;
	float dy;
	int life;
	SDL_Color color;
	SDL_Texture *texture;
	Effect *next;
};
Effect holds our location and direction details of our effect, as well as its color, texture, and how long it will live for. To handle effects, we've added a new compilation unit called effects.h. This contains a number of functions for creating, handling, and drawing effects. We'll look at one of the functions to add effects - addEnemyDeathEffect.
void addEnemyDeathEffect(void)
{
	Effect *e;
	int i;

	for (i = 0 ; i < 128 ; i++)
	{
		e = malloc(sizeof(Effect));
		memset(e, 0, sizeof(Effect));
		stage.effectTail->next = e;
		stage.effectTail = e;

		e->x = self->x;
		e->y = self->y;
		e->dx = 400 - rand() % 800;
		e->dy = 400 - rand() % 800;

		e->dx /= 100;
		e->dy /= 100;

		e->texture = whiteSquare16;

		e->color.r = 255;
		e->color.g = 128 + rand() % 128;
		e->color.b = 0;
		e->color.a = rand() % 255;

		e->life = rand() % FPS;
	}
}
In practice, this function will create a number of squares (128 of them..!) that spread out from the center of the enemy. As can be seen, we create a for loop to malloc 128 Effects, set each one to the enemy's (self) coordinates, give them a random dx and dy, and a random color between red and yellow. We also set the alpha of the color (color.a) to somewhere between 0 and 255. This will mean that when we come to draw the effects, they will show at various states of transparency. We also set to life to be somewhere between 0 and 1 second. The texture is a small white square, 16x16 pixels (whiteSquare16), that is a static variable within effects.c.
The logic for our effects is done by doEffects:
void doEffects(void)
{
	Effect *e, *prev;

	prev = &stage.effectHead;

	for (e = stage.effectHead.next ; e != NULL ; e = e->next)
	{
		e->x += e->dx;
		e->y += e->dy;

		e->color.a = MAX(e->color.a - 1, 0);

		if (--e->life <= 0)
		{
			if (e == stage.effectTail)
			{
				stage.effectTail = prev;
			}

			prev->next = e->next;
			free(e);
			e = prev;
		}

		prev = e;
	}
}
This function will simply step through all the effects, adding their dx and dy to their x and y, decreasing their life, and removing them once their life hits 0. One other thing we do is decrease their alpha (color.a), limiting it to 0. This will make the effects fade away as they age. Finally, let's look at drawEffects:
void drawEffects(void)
{
	Effect *e;

	SDL_SetRenderDrawBlendMode(app.renderer, SDL_BLENDMODE_ADD);

	for (e = stage.effectHead.next ; e != NULL ; e = e->next)
	{
		SDL_SetTextureBlendMode(e->texture, SDL_BLENDMODE_ADD);

		SDL_SetTextureColorMod(e->texture, e->color.r, e->color.g, e->color.b);
		SDL_SetTextureAlphaMod(e->texture, e->color.a);

		blit(e->texture, e->x - stage.camera.x, e->y - stage.camera.y, 1);
	}

	SDL_SetRenderDrawBlendMode(app.renderer, SDL_BLENDMODE_NONE);
}
This is where our colors and alpha come into play. We tell SDL to use an additive blend mode by calling SDL_SetRenderDrawBlendMode with SDL_BLENDMODE_ADD and passing over renderer. We tell the texture of the effect to also use an additive blend mode, then set the color and alpha information of the texture to that held by the effect. With this done, we draw the effect by calling our blit function, subtracting the camera x and y as we do, and telling the texture to be centered about those coordinates. Once done, we set the renderer's blend mode back to SDL_BLENDMODE_NONE to prevent any ill effects.
Finally, to bring this all together, we need to initialize various bits and pieces (such as loading and caching textures). We can do this in init.c, in initGame:
void initGame(void)
{
	...
	initPlayer();

	initEnemies();
	...

	initEffects();
}
Battle Arena Donk! is almost finished. In the final part of this tutorial we'll add the finishing touches, such as sound effects, a title screen, highscore table, and some other tweaks.
Purchase
The source code for all parts of this tutorial (including assets) is available for purchase:
From itch.io
It is also available as part of the SDL2 tutorial bundle: