PC Games
• Orb
• Lasagne Monsters
• Three Guys Apocalypse
• Water Closet
• Blob Wars : Attrition
• The Legend of Edgar
• TBFTSS: The Pandoran War
• Three Guys
• Blob Wars : Blob and Conquer
• Blob Wars : Metal Blob Solid
• Project: Starfighter
• TANX Squadron
Tutorials
• 2D shoot 'em up
• 2D top-down shooter
• 2D platform game
• Sprite atlas tutorial
• Working with TTF fonts
• 2D adventure game
• Widget tutorial
• 2D shoot 'em up sequel
• 2D run and gun
• Roguelike
• Medals (Achievements)
• 2D turn-based strategy game
• 2D isometric game
• 2D map editor
• 2D mission-based shoot 'em up
• 2D Santa game
• 2D split screen game
• 2D quest game
• SDL 1 tutorials (outdated)
Latest Updates
The Legend of Edgar 1.38
Thu, 1st January 2026
SDL2 Quest game tutorial
Wed, 7th May 2025
SDL2 Versus game tutorial
Wed, 20th March 2024
Download keys for SDL2 tutorials on itch.io
Sat, 16th March 2024
The Legend of Edgar 1.37
Mon, 1st January 2024
Tags
• battle-for-the-solar-system (10)
• blob-wars (10)
• brexit (1)
• code (6)
• edgar (10)
• games (45)
• lasagne-monsters (1)
• making-of (5)
• match3 (1)
• numberblocksonline (1)
• orb (2)
• site (1)
• tanx (4)
• three-guys (3)
• three-guys-apocalypse (3)
• tutorials (18)
• water-closet (4)
Books

The Honour of the Knights (Second Edition) (Battle for the Solar System, #1)
When starfighter pilot Simon Dodds is enrolled in a top secret military project, he and his wingmates begin to suspect that there is a lot more to the theft of a legendary battleship and the Mitikas Empire's civil war than the Helios Confederation is willing to let on. Somewhere out there the Pandoran army is gathering, preparing to bring ruin to all the galaxy...
— Sprite Atlas Tutorial —
Part 4: Using the atlas with SDL2
Note: this tutorial assumes knowledge of C, as well as prior tutorials.


Introduction
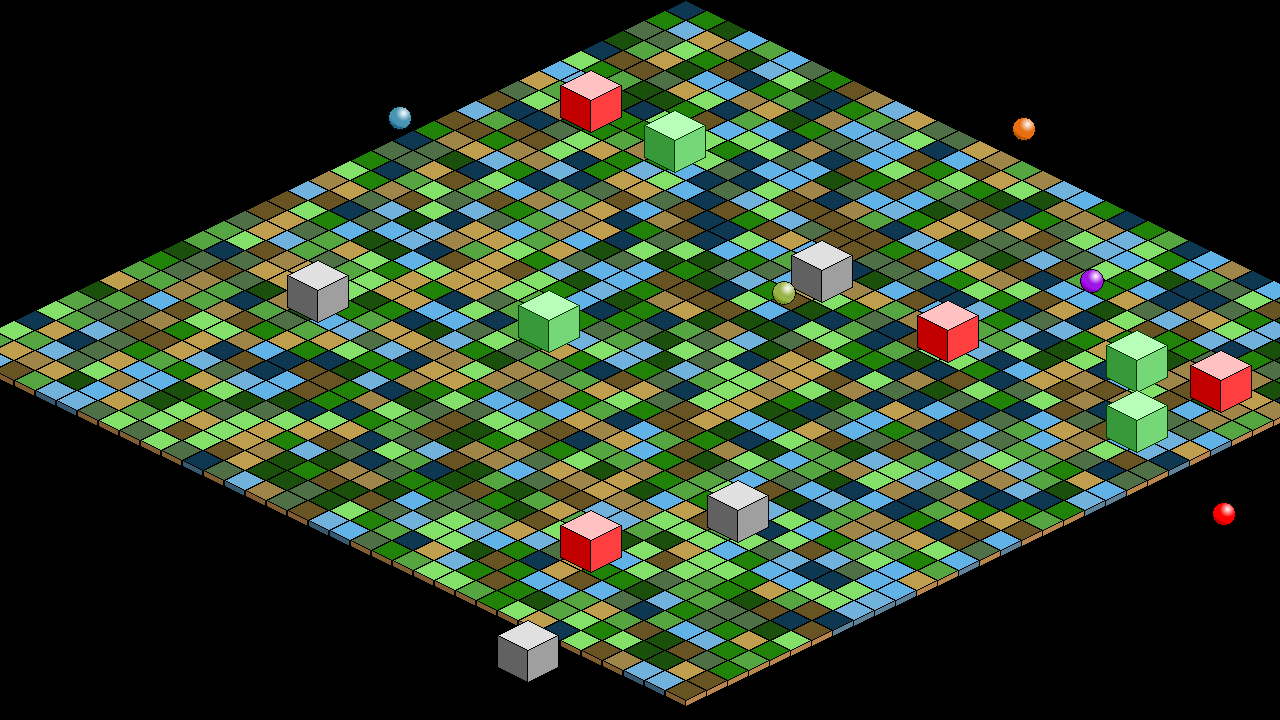
Now that we have a texture atlas created, we can put it to use in an SDL2 application. This tutorial will demonstrate how that's done, by rendering a demo scene using some of the sprites available in the atlas. Extract the archive, run cmake CMakeLists.txt, followed by make, and then run it with ./atlas04. An SDL2 window will open, displaying the scene above. To exit, close the window.
A quick word on the file layout changes. You'll notice that the gfx directory now only contains the atlas.png file, and that the atlas.json file lives in the data directory. In addition, the individual sprites have been moved into the dev directory. In order to create the sprite atlas, we now run a script using ./createAtlas.sh. This script uses the files in dev/gfx to generate the atlas, then moves the resulting atlas files into gfx and data:
#!/bin/bash -e

cd dev

../gen04 -dir gfx

mv atlas.png ../gfx/
mv atlas.json ../data/
The reason for this is so that we don't have both the atlas and the individual files in the gfx directory, which would make building an archive for distribution more difficult. The shell script helps us in this regard, as we need just ignore the entire dev directory.
Inspecting the code
There have been quite a few new files added to this tutorial. However, as plenty of bits and pieces were already covered in previous tutorials (such as setting up SDL, etc.) we're going to skip over those parts. Instead, we'll focus on what has gone into using our sprite atlas. We've also added a number of new structs to structs.h. We're only really interested in one, however:
struct AtlasImage {
	char filename[MAX_FILENAME_LENGTH];
	SDL_Rect rect;
	SDL_Texture *texture;
	AtlasImage *next;
};
This is the most important struct we're going to need, as it will hold the data for an entry into our sprite atlas. The filename, coordinates, and a pointer to the atlas itself are all included. Now, let's move onto loading the atlas data. This is all done in atlas.c. The initAtlas function sets things up:
void initAtlas(void)
{
	memset(&atlases, 0, sizeof(AtlasImage) * NUM_ATLAS_BUCKETS);

	atlasTexture = IMG_LoadTexture(app.renderer, "gfx/atlas.png");

	loadAtlasData();
}
The first thing we're doing is zeroing the memory for an array of AltasImages. This array of AtlasImages will act as the head to each bucket in your hashmap. The reason we're doing this is to speed up the lookups when fetching an image. While our demo is simple, having only 33 images, a larger atlas (for example, of 4096x4096), could contain 100s (or even 1000s of images). Testing up to this many strings while looking up a single sprite isn't all that efficient, so we break them down into smaller lists (we'll see more on this in a moment).
We're also loading the main atlas image (gfx/atlas.png) using SDL_Image's IMG_LoadTexture function. With the image and the hashmap prepared, we can then call loadAtlasData to load the meta data for the sprites.
It might look a bit complicated, but it's actually very straightforward:
static void loadAtlasData(void)
{
	AtlasImage *atlasImage, *a;
	int x, y, w, h;
	cJSON *root, *node;
	char *text, *filename;
	unsigned long i;

	text = readFile("data/atlas.json");

	root = cJSON_Parse(text);

	for (node = root->child ; node != NULL ; node = node->next)
	{
		filename = cJSON_GetObjectItem(node, "filename")->valuestring;
		x = cJSON_GetObjectItem(node, "x")->valueint;
		y = cJSON_GetObjectItem(node, "y")->valueint;
		w = cJSON_GetObjectItem(node, "w")->valueint;
		h = cJSON_GetObjectItem(node, "h")->valueint;

		i = hashcode(filename) % NUM_ATLAS_BUCKETS;

		a = &atlases[i];

		/* horrible bit to look for the tail */
		while (a->next)
		{
			a = a->next;
		}

		atlasImage = malloc(sizeof(AtlasImage));
		memset(atlasImage, 0, sizeof(AtlasImage));
		a->next = atlasImage;

		STRNCPY(atlasImage->filename, filename, MAX_FILENAME_LENGTH);
		atlasImage->rect.x = x;
		atlasImage->rect.y = y;
		atlasImage->rect.w = w;
		atlasImage->rect.h = h;

		atlasImage->texture = atlasTexture;
	}

	cJSON_Delete(root);

	free(text);
}
To begin with, we want to do is load the atlas meta data JSON file, by calling our readFile function (see util.c). With the text data loaded, we're going to once again make use of cJSON to parse it into a JSON object. This is as easy as calling cJSON_Parse, passing in the loaded text. We'll get back a JSON object to work with (in this case, an array).
We'll then loop through the cJSON array, by selecting the root node's child and processing each sibling in turn. We're grabbing the filename, x, y, w, h, values of each JSON object, which represent an entry in our sprite atlas. With those grabbed, we want to find out which bucket of our hashmap we'll be adding it into. We create a hashcode from the filename, by passing it to the hashcode function (see util.c), and then calculate of the modulo using our NUM_ATLAS_BUCKETS constant. With the bucket determined, we step through it until we find the final entry (the one acting as the tail in the linked list), which our new atlas image will follow on from.
A new AtlasImage is malloc'd and appended to the tail of the bucket. The filename is then set, along with the x, y, w, and h. Each AtlasImage has an SDL_Rect that will hold the coordinates of the area the sprite occupies. Finally, the texture of the atlas itself is set into the AtlasImage. This will come into play later.
That's the loading done, so now we can clean up the resources we've used, by calling cJSON_Delete and free, to destroy the loaded JSON and text data.
Our atlas data is loaded! What happens when we want to fetch a sprite, though? Well, grabbing an AtlasImage by filename is easy. It simple involves specifying the filename, determining the hashmap bucket it belongs to, and then searching the entries for a match. Our getAtlasImage function does exactly that:
AtlasImage *getAtlasImage(char *filename)
{
	AtlasImage *a;
	unsigned long i;

	i = hashcode(filename) % NUM_ATLAS_BUCKETS;

	for (a = atlases[i].next ; a != NULL ; a = a->next)
	{
		if (strcmp(a->filename, filename) == 0)
		{
			return a;
		}
	}

	SDL_LogMessage(SDL_LOG_CATEGORY_APPLICATION, SDL_LOG_PRIORITY_CRITICAL, "No such atlas image '%s'", filename);
	exit(1);

	return NULL;
}
A very simply function to understand. You'll notice we're taking the extreme measure of exiting if we're unable to find the image we're after. You may or may not want that in your own code, as you could well have a situation where the AtlasImage is optional for what you're doing (for example, loading a tileset where some entries might not exist). In such a case, an extra parameter to say the image is required and then testing the logic would fix this for you.
It's finally time to draw a scene using our sprite atlas. demo.c contains all the code for setting up and drawing such a scene, so let's take a look at that next.
The initDemo function essentially sets up some spheres, blocks, and tiles for our scene, calling upon the getAtlasImage function to grab the appropriate image to use:
void initDemo(void)
{
	int i;
	char filename[MAX_FILENAME_LENGTH];

	sphereAtlasImages[0] = getAtlasImage("gfx/spheres/blue.png");
	sphereAtlasImages[1] = getAtlasImage("gfx/spheres/lime.png");
	sphereAtlasImages[2] = getAtlasImage("gfx/spheres/orange.png");
	sphereAtlasImages[3] = getAtlasImage("gfx/spheres/purple.png");
	sphereAtlasImages[4] = getAtlasImage("gfx/spheres/red.png");

	for (i = 0 ; i < NUM_SPHERES ; i++)
	{
		spheres[i].x = rand() % SCREEN_WIDTH;
		spheres[i].y = 50 + (rand() % (SCREEN_HEIGHT - 100));
	}

	blockAtlasImages[0] = getAtlasImage("gfx/cubes/bigGreen.png");
	blockAtlasImages[1] = getAtlasImage("gfx/cubes/bigGrey.png");
	blockAtlasImages[2] = getAtlasImage("gfx/cubes/bigRed.png");

	for (i = 0 ; i < NUM_BLOCKS ; i++)
	{
		blocks[i].x = rand() % (MAP_SIZE - 4);
		blocks[i].y = rand() % (MAP_SIZE - 4);
	}

	qsort(blocks, sizeof(SDL_Point), NUM_BLOCKS, blockComparator);

	for (i = 0 ; i < NUM_TILES ; i++)
	{
		sprintf(filename, "gfx/tiles/%d.png", i + 1);

		tileAtlasImages[i] = getAtlasImage(filename);
	}

	for (i = 0 ; i < MAP_SIZE * MAP_SIZE ; i++)
	{
		map[i] = rand() % NUM_TILES;
	}

	app.delegate.logic = logic;
	app.delegate.draw = draw;
}
We won't talk any more about this function, as it's not the focus of this tutorial; it's really just setting up a random scene out of spheres, blocks, and some tiles. It's the drawing we want to focus on. The draw function draws our tiles, blocks, and spheres:
static void draw(void)
{
	drawTiles();

	drawBlocks();

	drawSpheres();
}
The drawSpheres function is easy to follow:
static void drawSpheres(void)
{
	int i;

	for (i = 0 ; i < NUM_SPHERES ; i++)
	{
		blitAtlasImage(sphereAtlasImages[i], spheres[i].x, spheres[i].y, 1);
	}
}
Looping through all our spheres, we call upon a new function: blitAtlasImage. If you've worked through previous tutorials, you'll be familiar with the blit functions there. This one is a little different, but not greatly so. In fact, it's only 17 lines long. This is the main function that deals with the rendering of an AtlasImage:
void blitAtlasImage(AtlasImage *atlasImage, int x, int y, int center)
{
	SDL_Rect dest;

	dest.x = x;
	dest.y = y;
	dest.w = atlasImage->rect.w;
	dest.h = atlasImage->rect.h;

	if (center)
	{
		dest.x -= (dest.w / 2);
		dest.y -= (dest.h / 2);
	}

	SDL_RenderCopy(app.renderer, atlasImage->texture, &atlasImage->rect, &dest);
}
The function accepts an AtlasImage, the destination x and y coordinates, and a flag to say whether it should be centered. The first thing we do is prepare an SDL_Rect (dest) that will be used to specify the destination area to render into. dest's x and y are set to the x and y we passed into the function, while the w and h (the width and height) are set to the AtlasImage's rect's w and h, ensuring that the sprite at the destination is drawn the same size as the original.
We test if we want to center to image, and if so, we shift the dest's x and y by half the dest's width and height. Nothing special there.
Finally, we call the standard SDL_RenderCopy function, to draw the sprite. Notice that the source texture is the texture member of the AtlasImage. We set this earlier when loading the atlas data. The reason for this is to give us some flexibility, in case we have more than one atlas image (which isn't beyond the realms of possibility, if you have lots and lots of images). The source rectangle is given as the AtlasImage's rect (&atlasImage->rect) and the destination rect as the dest rect we set up earlier.
Essentially, we are telling SDL to copy one rectangular area into another rectangular area, using the AtlasImage's coordinates in the atlas. Very easy!
The draw functions for the tiles and blocks use the same blitAtlasImage function, the only difference being that they do not centre their images.
static void drawTiles(void)
{
	int y, x, sx, sy, i;

	i = 0;

	for (x = MAP_SIZE ; x > 0 ; x--)
	{
		for (y = 0 ; y < MAP_SIZE ; y++)
		{
			toISO(x, y, &sx, &sy);

			blitAtlasImage(tileAtlasImages[map[i]], sx, sy, 0);

			i++;
		}
	}
}

static void drawBlocks(void)
{
	int sx, sy, i;

	for (i = 0 ; i < NUM_BLOCKS ; i++)
	{
		toISO(blocks[i].x, blocks[i].y, &sx, &sy);

		blitAtlasImage(blockAtlasImages[i % NUM_BLOCK_IMAGES], sx, sy, 0);
	}
}
That's it for loading and blitting the AtlasImages. One quick word on SDL's batch rendering support. It is controlled by the hint SDL_HINT_RENDER_BATCHING, and is enabled by default (there is actually no need to specify "1" in the line below):
SDL_SetHint(SDL_HINT_RENDER_BATCHING, "1");
Keep in mind that this behaviour was added into SDL 2.0.10, and is not available in prior releases. Even so, creating a sprite atlas to deal with batch rendering is all in all a grand idea.
Purchase
The source code for all parts of this tutorial (including assets) is available for purchase:
From itch.io
It is also available as part of the SDL2 tutorial bundle: