PC Games
• Orb
• Lasagne Monsters
• Three Guys Apocalypse
• Water Closet
• Blob Wars : Attrition
• The Legend of Edgar
• TBFTSS: The Pandoran War
• Three Guys
• Blob Wars : Blob and Conquer
• Blob Wars : Metal Blob Solid
• Project: Starfighter
• TANX Squadron
Tutorials
• 2D shoot 'em up
• 2D top-down shooter
• 2D platform game
• Sprite atlas tutorial
• Working with TTF fonts
• 2D adventure game
• Widget tutorial
• 2D shoot 'em up sequel
• 2D run and gun
• Roguelike
• Medals (Achievements)
• 2D turn-based strategy game
• 2D isometric game
• 2D map editor
• 2D mission-based shoot 'em up
• 2D Santa game
• 2D split screen game
• 2D quest game
• SDL 1 tutorials (outdated)
Latest Updates
The Legend of Edgar 1.38
Thu, 1st January 2026
SDL2 Quest game tutorial
Wed, 7th May 2025
SDL2 Versus game tutorial
Wed, 20th March 2024
Download keys for SDL2 tutorials on itch.io
Sat, 16th March 2024
The Legend of Edgar 1.37
Mon, 1st January 2024
Tags
• battle-for-the-solar-system (10)
• blob-wars (10)
• brexit (1)
• code (6)
• edgar (10)
• games (45)
• lasagne-monsters (1)
• making-of (5)
• match3 (1)
• numberblocksonline (1)
• orb (2)
• site (1)
• tanx (4)
• three-guys (3)
• three-guys-apocalypse (3)
• tutorials (18)
• water-closet (4)
Books
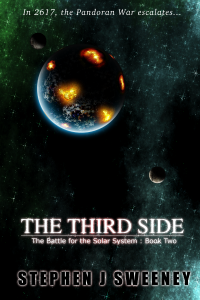
The Third Side (Battle for the Solar System, #2)
The White Knights have had their wings clipped. Shot down and stranded on a planet in independent space, the five pilots find themselves sitting directly in the path of the Pandoran war machine as it prepares to advance The Mission. But if they can somehow survive and find a way home, they might just discover something far more worrisome than that which destroyed an empire.
— Sprite Atlas Tutorial —
Part 1: Preparing the files
Note: this tutorial assumes knowledge of C, as well as prior tutorials.


Introduction
A sprite atlas (or texture atlas) is a single image composed of many other sprites or textures. The advantage of using such an image is that it greatly speeds up the performance of games and applications working on modern GPUs. With only one source of image data to work with, the GPU has to perform very little context switching and is able to work faster. Image data can therefore be drawn in batches, resulting in very fast and efficient rendering. Building such an atlas can be tricky, however. In this tutorial, we'll see how we can use SDL to create an atlas and use it in a simple application.
This first part will focus on preparing our files for use, as there are a few things we need to consider when creating our atlas. As this is a tool and we're starting out, there will only be console output to view.
Extract the archive, run cmake CMakeLists.txt, followed by make. Once compiling is finished type ./gen01 to run the code.
Important: some C/C++ SDKs don't include the required dirent.h header, that is common to many posix distributions (Linux, Mac, minGW etc). This header is used to interact with the underlying file system, and is ultimately used to search files and directories on the host computer. Those whose computers are configured to use a Microsoft Windows Operating System Experience are most affected by this.
If you are missing this header, you can download it here (it is also available on github - https://github.com/tronkko/dirent/blob/master/include/dirent.h). Place it in the src directory, and the code should now compile. You should add this file to all the src directories in this tutorial, if you so require.
Inspecting the code
All the work for generating our atlas will be done in atlasGen.c. We'll start with the main function and work our way around.
int main(int argc, char *argv[])
{
	int i, numImages;

	handleCommandLine(argc, argv);

	SDL_Init(SDL_INIT_VIDEO);

	numImages = initImages();

	for (i = 0 ; i < numImages ; i++)
	{
		printf("[%02d / %02d] %s\n", i + 1, numImages, images[i].filename);

		SDL_FreeSurface(images[i].surface);
		free(images[i].filename);
	}

	free(images);

	SDL_Quit();
}
main is quite simple. It handles the command line arguments, inits SDL, gathers the images for use, prints them out, and then frees all the data that was allocated. We'll look at handleCommandLine in a later tutorial. For now, let's jump straight to initImages, as this is a critical part of the atlas creation.
static int initImages(void)
{
	int numImages, i;

	i = 0;

	numImages = countImages(rootDir);

	images = malloc(sizeof(Image) * numImages);

	memset(images, 0, sizeof(Image) * numImages);

	loadImageData(&i, rootDir);

	qsort(images, i, sizeof(Image), imageComparator);

	return i;
}
The initImages function performs three important steps: it counts the number of images available, so that we can allocate the right amount of memory to hold them; it loads the actual images themselves and stores them, and finally sorts the images. It finally returns the total number of images that are to be added to the atlas. Starting with the first function, countImages:
static int countImages(const char *dir)
{
	DIR *d;
	struct dirent *ent;
	char *path;
	int i;

	i = 0;

	if ((d = opendir(dir)) != NULL)
	{
		while ((ent = readdir(d)) != NULL)
		{
			if (ent->d_type == DT_DIR)
			{
				if (ent->d_name[0] != '.')
				{
					path = malloc(strlen(dir) + strlen(ent->d_name) + 2);
					sprintf(path, "%s/%s", dir, ent->d_name);
					i += countImages(path);
					free(path);
				}
			}
			else
			{
				i++;
			}
		}

		closedir(d);
	}

	return i;
}
We're passing in the directory we wish to scan, and then iterating through all the entries contained within. We're using a C function called opendir and then reading each entry. Notice something important here: we are testing the type of entry that we have currently read, by testing the value of ent->d_type. If the value is DT_DIR, this entry is a directory. As such, will want to open it and scan the contents of it, too. This is done by calling the countImages function again, but this time using the path of the subdirectory we've encountered. This will allow us to recurse into subdirectories and count the total number of images available.
Take a look at the gfx directory. You'll see it contains 4 subfolders, each containing 5 images. If we only scanned the top level gfx directory, we'd not find any files, and the countImages function would return 0.
Something that's important here, too. We're testing that the first character of the filename is not a . (dot). When listing directory entries, two meta entries will show up: . (dot) and .. (double dot). These represent the current directory and the parent directory respectively. If we were to recurse into those, we could end up in an infinite loop and our program would crash (and perhaps even the computer). We therefore want to ignore them. This approach does mean that files that really start with a dot will be ignored, but that's of little consequence here.
Finally, when we do find a real file, we'll increment a counter (i) by 1. The recursive function called will then return its count, which will be added to the existing count of the prior call. This will ultimately count the total number of files found in all subdirectories of the parent.
With that done, and our array of Images has been created (see structs.h for the typedef), we can see the next major step in the initImages function is to load the actual image data itself. This is done in the loadImageData function:
static void loadImageData(int *i, const char *dir)
{
	DIR *d;
	struct dirent *ent;
	char *path;

	if ((d = opendir(dir)) != NULL)
	{
		while ((ent = readdir(d)) != NULL)
		{
			path = malloc(strlen(dir) + strlen(ent->d_name) + 2);

			if (ent->d_type == DT_DIR)
			{
				if (ent->d_name[0] != '.')
				{
					sprintf(path, "%s/%s", dir, ent->d_name);

					loadImageData(i, path);
				}
			}
			else
			{
				sprintf(path, "%s/%s", dir, ent->d_name);

				images[*i].surface = IMG_Load(path);

				if (images[*i].surface)
				{
					images[*i].filename = malloc(strlen(path) + 1);

					strcpy(images[*i].filename, path);
					SDL_SetSurfaceBlendMode(images[*i].surface, SDL_BLENDMODE_NONE);
					*i = *i + 1;
				}
			}

			free(path);
		}

		closedir(d);
	}
}
Once again, we're opening the root directory and recursing through it. This time, however, we're attempting to load the image using SDL's IMG_Load function. Should this be successful (and it might not, because we might attempt to load a file that's not an image), we copy the filename into the filename variable of the Image item we're working with.
The final part of the function is a call to qsort, passing in the images that we've loaded. The function is simple, comparing the heights of the loaded images and pushing those that are tallest to the top of the list:
static int imageComparator(const void *a, const void *b)
{
	Image *i1 = (Image*)a;
	Image *i2 = (Image*)b;

	return i2->surface->h - i1->surface->h;
}
The reason for this sorting will become clear later on. It should be noted that we're only sorting the images that were actually loaded, which might be different from the number of files that we scanned.
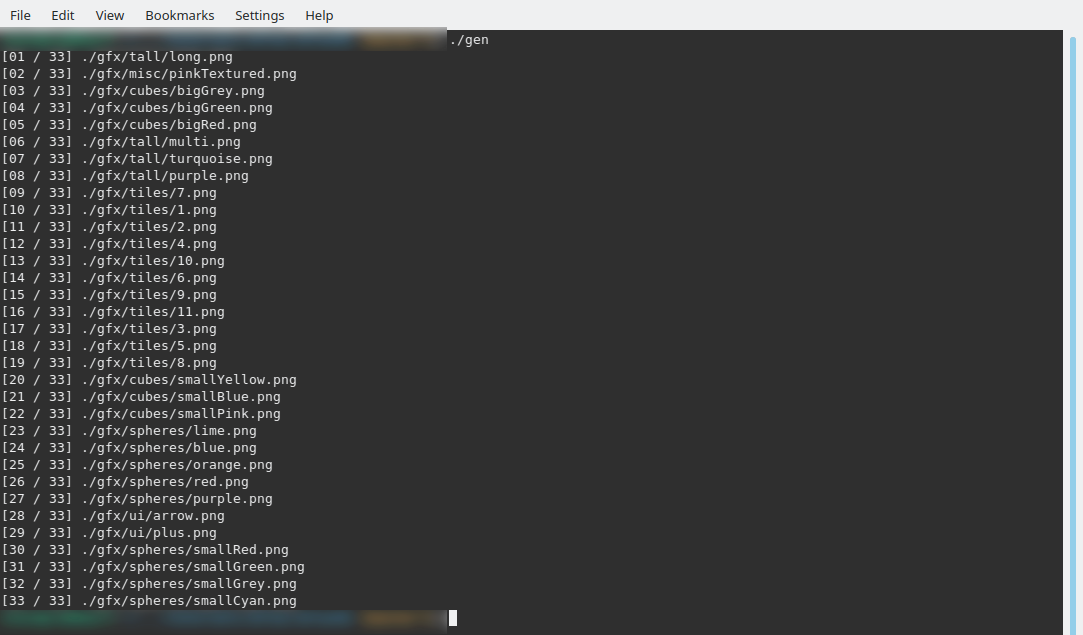
With all that done, we can loop through our list of images and print them out. When you run the program, you will see a list like this:
[01 / 33] gfx/tall/long.png
[02 / 33] gfx/misc/pinkTextured.png
[03 / 33] gfx/cubes/bigGrey.png
[04 / 33] gfx/cubes/bigGreen.png
[05 / 33] gfx/cubes/bigRed.png
[06 / 33] gfx/tall/multi.png
[07 / 33] gfx/tall/turquoise.png
[08 / 33] gfx/tall/purple.png
[09 / 33] gfx/tiles/7.png
[10 / 33] gfx/tiles/1.png
[11 / 33] gfx/tiles/2.png
[12 / 33] gfx/tiles/4.png
[13 / 33] gfx/tiles/10.png
[14 / 33] gfx/tiles/6.png
[15 / 33] gfx/tiles/9.png
[16 / 33] gfx/tiles/11.png
[17 / 33] gfx/tiles/3.png
[18 / 33] gfx/tiles/5.png
[19 / 33] gfx/tiles/8.png
[20 / 33] gfx/cubes/smallYellow.png
[21 / 33] gfx/cubes/smallBlue.png
[22 / 33] gfx/cubes/smallPink.png
[23 / 33] gfx/spheres/lime.png
[24 / 33] gfx/spheres/blue.png
[25 / 33] gfx/spheres/orange.png
[26 / 33] gfx/spheres/red.png
[27 / 33] gfx/spheres/purple.png
[28 / 33] gfx/ui/arrow.png
[29 / 33] gfx/ui/plus.png
[30 / 33] gfx/spheres/smallRed.png
[31 / 33] gfx/spheres/smallGreen.png
[32 / 33] gfx/spheres/smallGrey.png
[33 / 33] gfx/spheres/smallCyan.png
But that's not very useful right now. In the next part, we'll look at actually creating the atlas image itself.
Purchase
The source code for all parts of this tutorial (including assets) is available for purchase:
From itch.io
It is also available as part of the SDL2 tutorial bundle: