
— Sprite Atlas Tutorial —
Part 5: Rotating, scaling, blending, and colour modulation
Note: this tutorial assumes knowledge of C, as well as prior tutorials.


Introduction
We can now generate, load, and use a sprite atlas. All is good. This final tutorial will demonstrate how to achieve a few other rendering techniques available in SDL2, such as image scaling, alpha blending, etc., while using the atlas, as it might not be all that obvious. Additionally, we also didn't cover how to deal with images that had been rotated as part of the atlas generation, as we wanted to keep things simple to begin with.
Extract the archive, run cmake CMakeLists.txt, followed by make, then ./atlas05 to run. You will see an animated scene like the one above. Note that the atlas we're working with is smaller than the previous one and contains fewer sprites.
Inspecting the code
Only 4 files have been updated in this final part: atlas.c, draw.c, demo.c, and structs.h. Let's start with draw.c. There have been two new functions added, blitAtlasImageRotated and blitAtlasImageScaled. In addition, blitAtlasImage has been tweaked to handle rotated atlas images. To support this, we've added the rotated flag to the AtlasImage struct in structs.h:
struct AtlasImage {
	char filename[MAX_FILENAME_LENGTH];
	SDL_Rect rect;
	int rotated;
	SDL_Texture *texture;
	AtlasImage *next;
};
A one line addition, nothing special. Now let's move onto the updated blitAtlasImage function. There's a little bit more to this one now:
void blitAtlasImage(AtlasImage *atlasImage, int x, int y, int center)
{
	SDL_Rect dest;
	SDL_Point p;

	dest.x = x;
	dest.y = y;
	dest.w = atlasImage->rect.w;
	dest.h = atlasImage->rect.h;

	if (!atlasImage->rotated)
	{
		if (center)
		{
			dest.x -= (dest.w / 2);
			dest.y -= (dest.h / 2);
		}

		SDL_RenderCopy(app.renderer, atlasImage->texture, &atlasImage->rect, &dest);
	}
	else
	{
		if (center)
		{
			dest.x -= (dest.h / 2);
			dest.y -= (dest.w / 2);
		}

		p.x = 0;
		p.y = 0;

		dest.y += atlasImage->rect.w;

		SDL_RenderCopyEx(app.renderer, atlasImage->texture, &atlasImage->rect, &dest, -90, &p, SDL_FLIP_NONE);
	}
}
You'll notice that we're now testing the rotated flag of the AtlasImage right away. Working from top to bottom, we're first checking if the image has been rotated. If not, then we're rendering the image in the same fashion as the previous tutorial (along with the centering check). However, if the image has been rotated in the atlas, things are a bit different. We're performing the center check as before, but now we want to shift the x by half the image's h, and its y by half the image's w. Basically, this is the opposite to how we're doing it for a non-rotated image!
Next, we want to undo the rotation. We've introduced a new SDL_Point variable (simply called p), which represents the rotation point at the source rectangle. By default, SDL will rotate an image at its center. Owing to the way we've made our atlas, we want to rotate from the top left, so set the coordinates to 0,0. The rotation will also cause our image to shift up the screen by an amount equal to its width. We want to undo this by adding the image's width to the dest y.
With those things set up, we can now call upon SDL's SDL_RenderCopyEx function to draw our image. It's similar to SDL_RenderCopy, except it allows for rotations and mirroring. As our atlas rotated our image by 90 degrees, we want to rotated by negative 90 degrees to set it the correct way up. We're also pass SDL_FLIP_NONE to the function, informing it that we don't want any mirroring performed. Hopefully, that all makes sense. If not, just remember that we're undoing the rotation of the atlas generation, and making coordinate adjustments to compensate for subsequent coordinate shifts that result from it.
To see this in action, let's turn our attention to demo.c. We've made a number of changes to this file, so we'll quickly go over them. To start with, the initDemo function is loading fewer AtlasImages, and also setting up two new variables for handling rotation angles:
void initDemo(void)
{
	sphereAtlasImages[0] = getAtlasImage("gfx/spheres/smallRed.png");
	sphereAtlasImages[1] = getAtlasImage("gfx/spheres/smallGreen.png");
	sphereAtlasImages[2] = getAtlasImage("gfx/spheres/smallGrey.png");
	sphereAtlasImages[3] = getAtlasImage("gfx/spheres/smallCyan.png");

	cube = getAtlasImage("gfx/cubes/bigGrey.png");

	tiles[0] = getAtlasImage("gfx/tiles/1.png");
	tiles[1] = getAtlasImage("gfx/tiles/7.png");

	tallAtlasImage = getAtlasImage("gfx/tall/long.png");

	tallAngle = 0;

	tileAngle = 0;

	app.delegate.logic = logic;
	app.delegate.draw = draw;
}
The logic step is now simply incrementing the value of the two angle variables:
static void logic(void)
{
	tallAngle++;

	tileAngle++;
}
And the draw function is calling new functions that we have set up:
static void draw(void)
{
	drawTiles();

	drawTallSpinner();

	drawAlphaSpheres();

	drawColourCubes();

	drawScaledSprites();
}
If we look at drawTiles, we can see that we are calling blitAtlasImage for two of the tiles and another function called blitAtlasImageRotated (more on this in a bit). In this case, blitAtlasImage will be rotating the two tiles that are referenced.
static void drawTiles(void)
{
	blitAtlasImage(tiles[0], 50, 50, 0);

	blitAtlasImage(tiles[1], 150, 50, 0);

	blitAtlasImageRotated(tiles[1], 250, 50 + (tiles[1]->rect.w / 2), tileAngle);
}
If you take a look at the data/atlas.json file, you can see that the two tiles that were loaded in the initDemo function have been rotated (and if you open the gfx/atlas.png file, this should also become clear):
}, {
	"filename":	"gfx/tiles/7.png",
	"x":	98,
	"y":	0,
	"w":	27,
	"h":	42,
	"rotated":	1
}, {
	"filename":	"gfx/tiles/1.png",
	"x":	98,
	"y":	64,
	"w":	27,
	"h":	42,
	"rotated":	1
}, {
However, thanks to the changes that we made blitAtlasImage, they are being drawn the correct way! What about the blitAtlasImageRotated function that is being called for the 3rd tile? It's somewhat similar to the regular blitAtlasImage:
void blitAtlasImageRotated(AtlasImage *atlasImage, int x, int y, int angle)
{
	SDL_Rect dest;

	dest.x = x;
	dest.y = y;
	dest.w = atlasImage->rect.w;
	dest.h = atlasImage->rect.h;

	if (!atlasImage->rotated)
	{
		dest.x -= atlasImage->rect.h / 2;
		dest.y -= atlasImage->rect.w / 2;
	}
	else
	{
		dest.x -= atlasImage->rect.w / 2;
		dest.y -= atlasImage->rect.h / 2;

		angle -= 90;
	}

	SDL_RenderCopyEx(app.renderer, atlasImage->texture, &atlasImage->rect, &dest, angle, NULL, SDL_FLIP_NONE);
}
Like the regular blitAtlasImage function, we're testing if the AtlasImage is rotated. If if isn't, we're centering the AtlasImage around the x and y coordinates that we passed into the function, shifting the dest x and y by half the AtlasImage's width and height. However, if it is rotated, we're shifting the x and y by the height and width (as seen the blitAtlasImage function). However, we're also substracting 90 degrees from the angle. This is to once again undo the rotation that was performed on the image while adding it. With those done, we're calling the SDL_RenderCopyEx, to perform the actual rotation. So, somewhat similar to blitAtlasImage, but in other ways a bit different. Quite straightforward, however.
What about the spinning columns? How are they done? The drawTallSpinner function is simple. It just draws the long AtlasImage 5 times, in different locations. The tallAngle variable is used by all five, but the angle is give a small adjustment:
static void drawTallSpinner(void)
{
	blitAtlasImageRotated(tallAtlasImage, 150, 250, tallAngle);

	blitAtlasImageRotated(tallAtlasImage, 300, 250, tallAngle + 20);

	blitAtlasImageRotated(tallAtlasImage, 450, 250, tallAngle + 40);

	blitAtlasImageRotated(tallAtlasImage, 600, 250, tallAngle + 60);

	blitAtlasImageRotated(tallAtlasImage, 750, 250, tallAngle + 80);
}
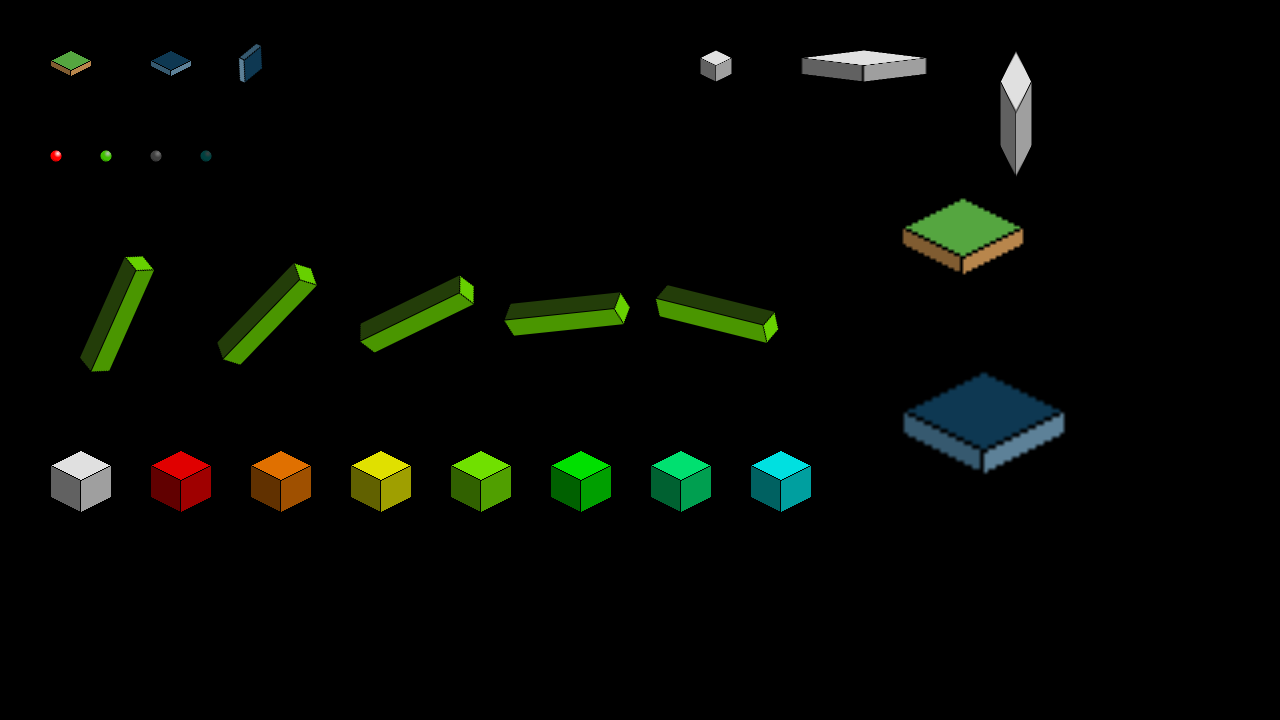
Let's look at something else. You'll notice the small coloured spheres above the spinning pillars. They're fading away as we move to the right.
static void drawAlphaSpheres(void)
{
	setAtlasColor(255, 255, 255, 255);
	blitAtlasImage(sphereAtlasImages[0], 50, 150, 0);

	setAtlasColor(255, 255, 255, 192);
	blitAtlasImage(sphereAtlasImages[1], 100, 150, 0);

	setAtlasColor(255, 255, 255, 128);
	blitAtlasImage(sphereAtlasImages[2], 150, 150, 0);

	setAtlasColor(255, 255, 255, 64);
	blitAtlasImage(sphereAtlasImages[3], 200, 150, 0);

	setAtlasColor(255, 255, 255, 255);
}
Alpha effects are nothing special in SDL; they are achieved by using SDL_SetTextureAlphaMod. Things don't change much when using a sprite atlas, and we've introduced a wrapper function called setAtlasColor (found in atlas.c) to handle the colour modulation and alpha effects:
void setAtlasColor(int r, int g, int b, int a)
{
	SDL_SetTextureColorMod(atlasTexture, r, g, b);
	SDL_SetTextureAlphaMod(atlasTexture, a);
}
SDL_SetTextureColorMod is used to handle the colour change in our sprite atlas, specifying the RGB values which can range from 0 to 255, with 255 being the top value. SDL_SetTextureAlphaMod changes the opacity of a texture, again range from 0 to 255, with 0 being fully transparent and 255 being fully opaque. This setAtlasColor allows us to change the colour modulation and alpha of the atlas with a single call.
Something important to note is the final line in the drawAlphaSpheres function. We're resetting the atlas to its default RGB and alpha values. The reason we need to do this is because the atlas will retain the state we set it to last in for the next drawing call. In other words, if we set the atlas to be red, every subsequent blit using any AtlasImage will also be red; it affects the entire texture, not the individual entry on the atlas. Remember to reset the state when you're done with it.
The coloured cubes use the setAtlasColor to create their short spectrum series:
static void drawColourCubes(void)
{
	setAtlasColor(255, 255, 255, 255);
	blitAtlasImage(cube, 50, 450, 0);

	setAtlasColor(255, 0, 0, 255);
	blitAtlasImage(cube, 150, 450, 0);

	setAtlasColor(255, 128, 0, 255);
	blitAtlasImage(cube, 250, 450, 0);

	setAtlasColor(255, 255, 0, 255);
	blitAtlasImage(cube, 350, 450, 0);

	setAtlasColor(128, 255, 0, 255);
	blitAtlasImage(cube, 450, 450, 0);

	setAtlasColor(0, 255, 0, 255);
	blitAtlasImage(cube, 550, 450, 0);

	setAtlasColor(0, 255, 128, 255);
	blitAtlasImage(cube, 650, 450, 0);

	setAtlasColor(0, 255, 255, 255);
	blitAtlasImage(cube, 750, 450, 0);

	setAtlasColor(255, 255, 255, 255);
}
And notice again that the final line is resetting the state of the atlas image, setting every parameter to 255.
Finally, let's see how we can handle scaled images. Some tiles and cubes on the right-hand side of the screen are scaled and streched:
static void drawScaledSprites(void)
{
	blitAtlasImageScaled(cube, 700, 50, 32, 32);

	blitAtlasImageScaled(cube, 800, 50, 128, 32);

	blitAtlasImageScaled(cube, 1000, 50, 32, 128);

	blitAtlasImageScaled(tiles[0], 900, 250, tiles[0]->rect.w * 3, tiles[0]->rect.h * 3);

	blitAtlasImageScaled(tiles[1], 900, 450, tiles[1]->rect.w * 4, tiles[0]->rect.h * 4);
}
To achieve this, we're calling upon a function called blitAtlasImageScaled. This function is rather like the others, but takes two new parameters: w and h, the width and height that we want to scale the AtlasImage by. The function is rather similar to other we've built already, but with a few minor differences:
void blitAtlasImageScaled(AtlasImage *atlasImage, int x, int y, int w, int h)
{
	SDL_Rect dest;
	SDL_Point p;

	dest.x = x;
	dest.y = y;
	dest.w = w;
	dest.h = h;

	if (atlasImage->rotated)
	{
		p.x = 0;
		p.y = 0;

		dest.y += w;

		SDL_RenderCopyEx(app.renderer, atlasImage->texture, &atlasImage->rect, &dest, -90, &p, SDL_FLIP_NONE);
	}
	else
	{
		SDL_RenderCopy(app.renderer, atlasImage->texture, &atlasImage->rect, &dest);
	}
}
Notice that when we are setting up the dest SDL_Rect, we're using the w and h parameters we passed into the function, rather than the width and height of the AtlasImage, as we do in other functions. This is the key to the scaling, as we're telling SDL the proportions of the destination rectangle. In addition, when we're undoing the rotation of a rotated image, we want to adjust the destination y by the width we're passing in, to ensure it renders in the correct location.
That's it for working with sprites atlases. Hopefully this will have given you a lot of insight into how it all works and can be used.
Purchase
The source code for all parts of this tutorial (including assets) is available for purchase:
From itch.io
It is also available as part of the SDL2 tutorial bundle: