
— Creating a basic widget system —
Part 8: In-game menu
Note: this tutorial assumes knowledge of C, as well as prior tutorials.


Introduction
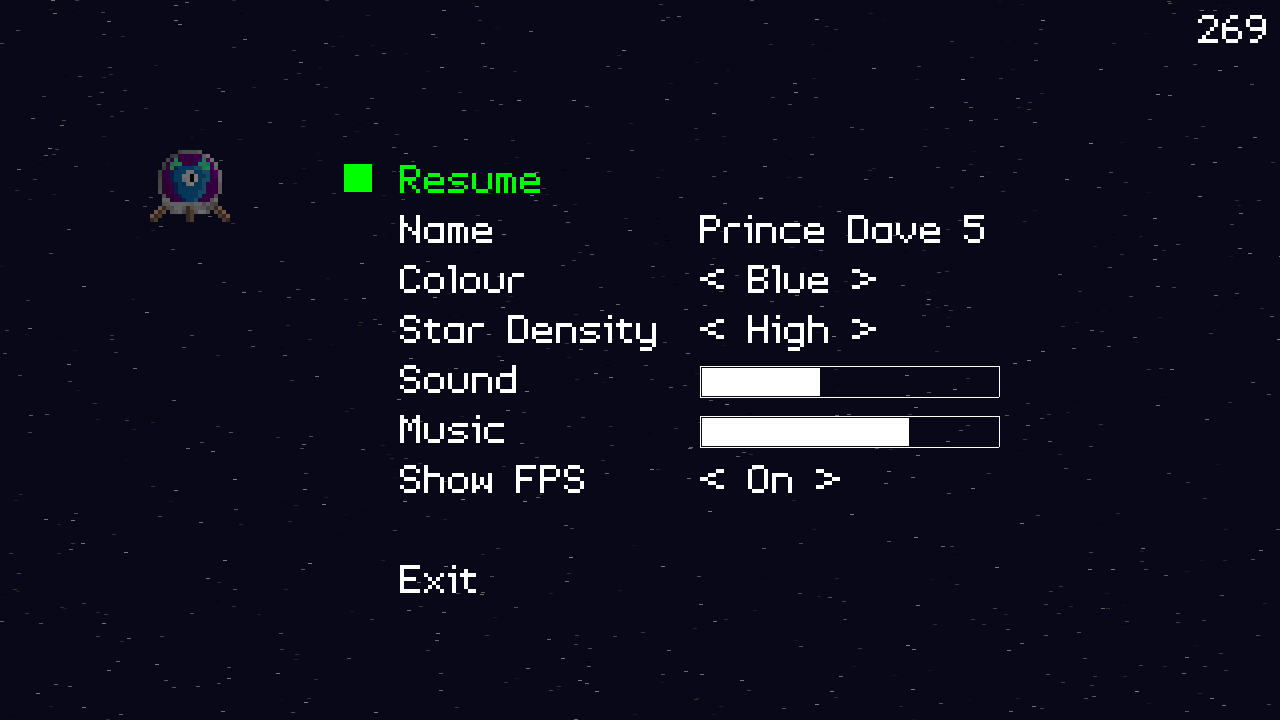
With all our widgets now done, we can look at how they would be implemented in an actual game. We're going to make a faux space shooter, featuring an alien. Things such as the starfield density, the sound and music volumes, the sprite, and whether to show the frame rate can be changed.
Extract the archive, run cmake CMakeLists.txt, followed by make, and then use ./widgets08 to run the code. You will see a window open like the one above. Using the arrow keys to control the alien, and the left control key to fire. Pressing Escape will pause the game and open the options menu. Change the options as you like, and then either select Resume or press Escape to return to the game. When you're done, either select Exit from the in-game menu or close the window.
Inspecting the code
Since we're now done with our widgets, the bulk of our changes are being done in demo.c. Before we go there, there's a minor update to structs.h:
typedef struct {
	struct {
		void (*logic)(void);
		void (*draw)(void);
	} delegate;
	SDL_Renderer *renderer;
	SDL_Window *window;
	int keyboard[MAX_KEYBOARD_KEYS];
	double deltaTime;
	Widget *activeWidget;
	char inputText[MAX_INPUT_LENGTH];
	int lastKeyPressed;
	struct {
		int fps;
		int showFPS;
	} dev;
} App;
Alongside fps in App, we've added showFPS. This will be used to control whether we display the frame rate. By default, it is will be 0 (false).
demo.c has received many, many more updates. There are some we'll not cover here, such as controlling the player, etc. as these were done in previous tutorials. We'll focus on how we deal with the widget interactions instead. Starting with initDemo:
void initDemo(void)
{
	Widget *w;
	InputWidget *iw;
	SelectWidget *sw;
	SliderWidget *sl;
	int i;

	memset(&bulletHead, 0, sizeof(Bullet));
	bulletTail = &bulletHead;

	alienImages[0] = getAtlasImage("gfx/greenAlien.png", 1);
	alienImages[1] = getAtlasImage("gfx/yellowAlien.png", 1);
	alienImages[2] = getAtlasImage("gfx/blueAlien.png", 1);
	alienImages[3] = getAtlasImage("gfx/redAlien.png", 1);

	memset(&player, 0, sizeof(Player));
	player.x = 150;
	player.y = 150;

	bulletImage = getAtlasImage("gfx/bullet.png", 1);

	for (i = 0 ; i < NUM_STARS ; i++)
	{
		stars[i].x = rand() % SCREEN_WIDTH;
		stars[i].y = rand() % SCREEN_HEIGHT;
		stars[i].speed = 10 + (rand() % 70);
		stars[i].speed *= 0.1;
	}

	paused = 0;

	w = getWidget("name");
	w->action = name;
	iw = (InputWidget*) w->data;
	iw->x = 700;
	iw->y = w->y;
	STRNCPY(iw->text, "King Paul VII", iw->maxLength);

	app.activeWidget = w;
	app.activeWidget->action();

	w = getWidget("colour");
	w->action = colour;
	sw = (SelectWidget*) w->data;
	sw->x = 700;
	sw->value = 0;

	app.activeWidget = w;
	app.activeWidget->action();

	w = getWidget("starfield");
	w->action = starfield;
	sw = (SelectWidget*) w->data;
	sw->x = 700;
	sw->value = 2;

	app.activeWidget = w;
	app.activeWidget->action();

	w = getWidget("sound");
	w->action = sound;
	sl = (SliderWidget*) w->data;
	sl->x = 700;
	sl->y = w->y + 16;
	sl->w = 300;
	sl->h = 32;
	sl->value = 100;

	app.activeWidget = w;
	app.activeWidget->action();

	w = getWidget("music");
	w->action = music;
	sl = (SliderWidget*) w->data;
	sl->x = 700;
	sl->y = w->y + 16;
	sl->w = 300;
	sl->h = 32;
	sl->value = 50;

	app.activeWidget = w;
	app.activeWidget->action();

	w = getWidget("showFPS");
	w->action = showFPS;
	sw = (SelectWidget*) w->data;
	sw->x = 700;
	sw->value = 0;

	app.activeWidget = w;
	app.activeWidget->action();

	w = getWidget("exit");
	w->action = quit;

	w = getWidget("resume");
	w->action = resume;

	app.activeWidget = w;

	app.delegate.logic = logic;
	app.delegate.draw = draw;
}
Wow, there's a lot happening there. However, it's mostly setup, and some of it we've seen before (such as getting the widgets and assigning their actions). We'll work our way down from the top.
We're starting by setting up our bullet linked list, then grabbing 4 images from our texture atlas that will be used for our alien, storing them in an array called alienImages. We're then preparing the player by zeroing its memory, and setting its x and y coordinates. Following on from that, we're fetching the image that will be used for our bullet. We're then setting up our starfield, but looping through all the stars in the array, and giving them random screen coordinates and speeds.
After that, we're setting a variable called paused to 0. This will tell our game that we're currently playing and not to show the menu. It is a key element to how our logic and drawing will work for our in-game menu. We're then fetching all of our widgets, setting their function pointers, coordinates, and default values as needed. One thing you'll notice is that we're assigning almost every widget as the activeWidget and immediately calling their action function pointer. This is so that things such as the player name, starfield density, and volumes are invoked. It helps to keep our game state consistent with the states of the widgets.
As you can see, the init function wasn't all that complex, it was just long. Now, let's move onto the logic function to see how the main game loop is working:
static void logic(void)
{
	if (!paused)
	{
		doPlayer();

		doStars();

		doBullets();
	}
	else
	{
		doWidgets();
	}

	if (app.keyboard[SDL_SCANCODE_ESCAPE])
	{
		app.keyboard[SDL_SCANCODE_ESCAPE] = 0;

		paused = !paused;
	}
}
The first thing we're doing is testing the paused flag. If its 0, we'll process our player, stars, and bullets. If it's 1, we'll call doWidgets, to process our widgets. As you can clearly see, when the paused flag is set to 1, all the action in the game will stop and the focus will be on the widget processing. Finally, notice how that whether the game is paused or not, we're testing if Escape has been pressed on the keyboard. If it has, we'll clear the key, and then toggle the pause state. This allows us to enter the in-game menu when playing the game, and exiting it if it's currently displayed.
Our draw function also makes use of the pause flag:
static void draw(void)
{
	drawStars();

	drawPlayer();

	drawBullets();

	if (!paused)
	{
		drawHud();
	}
	else
	{
		drawRect(0, 0, SCREEN_WIDTH, SCREEN_HEIGHT, 0, 0, 0, 128);

		drawWidgets();
	}
}
In all cases, we'll always draw our stars, player, and bullets. However, we'll then test if we're paused or not. If we're not paused, we'll draw the hud. Otherwise, we'll dim the screen a little by rendering a transparent black rectangle, and then call drawWidgets, to render all the widgets. Ultimately, this means that our widgets will be hidden until the game is paused. The reason the hud is hidden is merely to remove the player name from the display while the widgets are being shown. Having it displayed at the same time could cause a little confusion, so it's best to remove it.
Now, let's move onto the rest of the code. Again, since this tutorial is focused on the widgets, we'll not look at how the bullets, etc. work. So, let's look at all the widgets' functions pointers. Starting with resume:
static void resume(void)
{
	paused = 0;
}
There isn't much to what happens when we select Resume from the in-game menu - we simply set the paused flag to 0, so that we return to the game.
Next, the name function pointer:
static void name(void)
{
	InputWidget *iw;

	iw = (InputWidget*) app.activeWidget->data;

	STRCPY(player.name, iw->text);
}
We saw this in a previous tutorial. We're grabbing the text value of the InputWidget and copying it into the player's name, using our STRCPY macro.
Our colour function pointer is equally as straightforward:
static void colour(void)
{
	SelectWidget *sw;

	sw = (SelectWidget*) app.activeWidget->data;

	player.texture = alienImages[sw->value];
}
We're extracting the SelectWidget data, and using its value as the index to the alienImages array, which we'll use as the player's texture. Remember that our SelectWidget has an array of char*, backed by a value int. All we need to do is ensure that the text of our SelectWidget indexes matches up with the alienImages.
Next, our music function:
static void music(void)
{
	SliderWidget *sw;
	int vol;

	sw = (SliderWidget*) app.activeWidget->data;

	vol = MIX_MAX_VOLUME * (sw->value * 0.01);

	Mix_VolumeMusic(vol);
}
Remember that our SliderWidgets hold a value between 0 and 100, effectively representing a percentage. We're going to use this to affect our sound volume. MIX_MAX_VALUE is an SDL2 Mixer constant, with a value of 128. By taking our SliderWidget's value and dividing by 100 (in this case, multiplying by 0.01), we'll get a decimal value between 0 and 1. Multiplying MIX_MAX_VALUE by this result will give us a number between 0 and 128. We'll then use this with Mix_VolumeMusic, to change the volume of the music. Our music SliderWidget is a smooth type, so holding the left and right array keys will smoothly update the bar.
Our sound function pretty much works the same:
static void sound(void)
{
	SliderWidget *sw;
	int vol;

	sw = (SliderWidget*) app.activeWidget->data;

	vol = MIX_MAX_VOLUME * (sw->value * 0.01);

	Mix_Volume(-1, vol);
}
The only difference is that we're feeding the result into Mix_Volume and telling it to apply the volume to all sound channels (passing -1 to channel number, the first parameter). Our sound widget requires us to press left and right to change the volume, and its step is set to 10, so it changes at 10% increments.
The function for toggling the display of the frame rate is easy enough:
static void showFPS(void)
{
	SelectWidget *sw;

	sw = (SelectWidget*) app.activeWidget->data;

	app.dev.showFPS = sw->value;
}
We need only extract the SelectWidget and find out its value. Off and on will be 0 and 1, so we just have to assign this value to the showFPS variable in app.dev.
The starfield function has a little more to consider:
static void starfield(void)
{
	SelectWidget *sw;

	sw = (SelectWidget*) app.activeWidget->data;

	numRenderedStars = numStarsOptions[sw->value];
}
Our starfield options are Very Low, Low, Normal, High, and Max. Again, the value of the SelectWidget is a number from 0 to 4, meaning we can simply grab the desired value from a pre-defined index. numStarsOptions is a static variable, defined at the top of demo.c:
static int numStarsOptions[] = {100, 350, 500, 1000, NUM_STARS};
Just like choosing the image for the alien, the index of our SelectWidget will determine how many stars we want to process and render. When it comes to doing so, our logic and render functions for our stars is simple:
static void doStars(void)
{
	int i;

	for (i = 0 ; i < numRenderedStars ; i++)
	{
		stars[i].x -= (stars[i].speed * app.deltaTime);

		if (stars[i].x < 0)
		{
			stars[i].x += (SCREEN_WIDTH + abs(stars[i].x));
		}
	}
}
While we have created 1500 stars (NUM_STARS), we will only process the value of numRenderedStars. The SelectWidget for our starfield allows us to change this on the fly. The same logic is applied when drawing the stars:
static void drawStars(void)
{
	int i, c;

	for (i = 0 ; i < numRenderedStars ; i++)
	{
		c = 36 * stars[i].speed;

		SDL_SetRenderDrawColor(app.renderer, c, c, c, 255);

		SDL_RenderDrawLine(app.renderer, stars[i].x, stars[i].y, stars[i].x + 3, stars[i].y);
	}
}
In both cases, we want to use numRenderedStars, instead of NUM_STARS, to reduce the processing and rendering time for the starfield.
We're almost done. So let's look quickly at where our frame rate is displayed. Our main loop will always call a function in draw.c called presentScene. It is here that we'll test if we want to draw our frame rate:
void presentScene(void)
{
	if (app.dev.showFPS)
	{
		showFPS();
	}

	SDL_RenderPresent(app.renderer);
}
As we're testing and handling showFPS in presentScene, our frame rate will be shown, no matter where in the application we are. The showFPS function itself merely calls out to drawText:
static void showFPS(void)
{
	char fps[8];

	memset(fps, 0, sizeof(fps));

	sprintf(fps, "%d", app.dev.fps);

	drawText(fps, SCREEN_WIDTH - 10, 0, 255, 255, 255, TEXT_ALIGN_RIGHT, 0);
}
And that's it for implementing widgets in a game. We've one more thing to consider before we wrap up this tutorial, and that's grouping our widgets. Right now, we have an all-or-nothing approach to drawing our widgets. It would be good if we could only show certain ones. In our final part, we'll do just that.
Purchase
The source code for all parts of this tutorial (including assets) is available for purchase:
From itch.io
It is also available as part of the SDL2 tutorial bundle: