
— Creating a simple roguelike —
Part 8: Using items
Note: this tutorial assumes knowledge of C, as well as prior tutorials.


Introduction
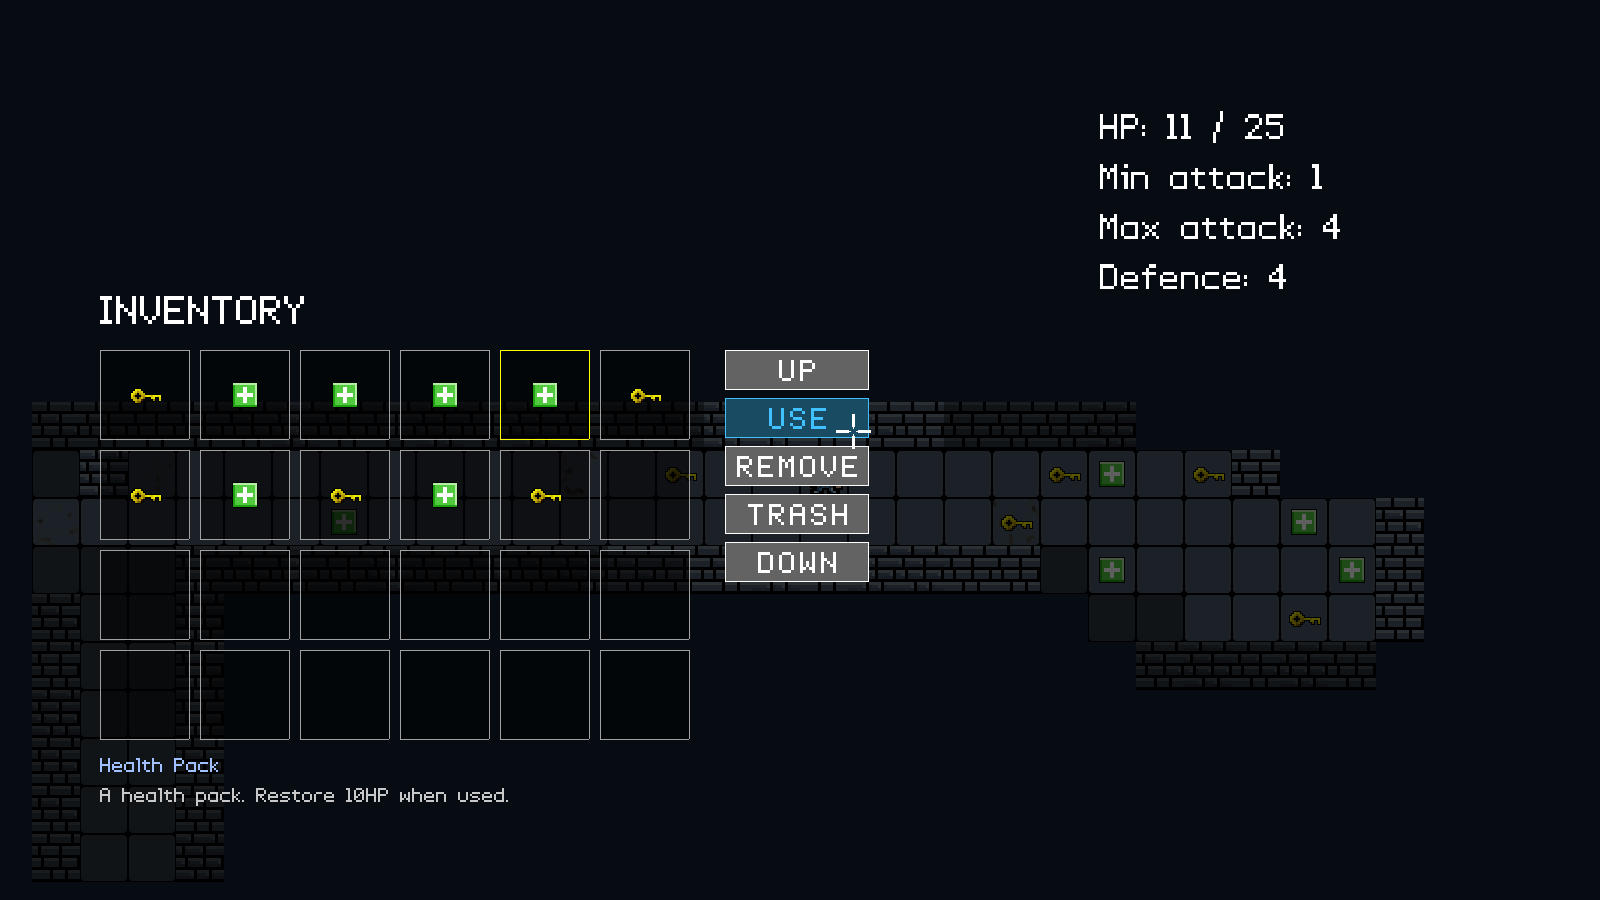
Now that we can pick up items and store them in our inventory, it would be good to add in the ability to use them, as well as manipulate our inventory. In this part, we'll do just that. We've introduced health packs to be picked up, as well as keys, and we have scattered 5 each through our small dungeon. For the purpose of demonstrating the health pack usage, we've started the player with 1 hit point. This part will be quite long, since UI work is quite intensive.
Extract the archive, run cmake CMakeLists.txt, followed by make, and then use ./rogue08 to run the code. You will see a window open like the one above, showing our main character in a dungeon environment. Use the same controls as before to move around and open the inventory. Pick up the items as you find them. Health packs can be used to restore health by opening the inventory, selecting a health pack with the mouse, and then clicking on the Use button. This button does nothing when used with a key. The inventory can be scrolled up and down by clicking the Up and Down buttons. Items can also be destroyed by clicking on the Trash button when they are selected. Note that the Remove button currently does nothing. So as to keep the focus on items, there are no monsters to be found in this part. Once you're finished, close the window to exit.
Inspecting the code
As already stated, this part will be quite long, so we'll dive straight in. Start with the update to defs.h:
enum {
	IC_UP,
	IC_USE,
	IC_REMOVE,
	IC_TRASH,
	IC_DOWN,
	IC_MAX
};
We've added a new enum for our inventory controls. The prefix IC_ stands for "inventory control", while the rest of the enum aligns with the name of the action we want to take.
Next, we've updated structs.h:
typedef struct {
	int (*use)(void);
} Item;
We've created a new struct for our Item. This struct contains a single function pointer called `use`, which will be invoked in our inventory when we click the Use button.
We've also made a small update to App:
typedef struct {
	struct {
		void (*logic)(void);
		void (*draw)(void);
	} delegate;

	double deltaTime;
	double fontScale;
	SDL_Renderer *renderer;
	SDL_Window *window;
	int keyboard[MAX_KEYBOARD_KEYS];
	int showPointer;

	struct {
		int x;
		int y;
		int buttons[MAX_MOUSE_BUTTONS];
	} mouse;

	struct {
		int fps;
	} dev;
} App;
We've added in a field called showPointer, which will be used to toggle displaying the crosshair mouse pointer. We'll see this in action later.
Turning now to items.c, we've updated addItems:
void addItems(void)
{
	int i;

	for (i = 0 ; i < 5 ; i++)
	{
		addEntityToDungeon(initEntity("Key"));
	}

	for (i = 0 ; i < 5 ; i++)
	{
		addEntityToDungeon(initEntity("Health Pack"));
	}
}
We're now creating 5 Keys and 5 Health Packs. The reason for creating so many is simply so that we can demonstrate the scrolling of our inventory. When we come to creating our dungeon properly, there might be only 1 of each to be found on a dungeon floor.
Next, we've updated createItem:
static Item *createItem(Entity *e)
{
	Item *i;

	i = malloc(sizeof(Item));
	memset(i, 0, sizeof(Item));

	e->type = ET_ITEM;
	e->data = i;

	e->touch = touch;

	return i;
}
This function now mallocs and memsets an Item, assigns it to the entity's `data` field, and then return the Item. This is much like our createMonster function, except that we're working with Items.
Of course, we've needed to create the init function for our health packs, and so we have a new function called initHealthPack:
void initHealthPack(Entity *e)
{
	Item *i;

	i = createItem(e);

	STRCPY(e->name, "Health Pack");
	STRCPY(e->description, "A health pack. Restore 10HP when used.");
	e->texture = getAtlasImage("gfx/entities/healthPack.png", 1);

	i->use = useHealthPack;
}
As you can see, this function is quite similar to other init functions. We're first calling createItem, passing over the Entity (`e`) and assigning the resulting Item to a variable called `i`. We're then setting the `name`, `description`, and `texture` of the Entity, and finally setting the Item's `use` function to useHealthPack.
useHealthPack itself is, again, an easy function to understand:
static int useHealthPack(void)
{
	Monster *m;

	m = (Monster*) dungeon.player->data;

	if (m->hp < m->maxHP)
	{
		m->hp = MIN(m->hp + 10, m->maxHP);

		return 1;
	}

	return 0;
}
The idea behind this function is to top up the player's health. We first extract the Monster data from dungeon's player object, and then test to see if `hp` is less than maxHP. If so, we'll add 10 to `hp`, limiting it to maxHP, so it doesn't exceed the maximum. We'll then return 1, to say that using the item succeeded. Otherwise, we'll return 0. We'll see how this return is used a bit later on.
Now, onto inventory.c. This is where the bulk of our changes have been made. Starting with initInventory:
void initInventory(void)
{
	game.inventoryTail = &game.inventoryHead;

	if (controlIconTextures[IC_UP] == NULL)
	{
		setupUI();
	}
}
We've wrapped our setupUI in an if statement, checking if the controlIconTextures at index IC_UP is NULL (which is defaults to); controlIconTextures is a static array within inventory.c. If so, we'll call setupUI. This is simply to not waste time calling setupUI if we've already done so.
Next, we've made some changes to initInventoryView:
void initInventoryView(void)
{
	app.delegate.logic = logic;

	app.delegate.draw = draw;

	inventorySlotStart = 0;

	selectedInventoryItem = NULL;

	app.showPointer = 1;
}
We're now initializating two new variables. inventorySlotStart is a variable used to control the position of our inventory display. When scrolling through our inventory, we want to know which item to start at for our view. We reset this to 0. selectedInventoryItem is a pointer to the Entity that we've selected when clicking on an inventory item. We set this to NULL. We're then setting app's showPointer variable to 1, to tell the system to draw our crosshair mouse pointer.
Next up is the `logic` function:
static void logic(void)
{
	doInventorySlots();

	doInventoryControls();

	if (app.keyboard[SDL_SCANCODE_TAB])
	{
		app.keyboard[SDL_SCANCODE_TAB] = 0;

		initDungeonView();
	}
}
We've added in two new calls, one to doInventorySlots and the other to doInventoryControls. We'll look first at doInventorySlots:
static void doInventorySlots(void)
{
	int i;
	SDL_Rect *r;
	Entity *e;

	for (i = 0, e = game.inventoryHead.next ; i < inventorySlotStart ; i++, e = e->next) {}

	for (i = 0 ; i < NUM_INVENTORY_BOXES ; i++)
	{
		if (e != NULL)
		{
			r = &inventoryBoxes[i];

			if (collision(r->x, r->y, r->w, r->h, app.mouse.x, app.mouse.y, 1, 1))
			{
				if (app.mouse.buttons[SDL_BUTTON_LEFT])
				{
					app.mouse.buttons[SDL_BUTTON_LEFT] = 0;

					if (e != selectedInventoryItem)
					{
						selectedInventoryItem = e;
					}
					else
					{
						selectedInventoryItem = NULL;
					}
				}
			}

			e = e->next;
		}
	}
}
This function is concerned with handling selecting our inventory boxes. The first thing we're doing, however, is locating the entity we want to use, based on the inventorySlotStart. We only display 24 inventory slots, but our inventory itself is unlimited. We therefore use a for-loop moving from 0 to inventorySlotStart. We'll also assign the entity at the head of the list to `e`, and move to its `next` as we progress our for-loop.
With our starting Entity found, we begin a for-loop to move through all our inventory boxes (0 to NUM_INVENTORY_BOXES). We test to see if `e` is not NULL and then assign the inventoryBoxes at index `i` to an SDL_Rect pointer called `r`. This is just to make things a bit more readable. We then test to see if the mouse pointer is over the inventory box by testing for a collision and feeding in the box's attributes, as well as our mouse's (with 1 for the width and height). If that passes, we check if the left mouse button has been pressed. If so, we zero the button to consume the click, and then check the state of `e`. If `e`, the entity we're processing, is not selectedInventoryItem, we'll make it so. If it is, we'll NULL it. This basically allows the user to select and deselect the entity at the inventory slot. With all that done, we assign `e` to `e`'s `next`, to move to the next inventory item.
Quite simple, really. We're just selecting an inventory item based on the slot we've clicked, as well as the offset.
Now we can look at the controls. These are handled in doInventoryControls:
static void doInventoryControls(void)
{
	int i;
	SDL_Rect *r;

	hoverControlIcon = -1;

	for (i = 0 ; i < IC_MAX ; i++)
	{
		r = &controlIcons[i];

		if (collision(r->x, r->y, r->w, r->h, app.mouse.x, app.mouse.y, 1, 1))
		{
			hoverControlIcon = i;

			if (app.mouse.buttons[SDL_BUTTON_LEFT])
			{
				app.mouse.buttons[SDL_BUTTON_LEFT] = 0;

				switch (i)
				{
					case IC_UP:
						scroll(-1);
						break;

					case IC_USE:
						use();
						break;

					case IC_REMOVE:
						removeItem();
						break;

					case IC_TRASH:
						trash();
						break;

					case IC_DOWN:
						scroll(1);
						break;

					default:
						break;
				}
			}
		}
	}
}
The goal of this function is to handle the player pressing the inventory controls. We start by setting a variable called hoverControlIcon to -1. hoverControlIcon is used to highlight which control the mouse is over, to give the player feedback on the action they are about to take. Next, we setup a for-loop, going from 0 to IC_MAX. We're grabbing a reference to the controlIcons SDL_Rect at index `i` and assigning it to a variable called `r` (once again to make things a bit more readable), and then testing for a mouse collison against this rectangle (controlIcons is a static array within inventory.c, of IC_MAX in size). If a collision is taking place, we're assigning hoverControlIcon to value of `i`.
Next, testing to see if the left mouse button has been pressed. If so, we'll clear the left mouse button and then perform a switch against `i`. Basically, we're now testing which of our controls we've clicked on and calling the appropriate function. For IC_UP, we'll call `scroll` and pass in -1; for IC_USE, we'll call `use`; for IC_REMOVE, we'll call removeItem; for IC_TRASH, we'll call `trash`; and for IC_DOWN, we'll call `scroll` and pass in 1. Several functions to cover. We'll go through them one at a time.
Starting with `scroll`:
static void scroll(int dir)
{
	int numInventoryItems;
	Entity *e;

	numInventoryItems = 0;

	for (e = game.inventoryHead.next ; e != NULL ; e = e->next)
	{
		numInventoryItems++;
	}

	if (dir > 0 && inventorySlotStart + NUM_INVENTORY_BOXES_PER_ROW < numInventoryItems)
	{
		inventorySlotStart += NUM_INVENTORY_BOXES_PER_ROW;
	}
	else if (dir < 0)
	{
		inventorySlotStart = MAX(inventorySlotStart - NUM_INVENTORY_BOXES_PER_ROW, 0);
	}
}
`scroll` takes a parameter called `dir`, which is the direction we want to scroll our inventory. The first thing we do is count the number of items currently in the inventory, by looping through our inventory linked list and incrementing a variable called numInventoryItems. The reason we're not caching the size of the inventory is to avoid micromanagement which will complicate our tutorial. With numInventoryItems known, we test `dir`. If it's greater than 1 (scrolling down), we'll test if increasing the value of inventorySlotStart by NUM_INVENTORY_BOXES_PER_ROW is less than numInventoryItems. If so, we're free to scroll the inventory, as we're not yet at the end. Going past the end could lead to a crash, due to us having fewer entities in our inventory linked list than our starting point. We don't want that to happen. If `dir` is less than 0 (scrolling up), we can simply substract NUM_INVENTORY_BOXES_PER_ROW from inventorySlotStart and limit the value to 0, since there's no chance of us going over.
The next function is `use`:
static void use(void)
{
	Item *i;

	if (selectedInventoryItem != NULL)
	{
		switch (selectedInventoryItem->type)
		{
			case ET_ITEM:
				i = (Item*) selectedInventoryItem->data;

				if (i->use != NULL && i->use())
				{
					trash();
				}
				break;

			default:
				break;
		}
	}
}
What this function does is attempt to use the currently selected item. We first test that selectedInventoryItem is not NULL, and then perform a switch against its `type`. Right now, the only thing we're testing against is ET_ITEM; we'll be expanding this in the next part, so it's good to prepare it now. If selectedInventoryItem is an ET_ITEM, we're extracting the Item from selectedInventoryItem's `data`. We're then testing if the Item has a `use` function set. If so, we'll call it, and if that call returns 1 (true), we'll call `trash` to remove the item.
A short explaination - we're testing for `use` because not all items will have one. A Key, for example, doesn't. Also, our `use` function returns 1 or 0, to say whether the item was used. If so, we'll consider that it was consumed and we'll remove it from our inventory (and the world) by calling `trash`. We'll see `trash` in action in a bit.
Notice that we're not exiting the inventory when an item is used. This means that it's quite possible that a player could use all the health packs they need, without fear of being attacked, even in the middle of combat. But that's okay, since it happens that way in some very well known, popular games ...

The next function is removeItem:
static void removeItem(void)
{

}
Right now, this is just a placeholder and literally does nothing. We'll expand upon it in the next part.
`trash` is next, and is quite simple to understand:
static void trash(void)
{
	if (selectedInventoryItem != NULL)
	{
		removeFromInventory(selectedInventoryItem);

		dungeon.deadTail->next = selectedInventoryItem;

		dungeon.deadTail = selectedInventoryItem;

		selectedInventoryItem = NULL;
	}
}
We're first testing that selectedInventoryItem isn't NULL and then calling removeFromInventory, passing selectedInventoryItem over to the call. We then add selectedInventoryItem to our dungeon's dead list (in much the same way as when entities are removed), and finally set selectedInventoryItem to NULL.
That's most of our inventory's logic handled. We can now look at the various draw calls. Starting with `draw` itself:
static void draw(void)
{
	drawMap();

	drawEntities();

	drawRect(0, 0, SCREEN_WIDTH, SCREEN_HEIGHT, 0, 0, 0, 160);

	drawInventoryBoxes();

	drawInventoryControls();

	drawStats();
}
We've added in three new function calls - drawInventoryBoxes, drawInventoryControls, and drawStats.
Starting with drawInventoryBoxes:
static void drawInventoryBoxes(void)
{
	int i;
	Entity *e;
	SDL_Rect *r;

	app.fontScale = 2;

	drawText("INVENTORY", 100, 280, 255, 255, 255, TEXT_ALIGN_LEFT, 0);

	app.fontScale = 1;

	for (i = 0, e = game.inventoryHead.next ; i < inventorySlotStart ; i++, e = e->next) {}

	for (i = 0 ; i < NUM_INVENTORY_BOXES ; i++)
	{
		r = &inventoryBoxes[i];

		drawRect(r->x, r->y, r->w, r->h, 0, 0, 0, 128);

		if (selectedInventoryItem != NULL && e == selectedInventoryItem)
		{
			drawOutlineRect(r->x, r->y, r->w, r->h, 255, 255, 0, 255);
		}
		else
		{
			drawOutlineRect(r->x, r->y, r->w, r->h, 160, 160, 160, 255);
		}

		if (e != NULL)
		{
			blitAtlasImage(e->texture, r->x + (r->w / 2), r->y + (r->h / 2), 1, SDL_FLIP_NONE);

			e = e->next;
		}
	}

	if (selectedInventoryItem != NULL)
	{
		drawText(selectedInventoryItem->name, 100, 750, 160, 192, 255, TEXT_ALIGN_LEFT, 0);

		drawText(selectedInventoryItem->description, 100, 780, 200, 200, 200, TEXT_ALIGN_LEFT, 0);
	}
}
We've made some adjustments to the existing code. Just like with doInventoryBoxes, we're stepping through out inventory linked list to find the relevant entity, according to inventorySlotStart (assigning to `e` each time). We're now also testing to see if `e` is the inventorySlotStart before drawing our boxes. If so, we're drawing the box in yellow, instead of a light grey, to highlight it. Finally, once our loop is done, we're checking if selectedInventoryItem is not NULL. If it's not, we're calling drawText twice, passing over selectedInventoryItem's `name` and `description` to show the information about what we've selected (much like how we show the detail of the entity in the dungeon view).
drawInventoryControls is next.
static void drawInventoryControls(void)
{
	int i;
	AtlasImage *t;
	SDL_Rect *r;

	for (i = 0 ; i < IC_MAX ; i++)
	{
		t = controlIconTextures[i];
		r = &controlIcons[i];

		if (i == hoverControlIcon)
		{
			SDL_SetTextureColorMod(t->texture, 64, 192, 255);
			blitAtlasImage(t, r->x, r->y, 0, SDL_FLIP_NONE);
			SDL_SetTextureColorMod(t->texture, 255, 255, 255);
		}
		else
		{
			blitAtlasImage(t, r->x, r->y, 0, SDL_FLIP_NONE);
		}
	}
}
We're drawing our inventory controls in this function, using a for-loop from 0 to IC_MAX. For each iteration of the loop, we're assigning the controlIconTextures at index `i` to an AtlasImage variable called `t` and the controlIcons at index `i` to an SDL_Rect variable called `r` (once again, for the sake of readability). We're then testing if the current value of `i` is the same as our hoverControlIcon. If so, we're using SDL_SetTextureColorMod to change the colour of our icon before rendering it (with blitAtlasImage). We're then calling SDL_SetTextureColorMod again to change the colour back to normal. Otherwise, we're calling blitAtlasImage as normal. This means that when drawing all our icons, we'll render the current icon that the mouse is hovering over with a blue tint.
The final draw function is drawStats. This one is very simple:
static void drawStats(void)
{
	Monster *m;
	char text[MAX_DESCRIPTION_LENGTH];

	m = (Monster*) dungeon.player->data;

	app.fontScale = 1.8;

	sprintf(text, "HP: %d / %d", m->hp, m->maxHP);
	drawText(text, 1100, 100, 255, 255, 255, TEXT_ALIGN_LEFT, 0);

	sprintf(text, "Min attack: %d", m->minAttack);
	drawText(text, 1100, 150, 255, 255, 255, TEXT_ALIGN_LEFT, 0);

	sprintf(text, "Max attack: %d", m->maxAttack);
	drawText(text, 1100, 200, 255, 255, 255, TEXT_ALIGN_LEFT, 0);

	sprintf(text, "Defence: %d", m->defence);
	drawText(text, 1100, 250, 255, 255, 255, TEXT_ALIGN_LEFT, 0);

	app.fontScale = 1.0;
}
This function draws the player's current `hp`, maxHP, minAttack, maxAttack, and `defence`. All we're doing is extracting the Monster data from dungeon's player pointer and using sprintf to draw the various strings. We're also scaling the font up to 1.8, to make it a little more visible.
The removeFromInventory function follows:
void removeFromInventory(Entity *e)
{
	Entity *other, *prev;

	prev = &game.inventoryHead;

	for (other = game.inventoryHead.next ; other != NULL ; other = other->next)
	{
		if (other == e)
		{
			prev->next = other->next;

			if (other == game.inventoryTail)
			{
				game.inventoryTail = prev;
			}

			other->next = NULL;

			other = prev;
		}

		prev = other;
	}
}
This function takes an entity (`e`) as a parameter and then loops through the inventory linked list, searching for it. Once found, the entity is removed from the list, and therefore the inventory. Notice that we don't free any of the entity's memory. This function is only concerned with removing the entity and not any sort of memory management.
Finally, we've made some updates to setupUI:
static void setupUI(void)
{
	int i, x, y;
	SDL_Rect *r;

	x = y = 0;

	for (i = 0 ; i < NUM_INVENTORY_BOXES ; i++)
	{
		r = &inventoryBoxes[i];

		r->x = 100 + (x * 100);
		r->y = 350 + (y * 100);
		r->w = 90;
		r->h = 90;

		x++;

		if (x >= NUM_INVENTORY_BOXES_PER_ROW)
		{
			x = 0;
			y++;
		}
	}

	controlIconTextures[IC_UP] = getAtlasImage("gfx/inventory/up.png", 1);

	controlIconTextures[IC_DOWN] = getAtlasImage("gfx/inventory/down.png", 1);

	controlIconTextures[IC_USE] = getAtlasImage("gfx/inventory/use.png", 1);

	controlIconTextures[IC_REMOVE] = getAtlasImage("gfx/inventory/remove.png", 1);

	controlIconTextures[IC_TRASH] = getAtlasImage("gfx/inventory/trash.png", 1);

	y = 350;

	for (i = 0 ; i < IC_MAX ; i++)
	{
		controlIcons[i].x = 725;
		controlIcons[i].y = y;
		controlIcons[i].w = controlIconTextures[i]->rect.w;
		controlIcons[i].h = controlIconTextures[i]->rect.h;

		y += controlIcons[i].h + 8;
	}
}
After having setup the inventory boxes, we're loading our 5 controlIconTextures. We're then setting up the controlIcons SDL_Rects, for the player to interact with. We're setting a variable called `y` to 350 to begin with, then using a for-loop to setup each controlIcon. Each is set at an `x` of 725, a `y` of the value of `y`, and their `w` and `h` the same as the controlIconTextures `w` and `h` at the same index (the textures and rects are both arrays of size IC_MAX and their indexes line up with one another). At the end of each loop, we're increasing the value of `y` by the height of the current controlIcons (at index `i`) plus 8 pixels, to appropriately space the controls apart vertically.
Wow! That was a lot to cover! And we've not even talked about equipping items yet. Thankfully, the rest of the code changes are minor.
Let's turn to dungeon.c where we've made a change to initDungeonView:
void initDungeonView(void)
{
	app.showPointer = 0;

	app.delegate.logic = logic;

	app.delegate.draw = draw;
}
We've added a line to set app's showPointer to 0. This turns off our pointer when we're back in the dungeon view.
Now, let's turn to draw.c, where we've also made some minor tweaks. Starting with initDraw:
void initDraw(void)
{
	pointerTexture = getAtlasImage("gfx/hud/pointer.png", 1);
}
This is a new function to load our crosshairs mouse image (called pointer.png). We're just calling getAtlasImage and assigning it to pointerTexture.
We've then updated presentScene, to show our pointer:
void presentScene(void)
{
	if (app.showPointer)
	{
		blitAtlasImage(pointerTexture, app.mouse.x, app.mouse.y, 1, SDL_FLIP_NONE);
	}

	SDL_RenderPresent(app.renderer);
}
We're testing to see if app's showPointer flag is set, before then calling blitAtlasImage and drawing our pointer. The reason we're doing this here is because we want the mouse pointer to be the last thing we draw before presenting our scene. It prevents other things from being rendered over the top of it.
Moving over to init.c, we've added the initDraw call to initGameSystem:
void initGameSystem(void)
{
	srand(time(NULL));

	initAtlas();

	initDraw();

	initFonts();

	initEntityFactory();

	initGame();

	initAStar();
}
This will ensure that our pointer is ready.
Finally, we want to ensure our Health Pack is available, and so we've added its init function to entityFactory.c, in initEntityFactory:
void initEntityFactory(void)
{
	memset(&head, 0, sizeof(InitFunc));
	tail = &head;

	addInitFunc("Player", initPlayer);
	addInitFunc("Micro Mouse", initMicroMouse);
	addInitFunc("Key", initKey);
	addInitFunc("Health Pack", initHealthPack);
}
Whenever we request a Health Pack, initHealthPack will be called.
And that's it for our inventory tutorial. As you can see, there's a lot that goes into managing the inventory, and really we're just scratching the surface. What's missing is the ability to equip items. You will have noticed that there is plenty of space available in our inventory view. We'll start filling that remaining space in our next part. We'll also be introducing a weapon, a piece of armour, and a microchip.
Purchase
The source code for all parts of this tutorial (including assets) is available for purchase:
From itch.io
It is also available as part of the SDL2 tutorial bundle: