
— An old-school isometric game —
Part 3: Adding entities
Note: this tutorial assumes knowledge of C, as well as prior tutorials.


Introduction
Now that we can draw tiles and select them with a mouse, it's time to add in some entities. Rendering our entities isn't too different from rendering our map tiles, however, we need to ensure that our entities are drawn on top of our map! In order to do that, we're going to introduce layers, and assign our ISOObjects a layer upon creation. Those ISOObjects at the bottom will be drawn first, with those higher up being drawn next. We'll support 10 layer levels, moving from background to foreground, to allow for space in-between.
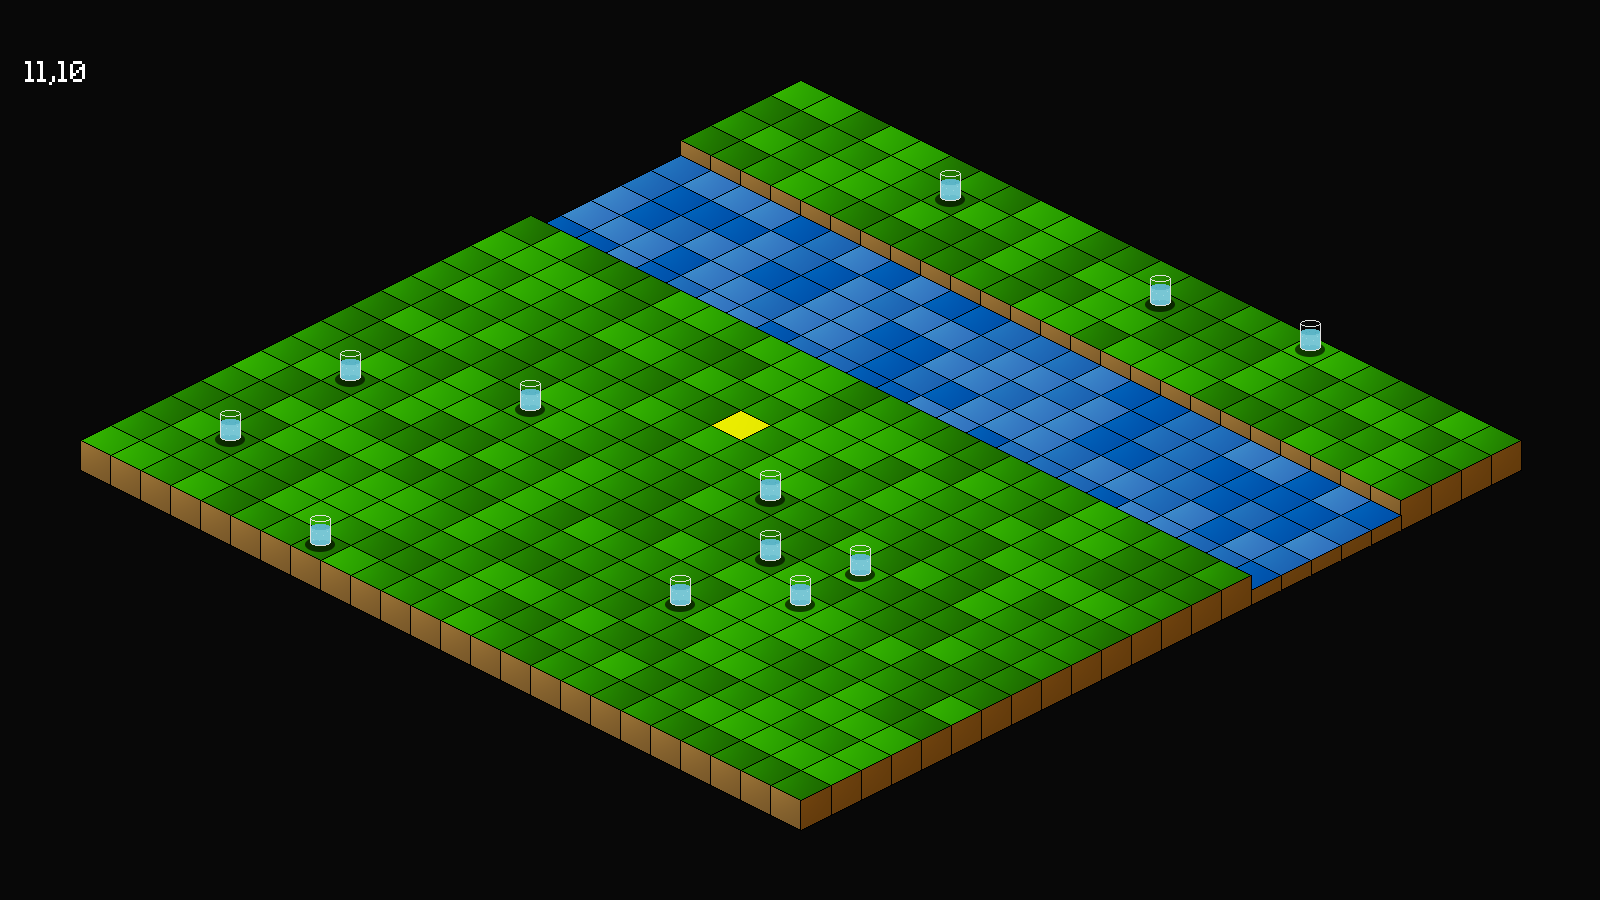
Extract the archive, run cmake CMakeLists.txt, followed by make, and then use ./isometric03 to run the code. You will see a window open like the one above. The glasses will be randomly placed with each run, but otherwise there is not much else to do. Once you're finished, close the window to exit.
Inspecting the code
Adding in our layering and entities is very easy, now that we've got the groundwork out of the way. To begin with, let's look at defs.h:
enum {
	LAYER_BACKGROUND,
	LAYER_MID = 5,
	LAYER_FOREGROUND = 10
};
We've added an enum containing LAYER data. LAYER_BACKGROUND is the map layer, LAYER_MID is essentially a middle layer, while LAYER_FOREGROUND will be where our entities live. Notice how we're spacing them at 5 value increments, to allow us to place things in between, if required. We're also not limited to these increments, and could easily have used 50 and 100.
Moving on to structs.h now, we've updated ISOObject:
typedef struct {
	int x;
	int y;
	int sx;
	int sy;
	int layer;
	AtlasImage *texture;
} ISOObject;
We've added in a new field here called `layer`. This will be the layer to which the ISOObject belongs, and will affect its rendering order.
Next, we've added in the Entity struct:
struct Entity {
	char name[MAX_NAME_LENGTH];
	int x;
	int z;
	int base;
	AtlasImage *texture;
	Entity *next;
};
This struct will be used to represent an entity in our game, for example, the water glasses. `name` is the entity's name, `x` and `z` are its map coordiates (tile indexes), `texture` is its texture. `base` is a special field that will be used to align the entity when we render it. We want to vertically align our object where it stands. Since we're working with isometric objects here, we need to manually specify this value, as attempting to calculate this value will only take us so far, and will always appear a little off.
We've also updated World:
typedef struct {
	MapTile map[MAP_SIZE][MAP_SIZE];
	Entity entityHead, *entityTail;
	struct {
		int x;
		int z;
	} cursor;
} World;
We've added in entityHead and entityTail, to act as a linked list for our entities.
Now, let's move onto glass.c, where we're defining our water glass. This file only has one function, initGlass:
void initGlass(Entity *e)
{
	e->texture = getAtlasImage("gfx/entities/glass.png", 1);
	e->base = -1;
}
A very basic function, it takes an Entity (`e`) as an argument. We're then setting the entity's `texture`, and setting its `base` to -1. This will be our vertical alignment adjustment. Note that we're using the EntityFactory pattern in this tutorial, as with our tutorials, so we won't touch on how that works.
Onward to entities.c, where we're handling our entities. Quite a few functions here, though none of them are very taxing. Starting with initEntities:
void initEntities(void)
{
	memset(&world.entityHead, 0, sizeof(Entity));
	world.entityTail = &world.entityHead;

	addEntities();

	shadowTexture = getAtlasImage("gfx/misc/shadow.png", 1);
}
We start by setting up our linked list, with a memset and an assignment of the tail to the head. Next, we're calling addEntities, to randomly add some entities to the map (in this case, just some water glasses), and finally loading a texture to use as a shadow, and assigning it to a variable called shadowTexture.
Next up, we have drawEntities. This is the interesting function, where we're actually drawing our entities as isometric objects:
void drawEntities(void)
{
	Entity *e;
	int sx, sy;

	for (e = world.entityHead.next ; e != NULL ; e = e->next)
	{
		sx = TILE_WIDTH / 2;
		sx -= e->texture->rect.w / 2;

		sy = TILE_HEIGHT / 2;
		sy -= e->texture->rect.h;
		sy -= e->base;

		addISOObject(e->x, e->z, sx, sy, e->texture, LAYER_FOREGROUND);

		// add the shadow

		sx = TILE_WIDTH / 2;
		sx -= shadowTexture->rect.w / 2;

		sy = -shadowTexture->rect.h;
		sy += TILE_HEIGHT;

		addISOObject(e->x, e->z, sx, sy, shadowTexture, LAYER_MID);
	}
}
For each entity in the world, we're going to be creating an ISOObject. To begin with, we're assigning a variable called `sx` the value of half our TILE_WIDTH, minus half the entity's texture's width. This will essentially align the entity in the horizontal middle of the tile. Next, we're assigning `sy` the value of half TILE_HEIGHT, subtracting the entity's texture's height, and then further subtracting the value of the entity's `base`. What this does is align the bottom of the entity's base to the middle of the tile, and then make a manual adjustment via the `base` value. In the case of our glass, this adjustment is minor, but for larger objects, it will be a lot more. Note that the only reason we have this `base` value is because we're aligning our entities to the middle of their tiles. If we didn't want to do this, the `base` variable wouldn't be needed. In other words, it's simply meta data (another approach that could've been used would be to make all our entity textures the same size, and centering the images within those bounds).
Now that we have our `sx` and `sy` values, we call addISOObject. As with our map tiles, we're passing over the entity's `x` and `z` values, but are also now passing over the `sx` and `sy` values, to perform the position adjustments. The texture is passed over, as expected, but we're now also sending over a new value: LAYER_FOREGROUND. This is used to tell our ISOObject that is it in the foreground layer. We'll see how this is used a bit later on.
With our entity added, we then add in the shadow. We're calculating the `sx` and `sy` adjustment values as needed (using the shadowTexture's width and height), but passing over LAYER_MID when calling addISOObject. We want the shadow to appear under the glass, but also above the map. LAYER_MID has a value halfway between LAYER_BACKGROUND and LAYER_FOREGROUND, which is just what we want.
That's our entity drawing handled. We'll be expanding this a lot in future. For now, let's move onto the rest of entities.c. Next up is getEntityAt:
Entity *getEntityAt(int x, int z)
{
	Entity *e;

	for (e = world.entityHead.next ; e != NULL ; e = e->next)
	{
		if (e->x == x && e->z == z)
		{
			return e;
		}
	}

	return NULL;
}
No real surprises here. The function takes to variables: `x` and `z`, and looks for an entity with `x` and `z` values that match those, and returns it.
Next up is addEntities:
static void addEntities(void)
{
	Entity *e;
	int i, x, z;

	for (i = 0 ; i < 12 ; i++)
	{
		placeRandom(&x, &z);

		e = initEntity("glass");
		e->x = x;
		e->z = z;
	}
}
This function merely randomly adds 12 glasses to random locations around the map.
The placeRandom function follows:
static void placeRandom(int *x, int *z)
{
	int ok;

	do
	{
		*x = rand() % MAP_RENDER_SIZE;
		*z = rand() % MAP_RENDER_SIZE;

		ok = world.map[*x][*z].tile >= 10 && world.map[*x][*z].tile < 20 && getEntityAt(*x, *z) == NULL;
	}
	while (!ok);
}
All this function does is pick a random spot in the current map view (we're not using the whole map right now, just a portion, as denoted by MAP_RENDER_SIZE), and assign the values to `x` and `z`. Note that `x` and `z` are pointers to variables. We do this by setting up a while-loop that repeats until we find a location on the map that is a ground tile, and also isn't already occupied by another entity.
That's entities.c finished with, so we can move onto iso.c, where we've made a few tweaks.
Starting with addISOObject:
void addISOObject(int x, int z, int sx, int sy, AtlasImage *texture, int layer)
{
	ISOObject *o;

	if (numISOObjects < MAX_ISO_OBJECTS)
	{
		o = &isoObjects[numISOObjects++];

		toISO(x, z, &o->x, &o->y);

		o->sx = o->x + sx;
		o->sy = o->y + sy;
		o->layer = layer;
		o->texture = texture;
	}
}
We've already seen that we're passing over the layer to this function; we've added it in as the last parameter. We're then setting the ISOObject's `layer`'s value to that which we passed in.
The drawComparator function has seen a bit of a larger update:
static int drawComparator(const void *a, const void *b)
{
	int result;
	ISOObject *o1, *o2;

	o1 = (ISOObject*) a;
	o2 = (ISOObject*) b;

	result = o1->layer - o2->layer;

	if (result == 0)
	{
		result = o1->y - o2->y;

		if (result == 0)
		{
			result = (o1->sx + o1->texture->rect.w) - (o2->sx + o2->texture->rect.w);
		}
	}

	return result;
}
We're now comparing the ISOObject's `layer`s in the very first instance. Those with a lower layer value will be moved towards the top of the list, so we draw from "bottom to top". If the result of this calculation is 0, meaning they both occupy the same layer, we then test the `y` values as before. However, now, if the result of that calculation is 0, we then compare the `sx` values of each (the actual screen coordinates), taking into account the texture widths. This test ensures that the wider of the two entities is drawn first. This helps clear up a situation where a large entity behind another ends up drawing over the top of one closer to the front (this is an example of where isometric sorting can become complicated, due to using sprites).
That's iso.c updated. We just need a few little tweaks to world.c, and this part is done.
Frist, to initWorld:
void initWorld(void)
{
	initMap();

	initEntities();

	initISORender();

	app.delegate.logic = logic;
	app.delegate.draw = draw;
}
We're simply calling initEntities.
Next, we've updated `draw`:
static void draw(void)
{
	clearISOObjects();

	drawMap();

	drawEntities();

	drawISOObjects();

	drawHud();
}
Rather predictability, we're now calling drawEntities.
And that's it, we have entities rendering. We'll now be able to add in lots of other entities, and have them render on the map, just as we expect (more or less!). What we should do next is introduce Purple Guy, the main character, for the player to control.
So, in the next part, we'll be adding in an entity for the player to move around the map, by clicking on tiles of the target destination.
Purchase
The source code for all parts of this tutorial (including assets) is available for purchase:
From itch.io
It is also available as part of the SDL2 tutorial bundle: