
— An old-school isometric game —
Part 10: Basic lighting
Note: this tutorial assumes knowledge of C, as well as prior tutorials.


Introduction
We've got a lot happening in our game now, so we're going to add in a couple of nice to have features. This first one will involve adding in some basic lighting. It's not quite as difficult as one might at first imagine. However, it does come with limitations. And, again, for more realistic lighting, one would need to switch to a full OpenGL solution, to allow for fragment shaders to be used.
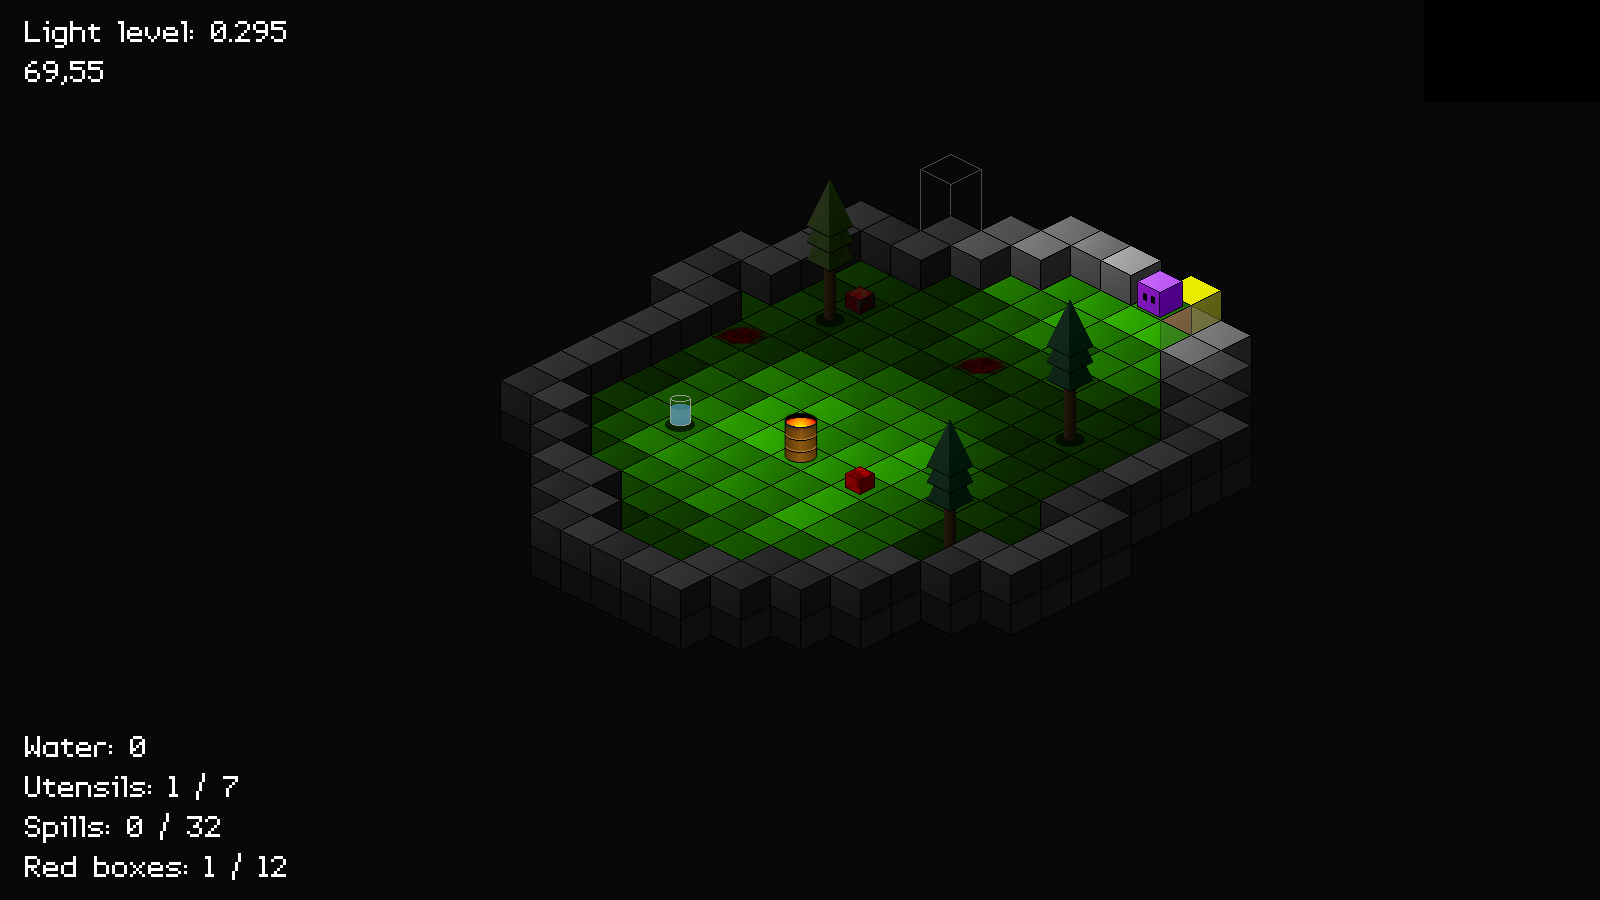
Extract the archive, run cmake CMakeLists.txt, followed by make, and then use ./isometric10 to run the code. You will see a window open like the one above. Play the game as normal. Notice how Purple Guy's light source follows him around as he moves, illuminating his surroundings. There are two extra keys that can be pressed to change the light level: - (minus) will reduce the light level, while = (equals) will increase it. The light level is limited to 0 and 1.0, and is displayed in the top-left of the screen. Once you're finished, close the window to exit.
Inspecting the code
Again, adding in our lighting is fairly straightforward. If you remember, we added in colour support to our isometric object back when we added occlusion testing. We're going to leverage this now.
Starting with defs.h:
#define IF_BRIGHT (2 << 1)
We've added in a new isometric flag - IF_BRIGHT. This flag will be used to declare that an isometric object is not affected by our lighting system. We'll be applying it to things such as Purple Guy, the barrel, and buttons, so that they are easier to see.
Now over to structs.h:
struct Light {
	int x;
	int z;
	double level;
	int radius;
	Light *next;
};
We've added in the Light struct, which will be used to represent a light source in our game. `x` and `z` are the map coordinates of the light. `level` is the brightness level, a value between 0 and 1. `radius` is the size of the light, in tiles. `next` is the next Light in our linked list.
We've also updated World:
typedef struct {
	MapTile map[MAP_SIZE][MAP_SIZE];
	Entity entityHead, *entityTail;
	Node routeHead;
	Entity *player;
	Light lightHead, *lightTail;
	SDL_Rect playerISORect;
	int utensils, totalUtensils;
	int redBoxes, totalRedBoxes;
	int spills, totalSpills;
	int water;
	double lightLevel;
	struct {
		int x;
		int z;
	} cursor;
	struct {
		int x;
		int z;
	} camera;
} World;
We've added in lightHead and lightTail, to act as our Light linked list. We've also added in lightLevel. This is the default light level of the world, and can be controlled by the minus and equals keys to darken or brighten the world as we see fit.
Finally, we've updated ISOObject:
typedef struct {
	int x;
	int y;
	int sx;
	int sy;
	int mx;
	int mz;
	int layer;
	AtlasImage *texture;
	struct {
		int r;
		int g;
		int b;
		int a;
	} color;
} ISOObject;
We've added in two new fields: `mx` and `mz`. These will hold the map position of the ISOObject (m being short for "map"). We will need these when it comes to applying our lighting model.
Now let's head over to lights.c, where we're doing the main light source work. First up is initLights:
void initLights(void)
{
	memset(&world.lightHead, 0, sizeof(Light));
	world.lightTail = &world.lightHead;

	world.lightLevel = 0.3;
}
A simple function. We're setting up our lights linked list, and then setting World's lightLevel to 0.3. Again, this is the default light level for a tile, when it isn't lit by a light source.
Now onto addLight:
Light *addLight(int x, int z, int radius)
{
	Light *l;

	l = malloc(sizeof(Light));
	memset(l, 0, sizeof(Light));
	world.lightTail->next = l;
	world.lightTail = l;

	l->x = x;
	l->z = z;
	l->radius = radius;

	return l;
}
Quite a simple function. It's responsible for adding a light to our linked list. It takes three parameters - the `x` and `z` map position, and the `radius`. We malloc and memset a Light (`l`), and add it to our World's light linked list. Next, we set the light's `x`, `z`, and `radius` values, using those passed into the function, and then finally return the Light itself, in case we wish to do anything else with it. All good.
Now onto the first of three important functions when it comes to actually working with our light model. Starting with applyLighting:
void applyLighting(void)
{
	int x, z;

	for (x = 0 ; x < MAP_RENDER_SIZE ; x++)
	{
		for (z = 0 ; z < MAP_RENDER_SIZE ; z++)
		{
			tileLightLevel[x][z] = world.lightLevel;

			applyLights(x, z);
		}
	}
}
This function sets up two for-loops, to handle the light in our current zone. It works with a multidimensional array called tileLightLevel (static in lights.c, of MAP_RENDER_SIZE x MAP_RENDER_SIZE in size). For each entry, we set the value to World's lightLevel, to act as the default value. Next, we call applyLights, passing over the `x` and `z` position we're working with.
applyLights is where we add in all the lights that have been defined in the world:
static void applyLights(int x, int z)
{
	Light *l;
	double level, distance;

	for (l = world.lightHead.next ; l != NULL ; l = l->next)
	{
		if (isWithinISOScreen(l->x, l->z))
		{
			distance = getDistance(l->x - world.camera.x, l->z - world.camera.z, x, z);

			if (distance <= l->radius)
			{
				level = 1.0 - (distance / l->radius);

				tileLightLevel[x][z] += level;

				tileLightLevel[x][z] = MAX(MIN(tileLightLevel[x][z], 1), 0);
			}
		}
	}
}
We loop through all the lights in the world, looking for any that are within our current zone, via a call to isWithinISOScreen, passing over the light's `x` and `z` coordinates. If it is, we calculate the distance of the current tile (`x` and `z`) from the light source's position, remembering to take the camera position into account. We assign the result of getDistance to a variable called `distance`, and then check if the distance falls within the light's `radius`.
If so, we're going to increase the value of the current tile's light level (tileLightLevel). We do this by dividing `distance` by the light's `radius`, and then subtracting the result from 1.0, assigning the overall result to a variable called `level`. What this means is that the value of `level` will increase the closer the current tile is to the light source. As we get further away, the value will decrease. `level` will hold a value between 0.0 and 1.0, basically a percentage based on our range.
With `level` known, we add the value to the tileLightLevel at `x` and `z`. Finally, we limit that value to between 0.0 and 1.0, so that we don't get too light or too dark. What this all means is that multiple light sources can combine together to fully illuminate a tile. One can see this in action in the zone containing the barrel. Notice how as Purple Guy approaches the barrel, the two light values at the fall off from the lights adds together to increase the brightness.
Finally, we come to applyObjectLight:
void applyObjectLight(ISOObject *o)
{
	o->color.r *= tileLightLevel[o->mx][o->mz];
	o->color.g *= tileLightLevel[o->mx][o->mz];
	o->color.b *= tileLightLevel[o->mx][o->mz];
}
A simple function, but one that is very important, as it is here that we're applying the light level to our ISOObject. We pass the ISOObject (`o`) we want to affect into the function, and then multiply its `color`'s rgb values by the value of the light level at its tile (`mx` and `mz`). Since our light levels at these tile indexes are between 0.0 and 1.0, the ISOObject's overall colour will lighten or darken, based on the tile they are currently occupying.
It is actually possible here to apply some coloured lighting. Consider the two following scenes, created by tweaking the levels:
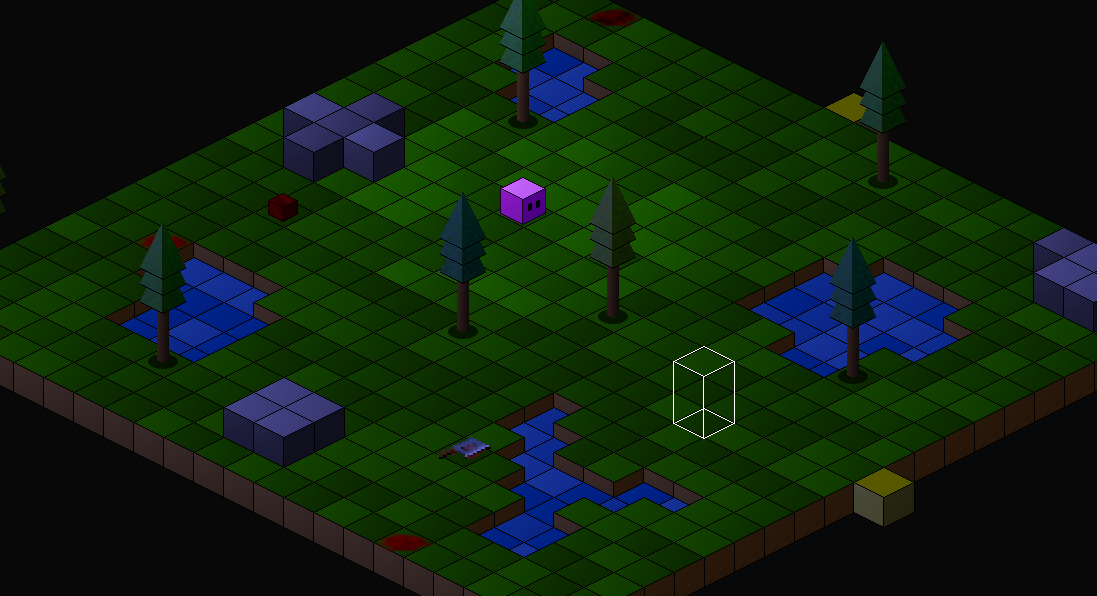
The above was created by setting:
o->color.r *= tileLightLevel[o->mx][o->mz] * 0.5;
o->color.g *= tileLightLevel[o->mx][o->mz] * 0.5;
o->color.b *= tileLightLevel[o->mx][o->mz];
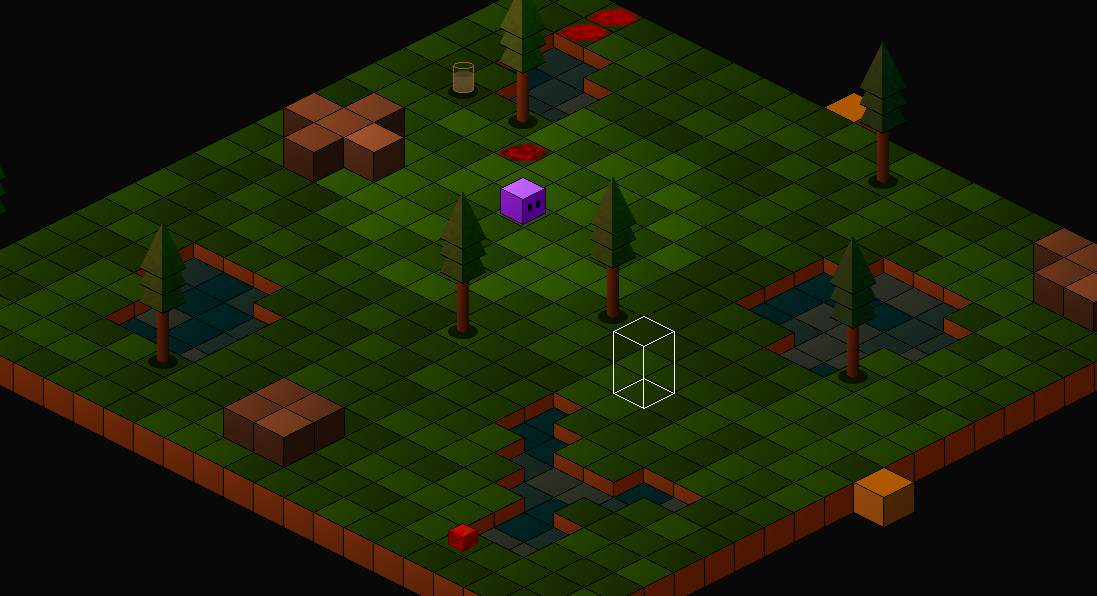
The same scene (with random object placement), but with the following set:
o->color.r *= tileLightLevel[o->mx][o->mz];
o->color.g *= tileLightLevel[o->mx][o->mz] * 0.5;
o->color.b *= tileLightLevel[o->mx][o->mz] * 0.25;
With some planning, it would actually be possible to set the colours of individual zones, so one could change the light levels and colours as Purple Guy moves indoors or outside, for example. Outside could be night time, while inside could be brightly lit.
That's our major lighting coding done. We can now look at how we're adding lights to the world, and what other tweaks have been made.
Starting with barrel.c, we've updated initBarrel:
void initBarrel(Entity *e)
{
	e->layer = LAYER_FOREGROUND;
	e->base = -8;
	e->texture = getAtlasImage("gfx/entities/barrel.png", 1);
	e->flags = EF_SOLID;
	e->isoFlags = IF_BRIGHT;

	addLight(59, 60, 5);
}
We're setting the barrel's isoFlags to IF_BRIGHT, so that it is unaffected by our lighting model. Next, we're adding in a light, via addLight. Notice that we're cheating here, as we're hardcoding the positon. We're assuming that our barrel will live at 59 x 60, which it does in entities.json. We'll get away with it in this instance, since this is just a demonstration. However, if we move the barrel, our light will remain at this positon. If we were to build a full adventure game, we'd want to add the light in after we've loaded in the barrel and set its attributes.
Now onto button.c, where we've updated initButton:
void initButton(Entity *e)
{
	e->layer = LAYER_MID;
	e->texture = getAtlasImage("gfx/entities/buttonOff.png", 1);
	e->isoFlags = IF_BRIGHT;

	e->touch = touch;
}
Again, we're setting the button's isoFlags to IF_BRIGHT. We don't want to lose track of the button if it's too dark to see, as this would be annoying!
Lastly, we've updated purpleGuy.c and the initPurpleGuy function:
void initPurpleGuy(Entity *e)
{
	e->layer = LAYER_FOREGROUND;
	e->base = -13;
	e->isoFlags = IF_BRIGHT;

	world.player = e;
}
Again, we're setting Purple Guy's isoFlags to IF_BRIGHT.
Now over to iso.c, where we've made a couple of tweaks to addISOObject:
void addISOObject(int x, int z, int sx, int sy, AtlasImage *texture, int layer, unsigned long flags)
{
	ISOObject *o;

	if (numISOObjects < MAX_ISO_OBJECTS)
	{
		o = &isoObjects[numISOObjects++];

		toISO(x, z, &o->x, &o->y);

		o->mx = x;
		o->mz = z;
		o->sx = o->x + sx;
		o->sy = o->y + sy;
		o->layer = layer;
		o->texture = texture;
		o->color.r = o->color.g = o->color.b = o->color.a = 255;

		if (flags & IF_TEST_OCCLUSION &&
			(world.player->x - world.camera.x) >= x && (world.player->z - world.camera.z) <= z &&
			collision(world.playerISORect.x, world.playerISORect.y, world.playerISORect.w, world.playerISORect.h, o->sx, o->sy, texture->rect.w, texture->rect.h))
		{
			o->color.a *= 0.35;
		}

		if (!(flags & IF_BRIGHT))
		{
			applyObjectLight(o);
		}
	}
}
First, we're setting the ISOObject's (`o`) `mx` and `mz` fields to the `x` and `z` map coordinates that were passed into the function, as we'll need these for when we come to apply our lighting. We're also calling applyObjectLight at the end of the function, passing over the ISOObject to update. Notice, however, that we're first testing that `flags` does not contain IF_BRIGHT. If it does, we'll want to skip the lighting operation. This is how we keep objects such as the buttons to always be visible, no matter how dark it is.
Now for player.c. You will of course have noticed that when Purple Guy moves around, his light sources comes with him. We'll see how this is done now, starting with initPlayer:
void initPlayer(void)
{
	textures[FACING_NORTH] = textures[FACING_EAST] = getAtlasImage("gfx/entities/purpleGuyNorthEast.png", 1);
	textures[FACING_SOUTH] = getAtlasImage("gfx/entities/purpleGuySouth.png", 1);
	textures[FACING_WEST] = getAtlasImage("gfx/entities/purpleGuyWest.png", 1);

	world.player->texture = textures[FACING_SOUTH];

	walkTimer = 0;

	world.camera.x = (world.player->x / MAP_RENDER_SIZE) * MAP_RENDER_SIZE;
	world.camera.z = (world.player->z / MAP_RENDER_SIZE) * MAP_RENDER_SIZE;

	light = addLight(0, 0, 5);
}
We're calling addLight on the final line, and assigning it to a variable called `light` (static in player.c). Notice that we're passing over 0,0 as the map coordinates. This is because we don't care about the location, as we'll be updating it ourselves.
If we now head to doPlayer, we can see how this is happening:
void doPlayer(void)
{
	Node *n;
	Entity *other;
	int x, z, dx, dz, facing;

	// snipped

	light->x = world.player->x;
	light->z = world.player->z;

	if (app.keyboard[SDL_SCANCODE_MINUS])
	{
		world.lightLevel = MAX(world.lightLevel - 0.005 * app.deltaTime, 0.0);
	}

	if (app.keyboard[SDL_SCANCODE_EQUALS])
	{
		world.lightLevel = MIN(world.lightLevel + 0.005 * app.deltaTime, 1.0);
	}
}
Here, we're updating `light`'s `x` and `z` values, using `player`'s `x` and `z` value. This is happening at the end of the function, so the light will be updated with the player's present location. So, whenever Purple Guy moves about, the light that we assigned earlier will be updated to follow him.
Also note that we're testing whether the minus or equals keys are being held down, and adjusting World's lightLevel accordingly. We're capping the value between 0.0 and 1.0.
We're almost done! We just need to head over to world.c and make sure we're calling our new functions. Starting with initWorld:
void initWorld(void)
{
	initLights();

	initMap();

	initEntities();

	initISORender();

	initPlayer();

	tileSelect[0] = getAtlasImage("gfx/misc/tileSelectBack.png", 1);
	tileSelect[1] = getAtlasImage("gfx/misc/tileSelectFront.png", 1);

	app.delegate.logic = logic;
	app.delegate.draw = draw;
}
We're calling initLights, to get things going. Next, we've updated `draw`:
static void draw(void)
{
	clearISOObjects();

	applyLighting();

	drawMap();

	drawEntities();

	drawCursor();

	drawISOObjects();

	drawHud();
}
After clearing our ISOObjects, we're next calling applyLighting. We need to do this first, so that every ISOObject added can benefit from it.
Finally, we've made a tweak to hud.c, to present our light level info. Two lines in drawInfo is all that's needed:
static void drawInfo(void)
{
	char text[64];
	int y;

	sprintf(text, "Light level: %.3f", world.lightLevel);
	drawText(text, 25, 10, 255, 255, 255, TEXT_ALIGN_LEFT, 0);

	sprintf(text, "%d,%d", world.cursor.x + world.camera.x, world.cursor.z + world.camera.z);
	drawText(text, 25, 50, 255, 255, 255, TEXT_ALIGN_LEFT, 0);

	// snipped
}
We're rendering the "Light level" text, making use of World's lightLevel.
There we go! We've got some basic lighting working in our game, that helps to create some atmosphere. We can now say that Purple Guy's "cleaning job" is taking place late at night, hence the need for a light source to guide his way.
There's one more little feature we should add to our game before we finish up, and that's a mini map. It can remain difficult to see the objects that we want to collect on the map, due to the perspective, and so adding in a mini map will go some way to helping to overcome this. So, in the penultimate part, we'll be looking into adding one to the bottom right of the screen.
Purchase
The source code for all parts of this tutorial (including assets) is available for purchase:
From itch.io
It is also available as part of the SDL2 tutorial bundle: